Follow the steps in order, from opening your invitation link on day one until your shop is ready to sell. Every step has a real screenshot, and the numbered circles match the steps to follow.
You can't sign up on the website yet. Our team opens a shop for you and emails you a link.
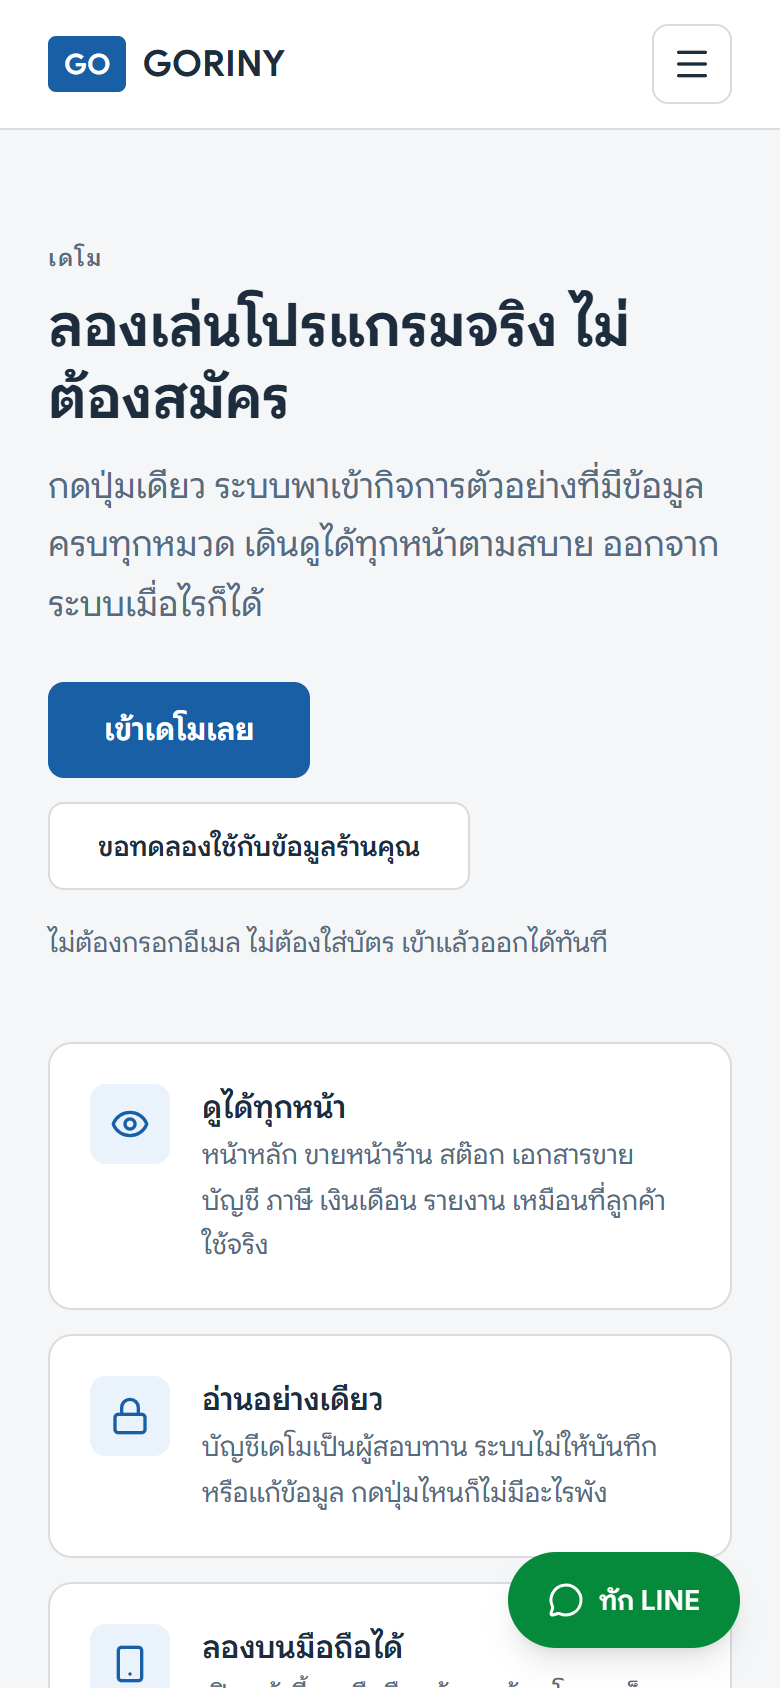
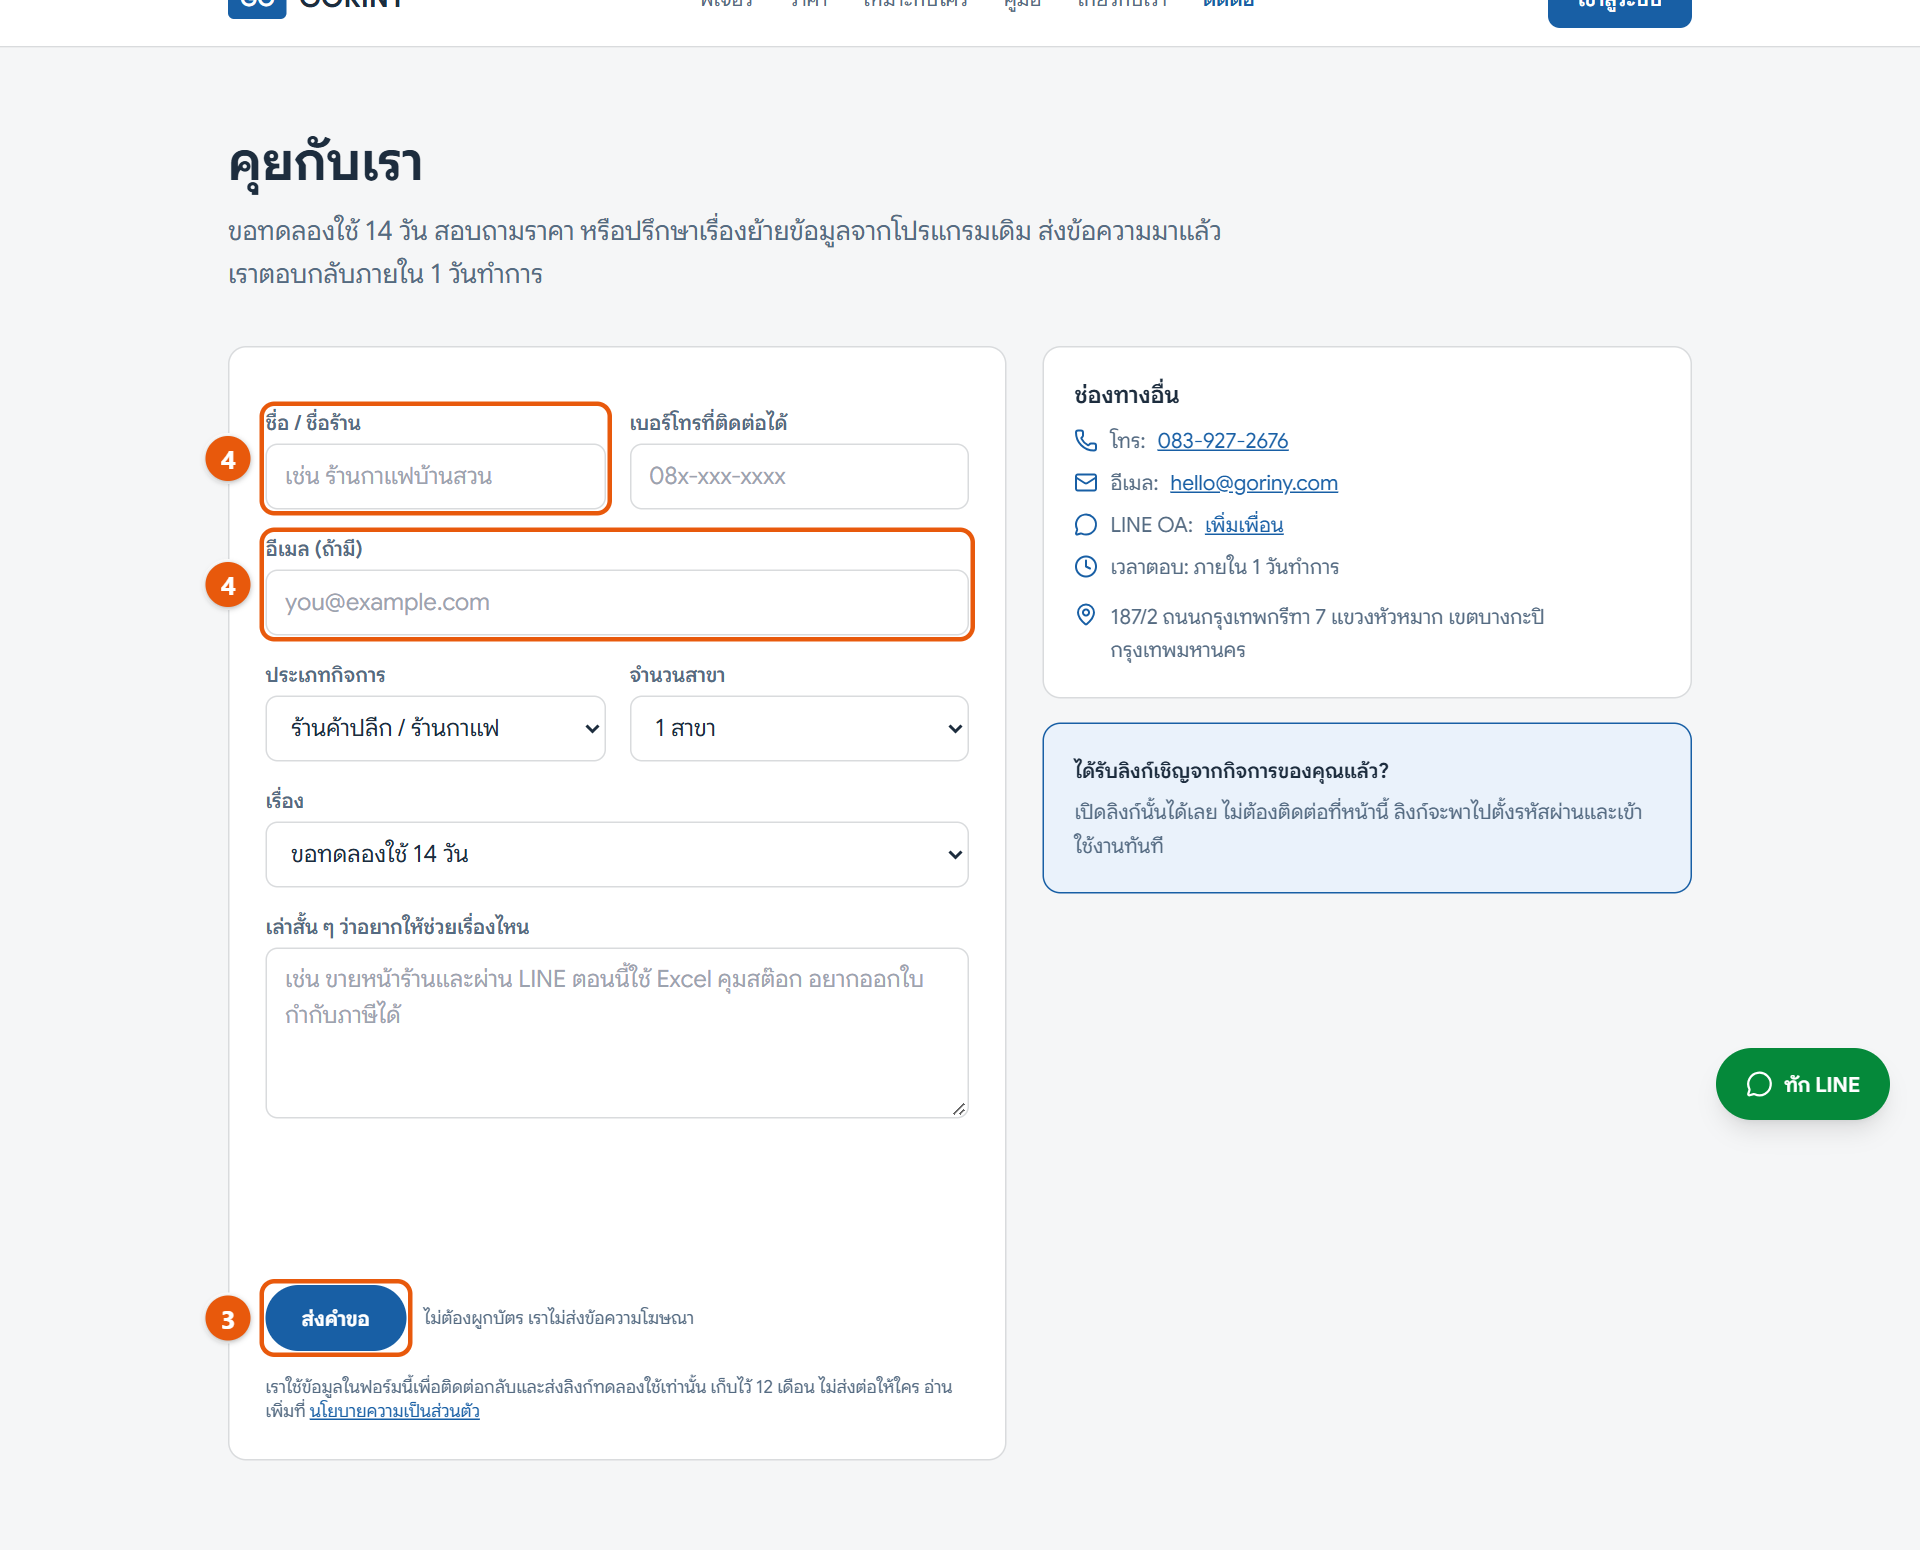
The demo page. One press takes you into the sample shop.The contact page with the trial request form
Do this
1Want a look first? Open goriny.com/demo and press the button on that page to enter the sample shop. No email needed.
2Look around every menu as much as you like. The sample shop can't save anything, so nothing you press can break it.
3Ready to use it for your own shop? Open goriny.com/contact and fill in the trial request form (the page is in Thai), or email hello@goriny.com.
4Give your shop name and the email you will sign in with. Make sure the email is right, because your access link goes there.
5Wait for an email from our team about your GORINY Business Suite trial link. The email is written in Thai.
When it worked: You get an email from our team with a button to set your password. Your 14-day trial shop is ready and waiting.
If you get stuck
I can't find a sign-up form
That's expected. Self sign-up isn't open yet. Ask through the contact page or email hello@goriny.com and our team will open a shop for you.
The demo didn't open
Try again. If it still fails, message LINE @791ibitd or call 083-927-2676.
I've waited and no email has arrived
Check your junk (Spam) folder first. If it is not there, message LINE @791ibitd.
2
Open your invite link and set a password
The link in the email is your first way into your shop. Set your password here once; after that you sign in with your email and this password.
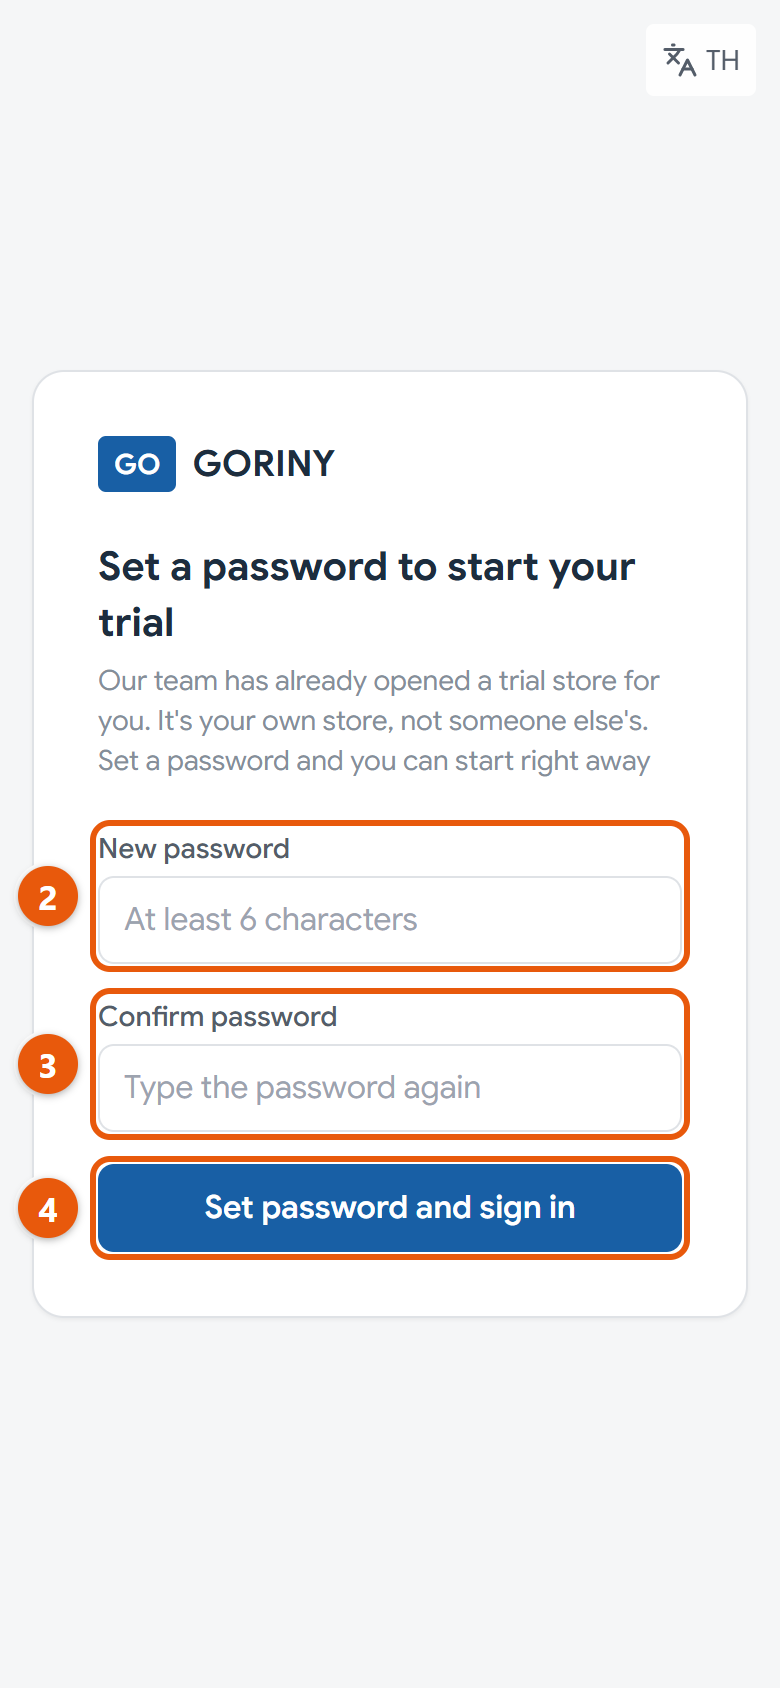
Setting your first password from the email link
Do this
1Open the email from our team and press the button in it. If the button doesn't work, copy the whole link and paste it into your browser.
2Type at least 6 characters in New password.
3Type the same password again in Confirm password.
4Press Set password and sign in.
5Keep this email and password somewhere safe. You'll need them to sign in next time.
When it worked: You land on your shop’s Home page straight away, with no need to sign in again.
If you get stuck
It says the link is no longer valid or has expired
The link works once and for a limited time. If you already set a password, go to goriny.com/login and press Sign in. If you haven't, reply to that email or message LINE @791ibitd and our team will send a new link.
It says the two passwords don't match
Type exactly the same thing in both boxes, and check that Caps Lock is off.
It says the invite link is incomplete
The link got cut off. Open it straight from the email or chat instead of typing it in.
3
Sign in, and what to do if you forget your password
Each time you come back, sign in with your email and password. If you forget the password, you can reset it yourself without waiting for our team.
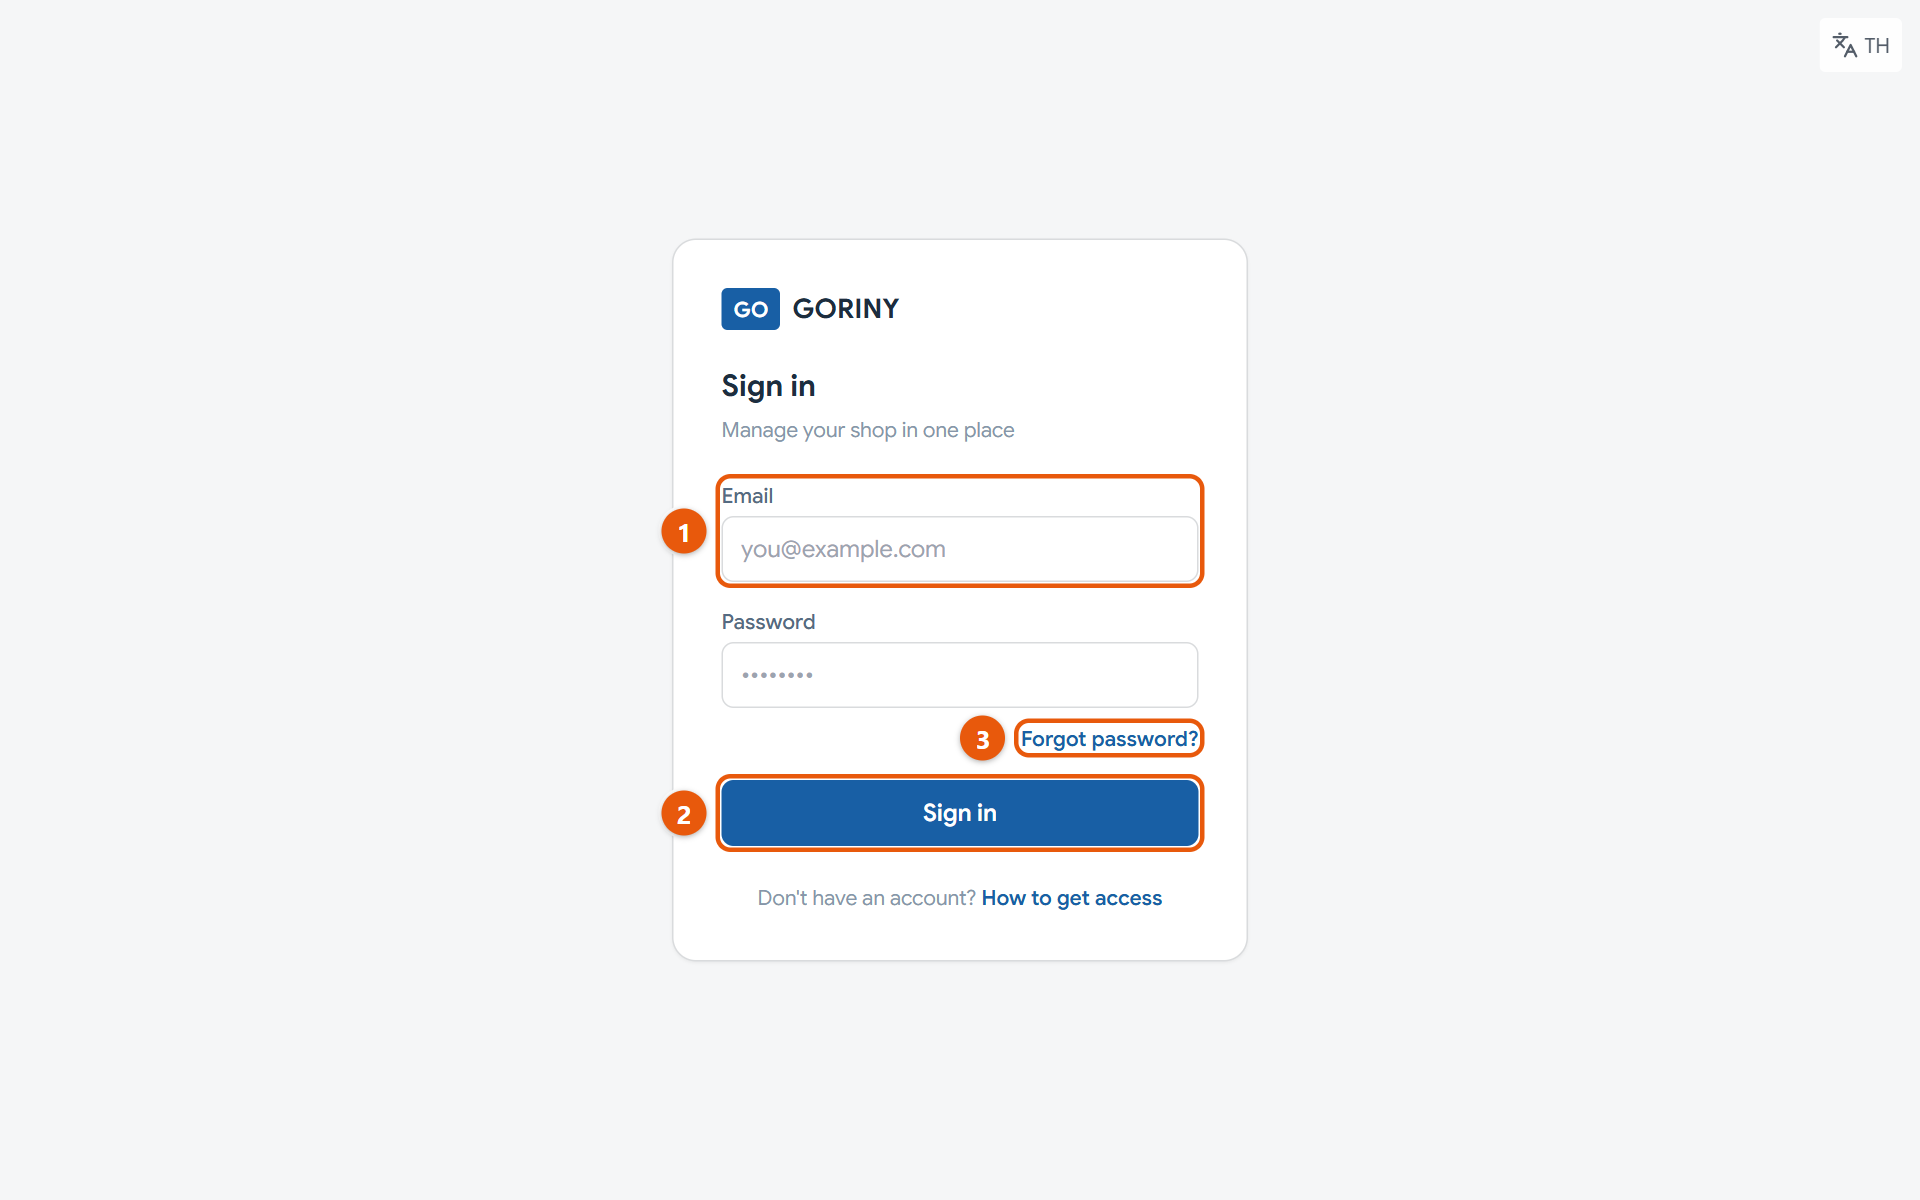
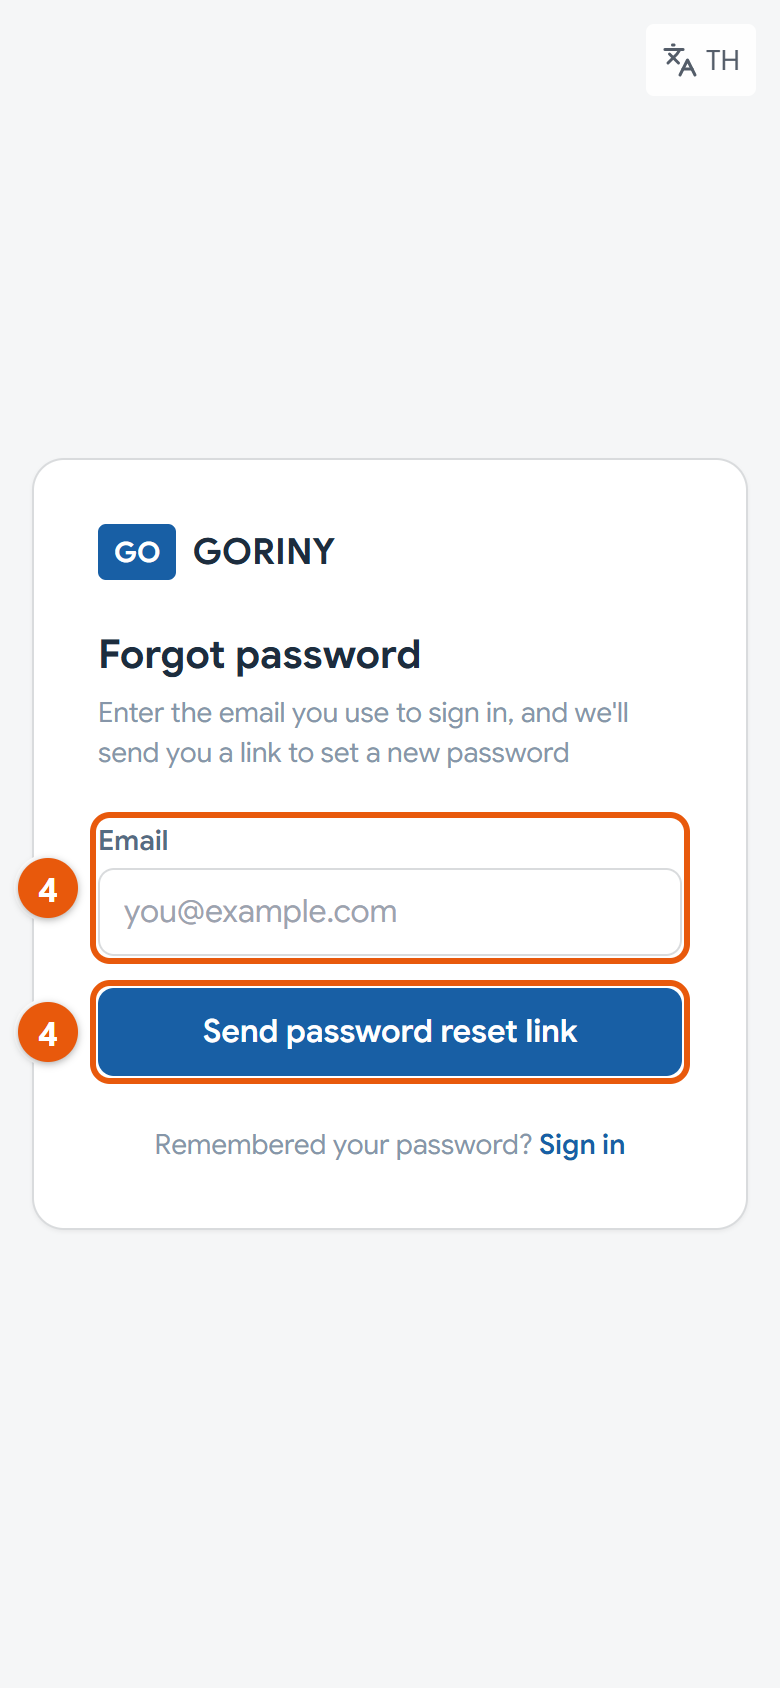
The sign-in pageAsking for a password reset link by email
Do this
1Open goriny.com/login and fill in Email and Password.
2Press Sign in.
3Forgot your password? Press Forgot password? under the password box.
4Enter the email you sign in with, then press Send password reset link.
5Open the password reset email from GORINY (written in Thai) and press the link in it. If you see Confirm and set new password, press it first.
6Choose a new password of at least 8 characters, then press Save new password and sign in.
When it worked: You see your shop's Home page, with your shop name at the top left.
If you get stuck
It says the email or password is incorrect
Check the email is spelled right, has no extra spaces, and that Caps Lock is off. If it still fails, press Forgot password? and set a new one.
The password reset email hasn't arrived
It can take several minutes. Check your junk (Spam) folder too. If you asked more than once, use the link in the newest email.
After my password it asks for a 6-digit code
This account has the phone code turned on (step 13). Open the app on your phone, type the latest code you see, and press Verify code.
4
Get to know the screen
Knowing where things are helps you find menus quickly and avoid working in the wrong branch.
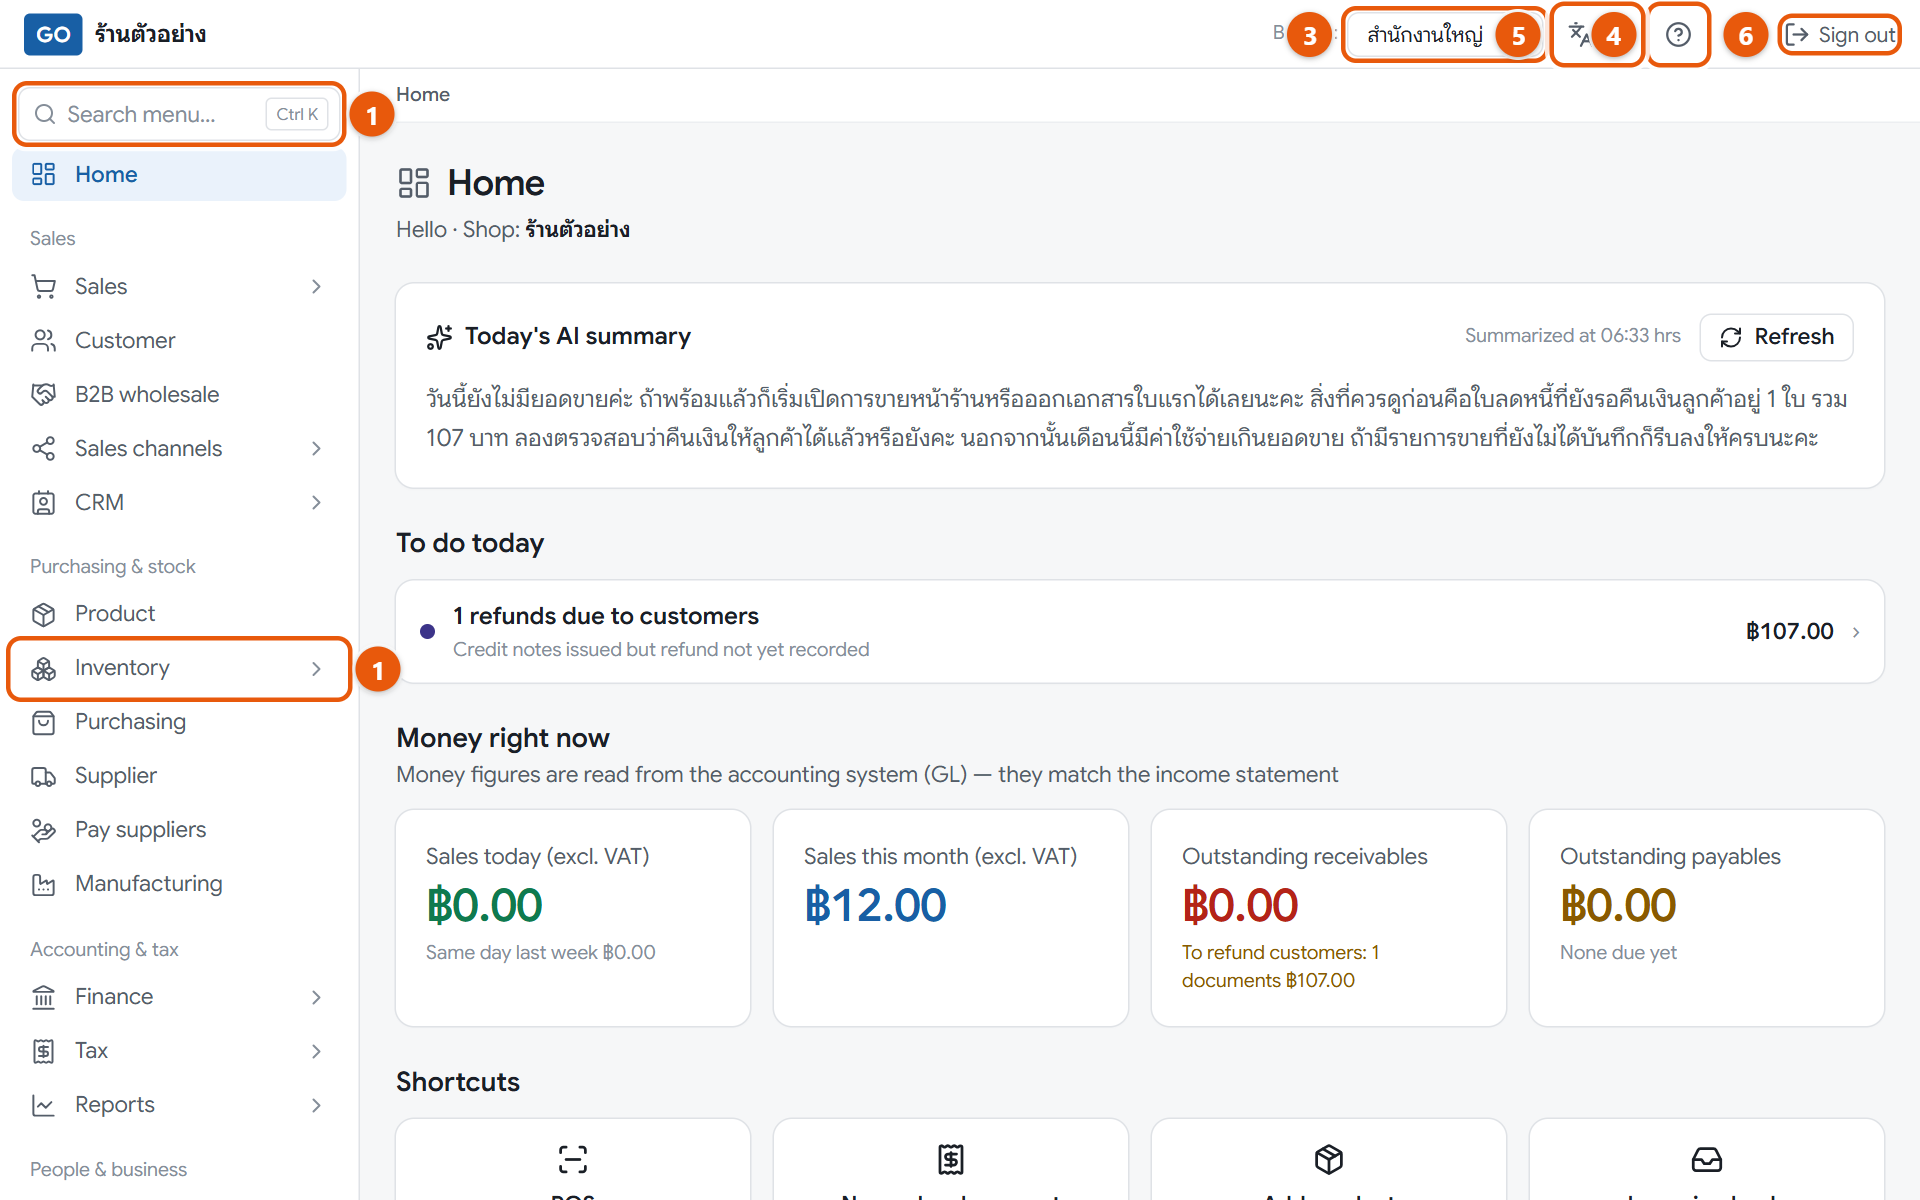
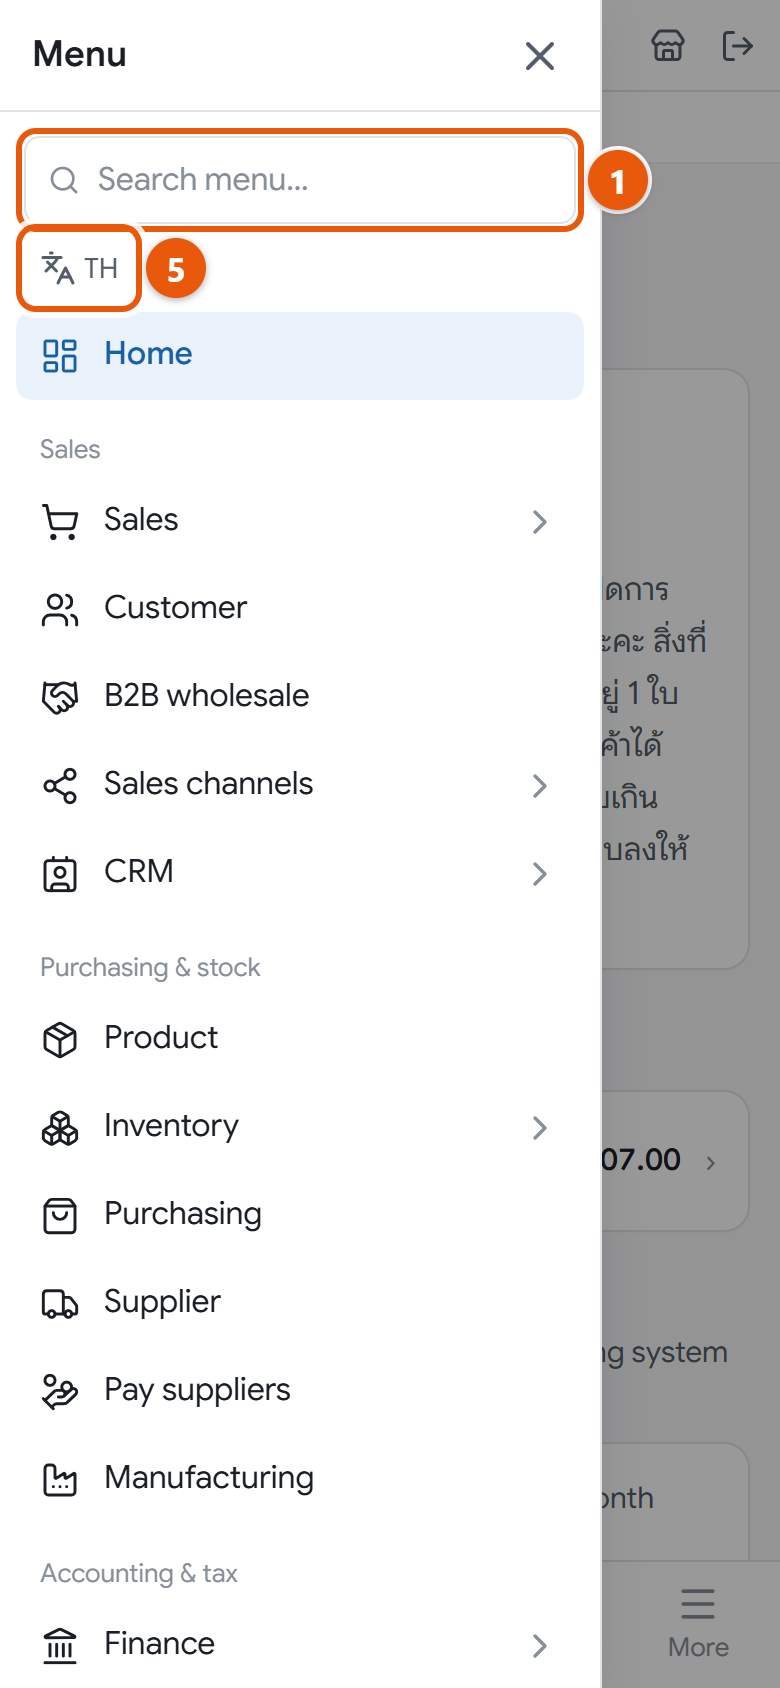
Home, the left menu and the top bar on a computerThe phone menu, with the language button under the search box
Do this
1On a computer the menu is on the left. Press a group such as Inventory to open it, or type in Search menu.
2On a phone, tap Open menu (the three-line button at the top left) or More on the bottom bar to see the full menu.
3Check that Branch: in the top bar shows the branch you are working in. To see combined figures, choose All branches.
4Not sure where to do something? Press Ask how to use (the question-mark icon in the top bar) and type your question.
5To switch between Thai and English, press Change language in the top bar on a computer (the button marked EN or TH). On a phone, open the menu first and press the same button there.
6When you finish, press Sign out at the top right, especially on a shared device.
When it worked: Home shows today's to-dos and money figures for the selected branch, and the top bar shows your shop name, the branch picker and the help button.
If you get stuck
I don't see the branch picker
That is normal. It only appears when your account can access 2 or more branches.
Some menus are missing
Your role doesn't have access to those pages, so they are hidden. If you need them, ask the shop owner to change your role.
I can't find the language button on my phone
Phone screens are narrow, so the button lives inside the menu. Tap Open menu and you will find it under the menu search box.
Get your shop ready to sell
Do this once. This is the most important part, and it is easiest in order.
5
Fill in your business details and VAT status
Your shop name, address and tax ID appear on every receipt and invoice, and the VAT setting tells the program whether to charge VAT.
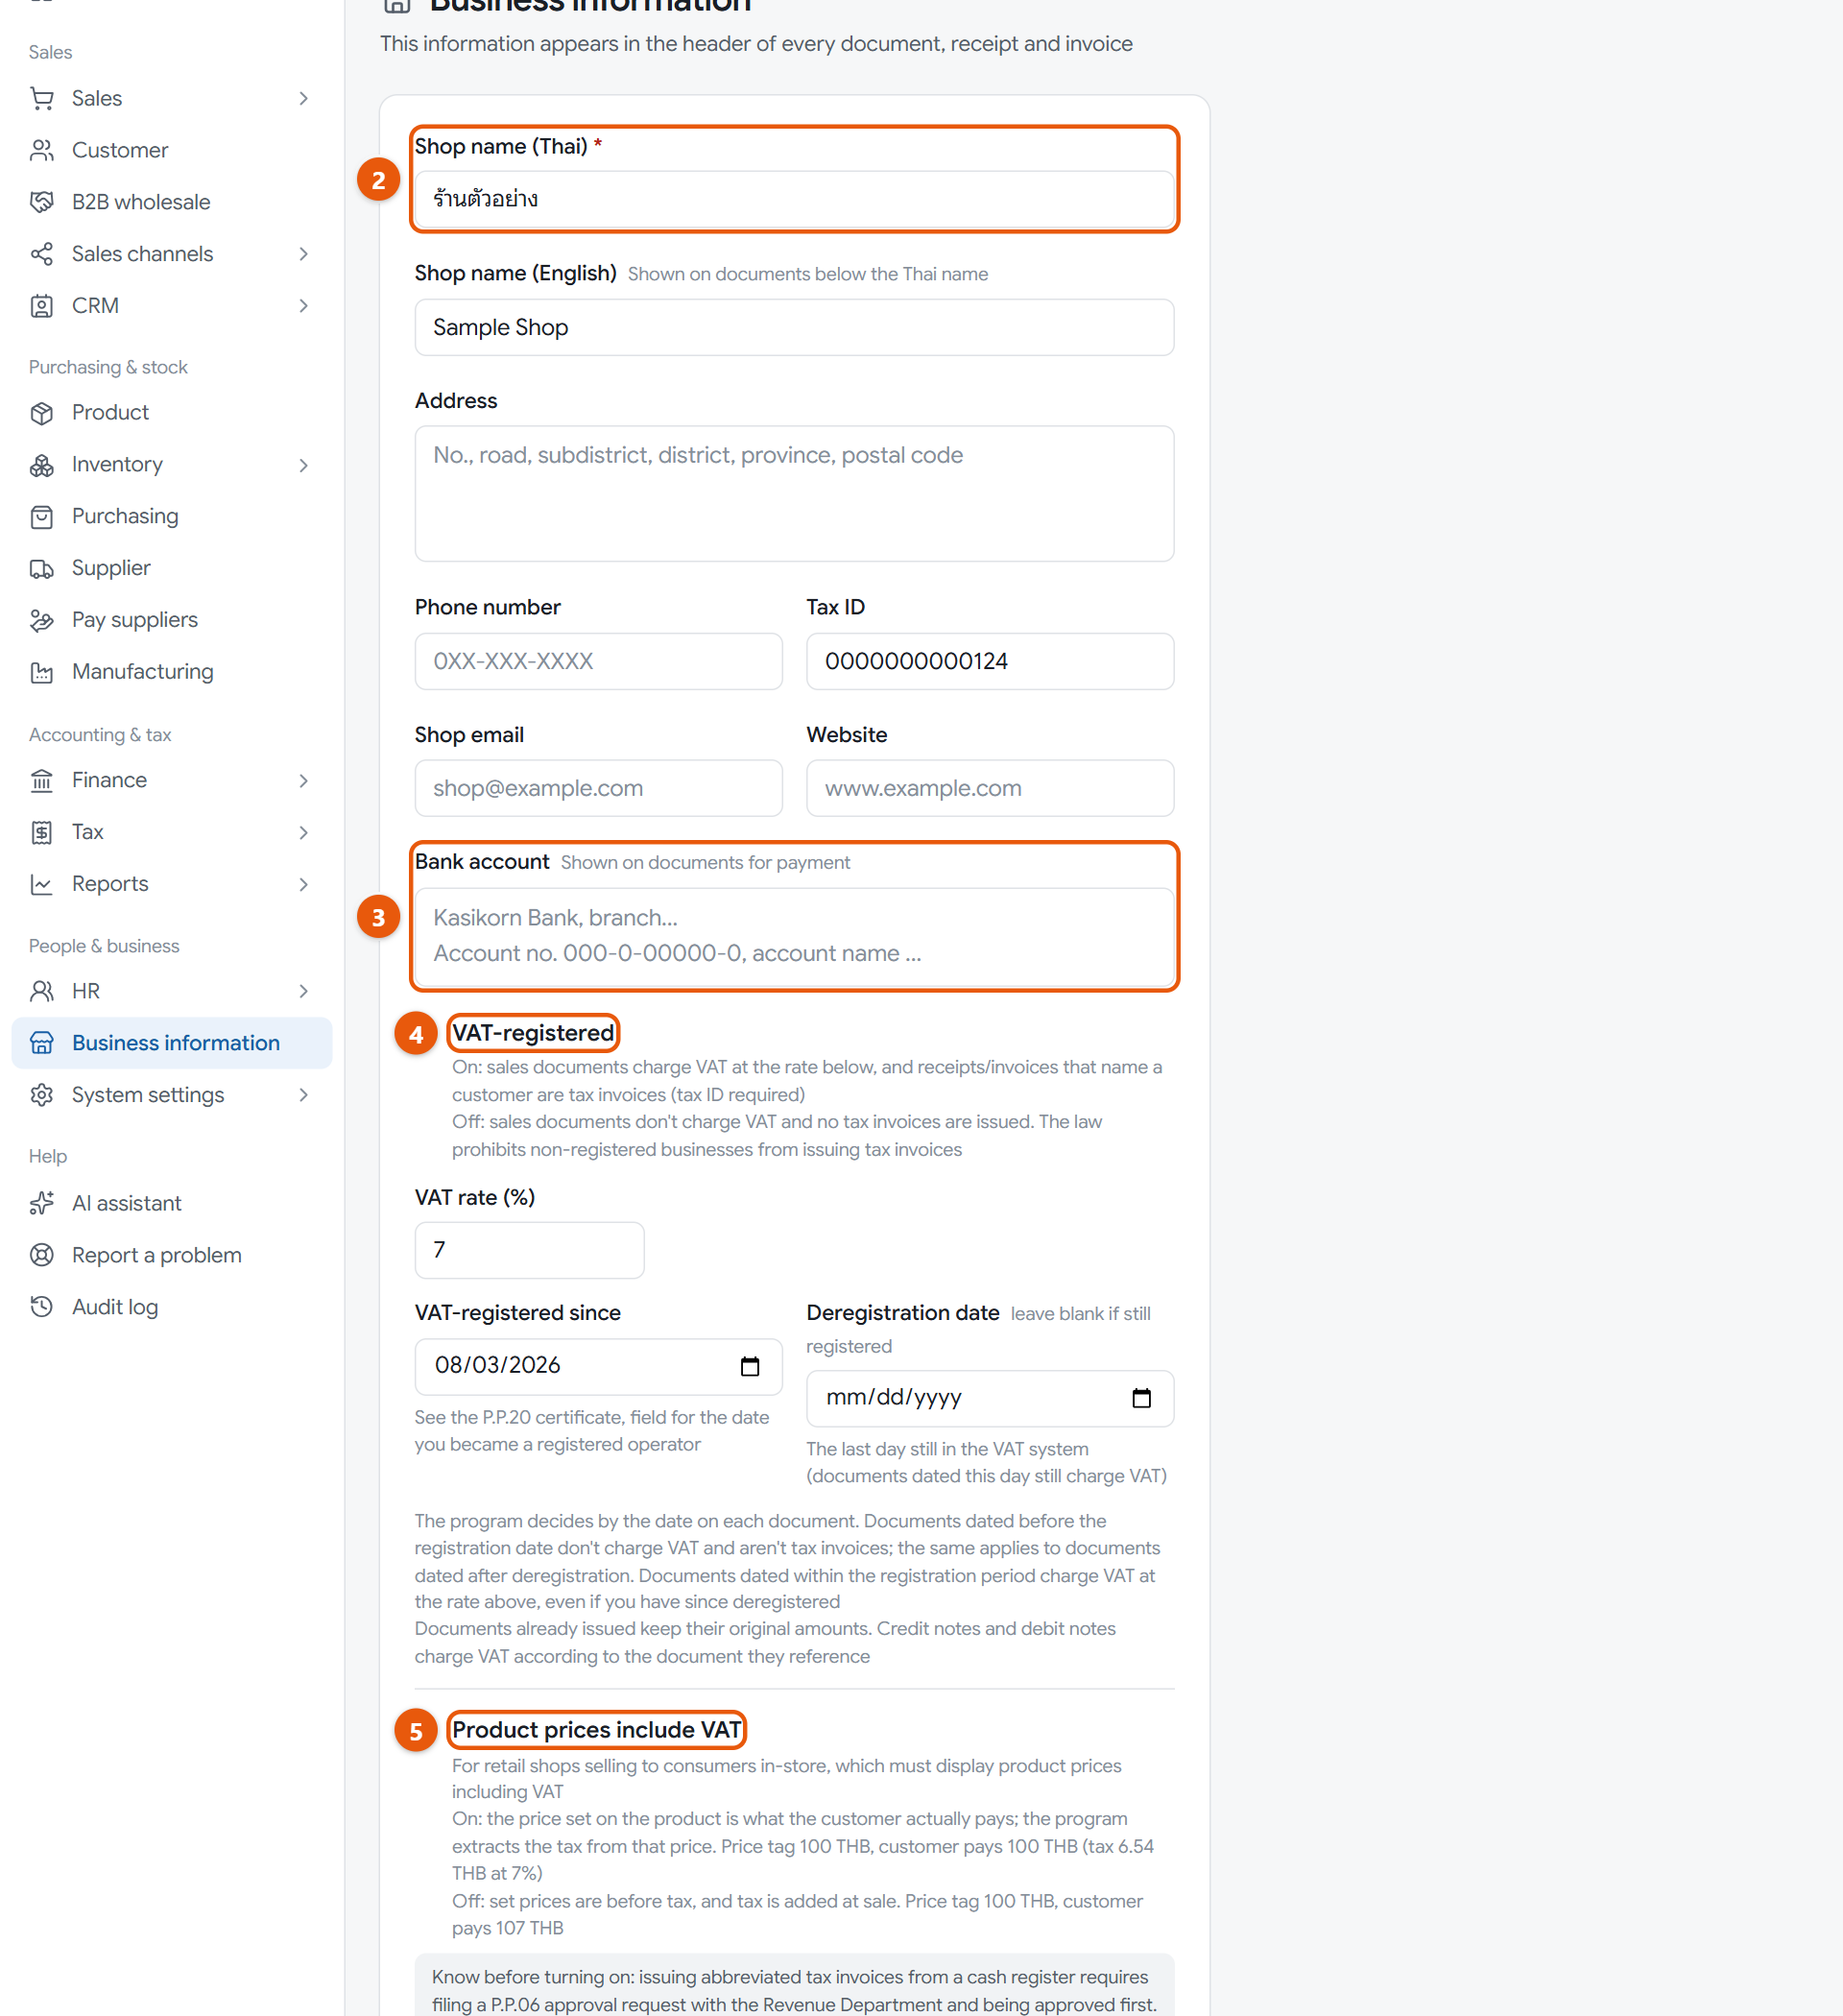
The business information page and its VAT settings
Do this
1Open Business information in the menu, or press the shop icon in the top bar.
2Fill in Shop name (Thai), Address, Phone number and your 13-digit Tax ID.
3Enter the Bank account you want customers to transfer money to.
4If you are VAT-registered, tick VAT-registered and fill in VAT-registered since from your P.P.20 certificate. If not, leave it unticked.
5Retail shops whose price tags already include VAT should also tick Product prices include VAT.
6Press Save.
When it worked: A saved message appears, and the shop name in the top bar updates right away.
If you get stuck
It says the tax ID must be 13 digits
Enter all 13 digits with no dashes, or clear the box if you don't have one yet. A sole proprietor uses their national ID number.
I ticked VAT-registered and it won't save
A VAT-registered shop must fill in the 13-digit tax ID and the registration date from the P.P.20 certificate first.
I'm not sure whether my shop is VAT-registered
Check whether you have a P.P.20 certificate from the Revenue Department. If not, you aren't registered, so leave it unticked; unregistered shops may not issue tax invoices.
6
Check your branch, and add more if you have several shops
Products, stock and sales are kept per branch, so a shop with several locations should add every branch before adding products and inviting staff.
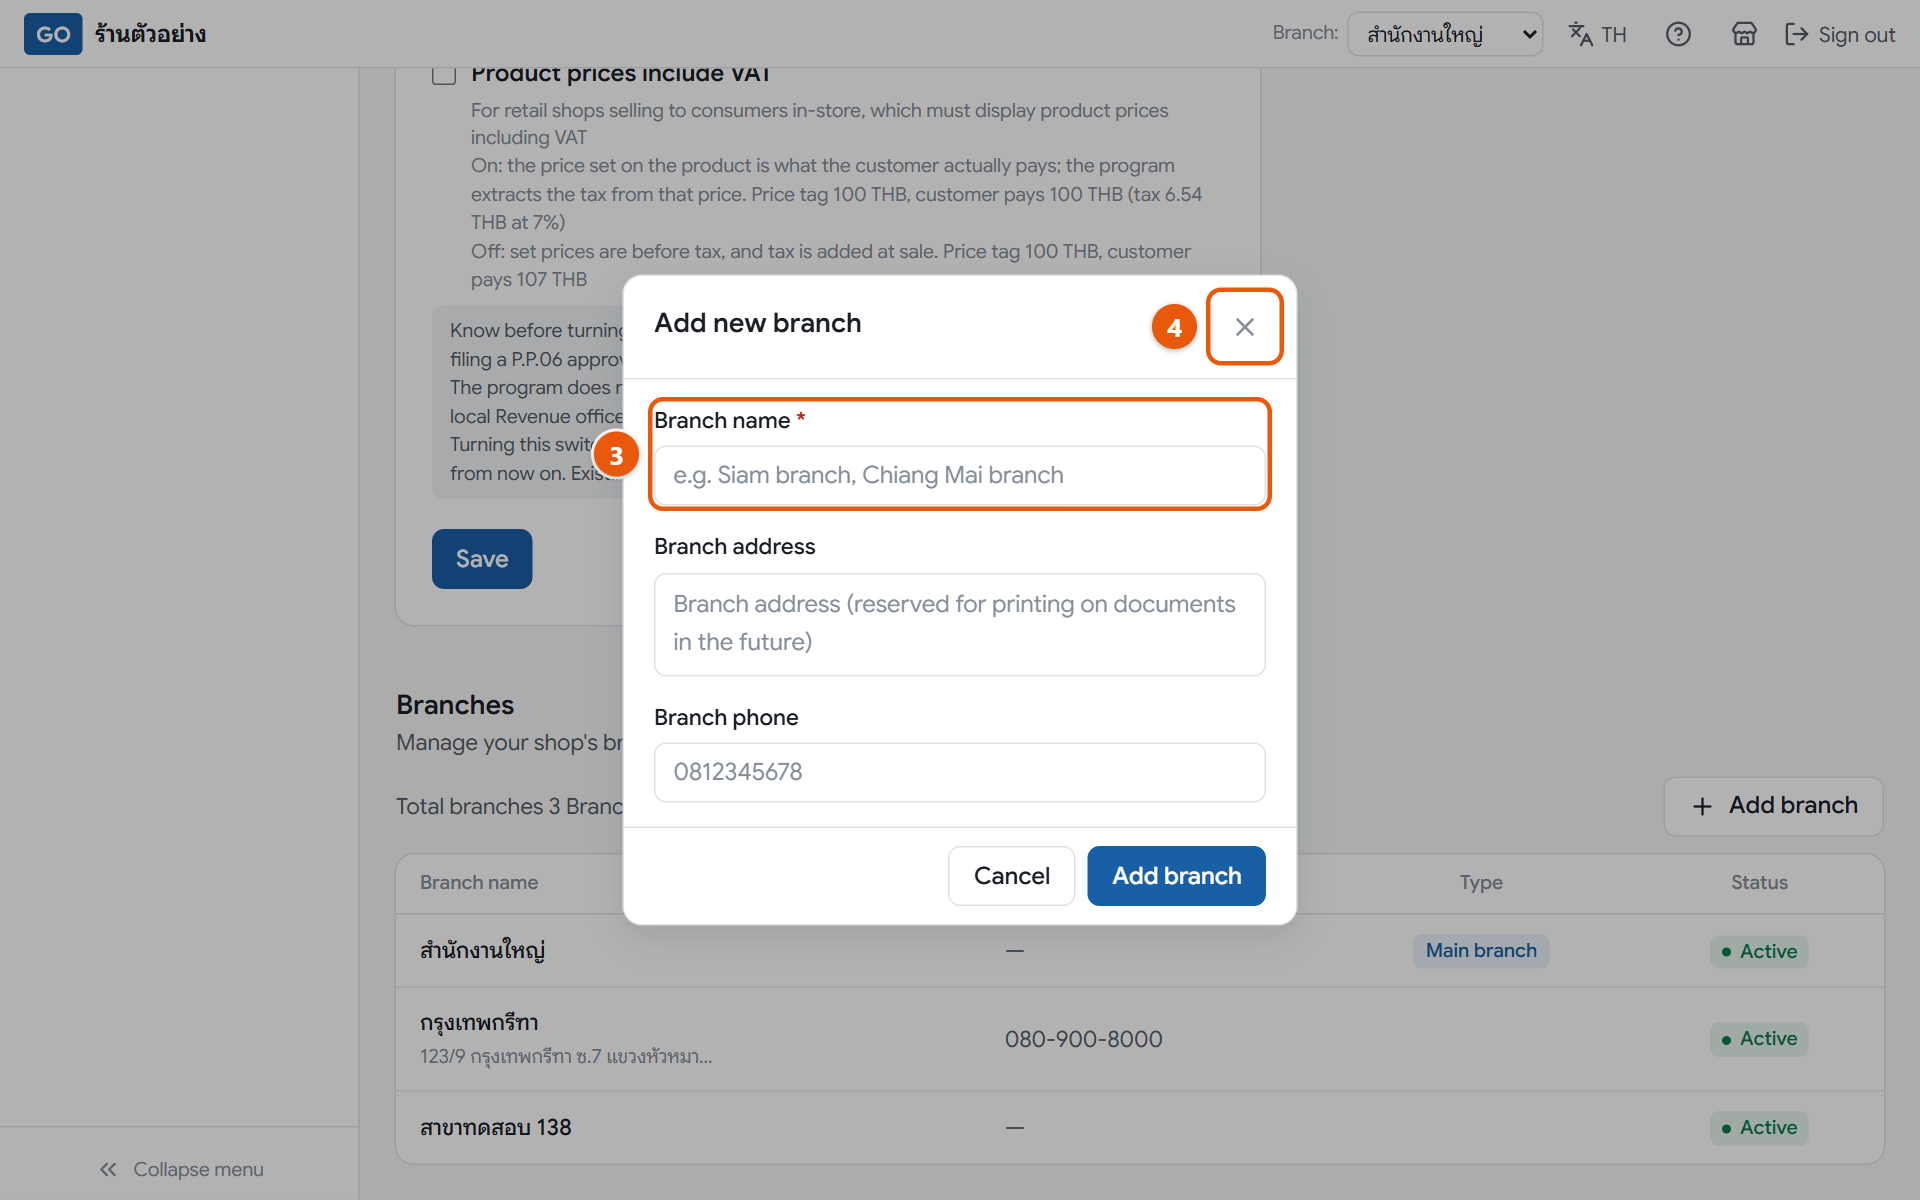
The branches section and the add-branch window
Do this
1Open Business information and scroll down to the branches section. Your main branch is already there.
2Have another location? Press Add branch.
3Fill in Branch name, plus Branch address and Branch phone if you have them.
4Press Add branch at the bottom of the window.
5To rename your main branch, tap its row, make the change and press Save.
When it worked: The new branch appears in the table and can be picked from Branch: in the top bar.
If you get stuck
It asks me to enter a branch name
The branch name box has a red asterisk, which means it must be filled in before saving.
My staff can't see the new branch
Staff only see the branches ticked when they were invited, and you can't yet add branches to an existing user yourself. So add all branches before inviting staff (step 12). If you already invited them, contact our team.
Does adding a branch change what I pay?
The fee is based on the number of active branches. See the amount under Plan. Branches can’t be deleted, only deactivated.
7
Look over the chart of accounts (usually nothing to change)
The chart of accounts is the list of accounts the program posts to automatically. A full standard set is already there, so you only need to know what it contains.
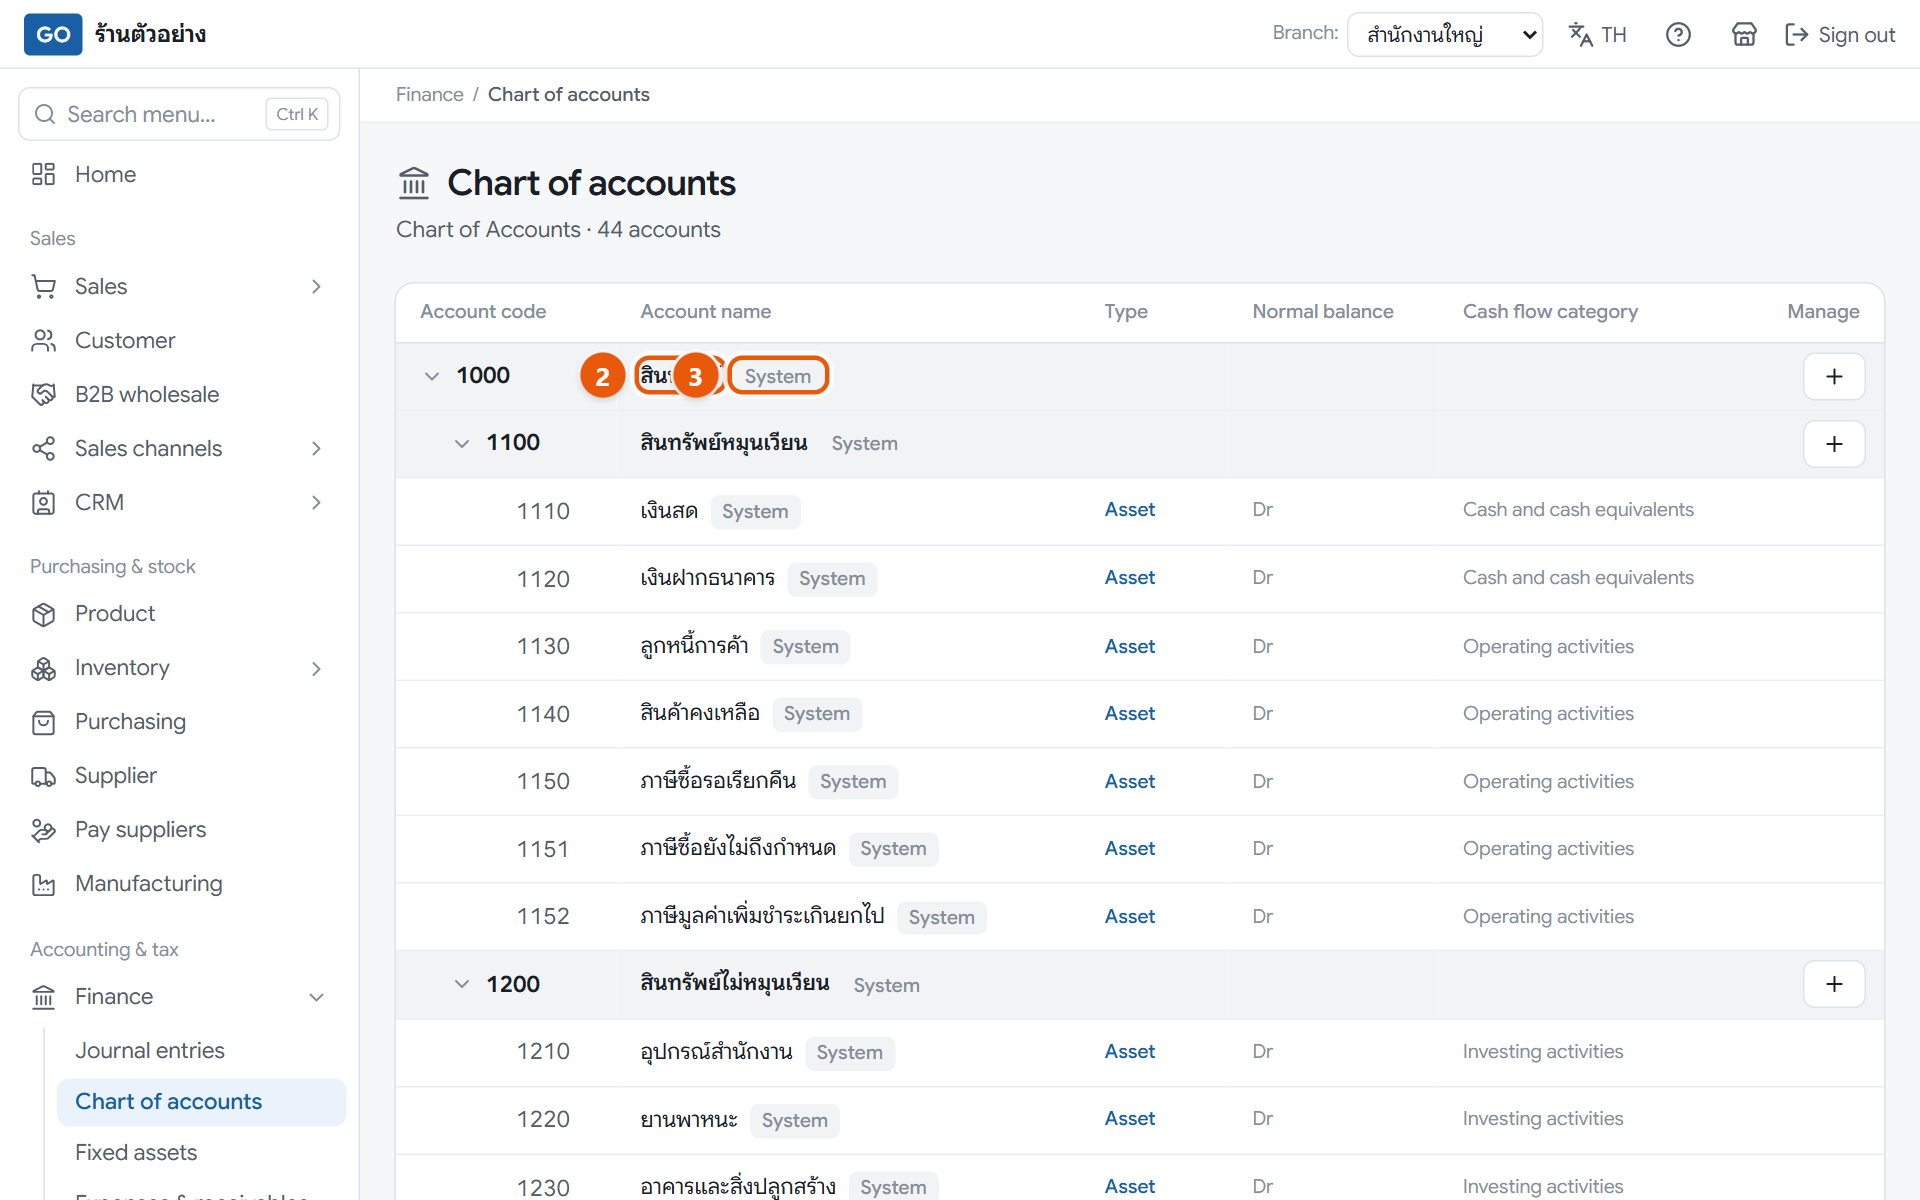
The chart of accounts tree with 5 groups
Do this
1Open Finance in the menu, then press Chart of accounts.
2Look through the 5 groups: assets, liabilities, owner’s equity, income and expenses. Tap a heading row to open or close it.
3Accounts tagged System are the standard set and can’t be edited. That is normal.
4If your accountant asks for extra accounts, such as one per bank, press the plus icon on the parent account, fill in the code and name, then press Review before creating.
5Double-check, then press Confirm and create account. Accounts can’t be deleted once created.
When it worked: You see all 5 account groups, with the total number of accounts shown under the page title.
If you get stuck
I don't see the chart of accounts menu
Only the owner, accountant and auditor roles can open this page. Other roles don’t see the menu.
Every row is tagged System and has no edit button
That is normal. Standard accounts can’t be changed; the Edit button only appears on accounts your shop added.
I created an account by mistake
It can’t be deleted. You can only change its name and cash flow category with Edit at the end of the row. When unsure, ask your accountant before creating one.
8
Add your products and services
You can only sell items that are in your product list, and the prices you set here are the ones used when you sell.
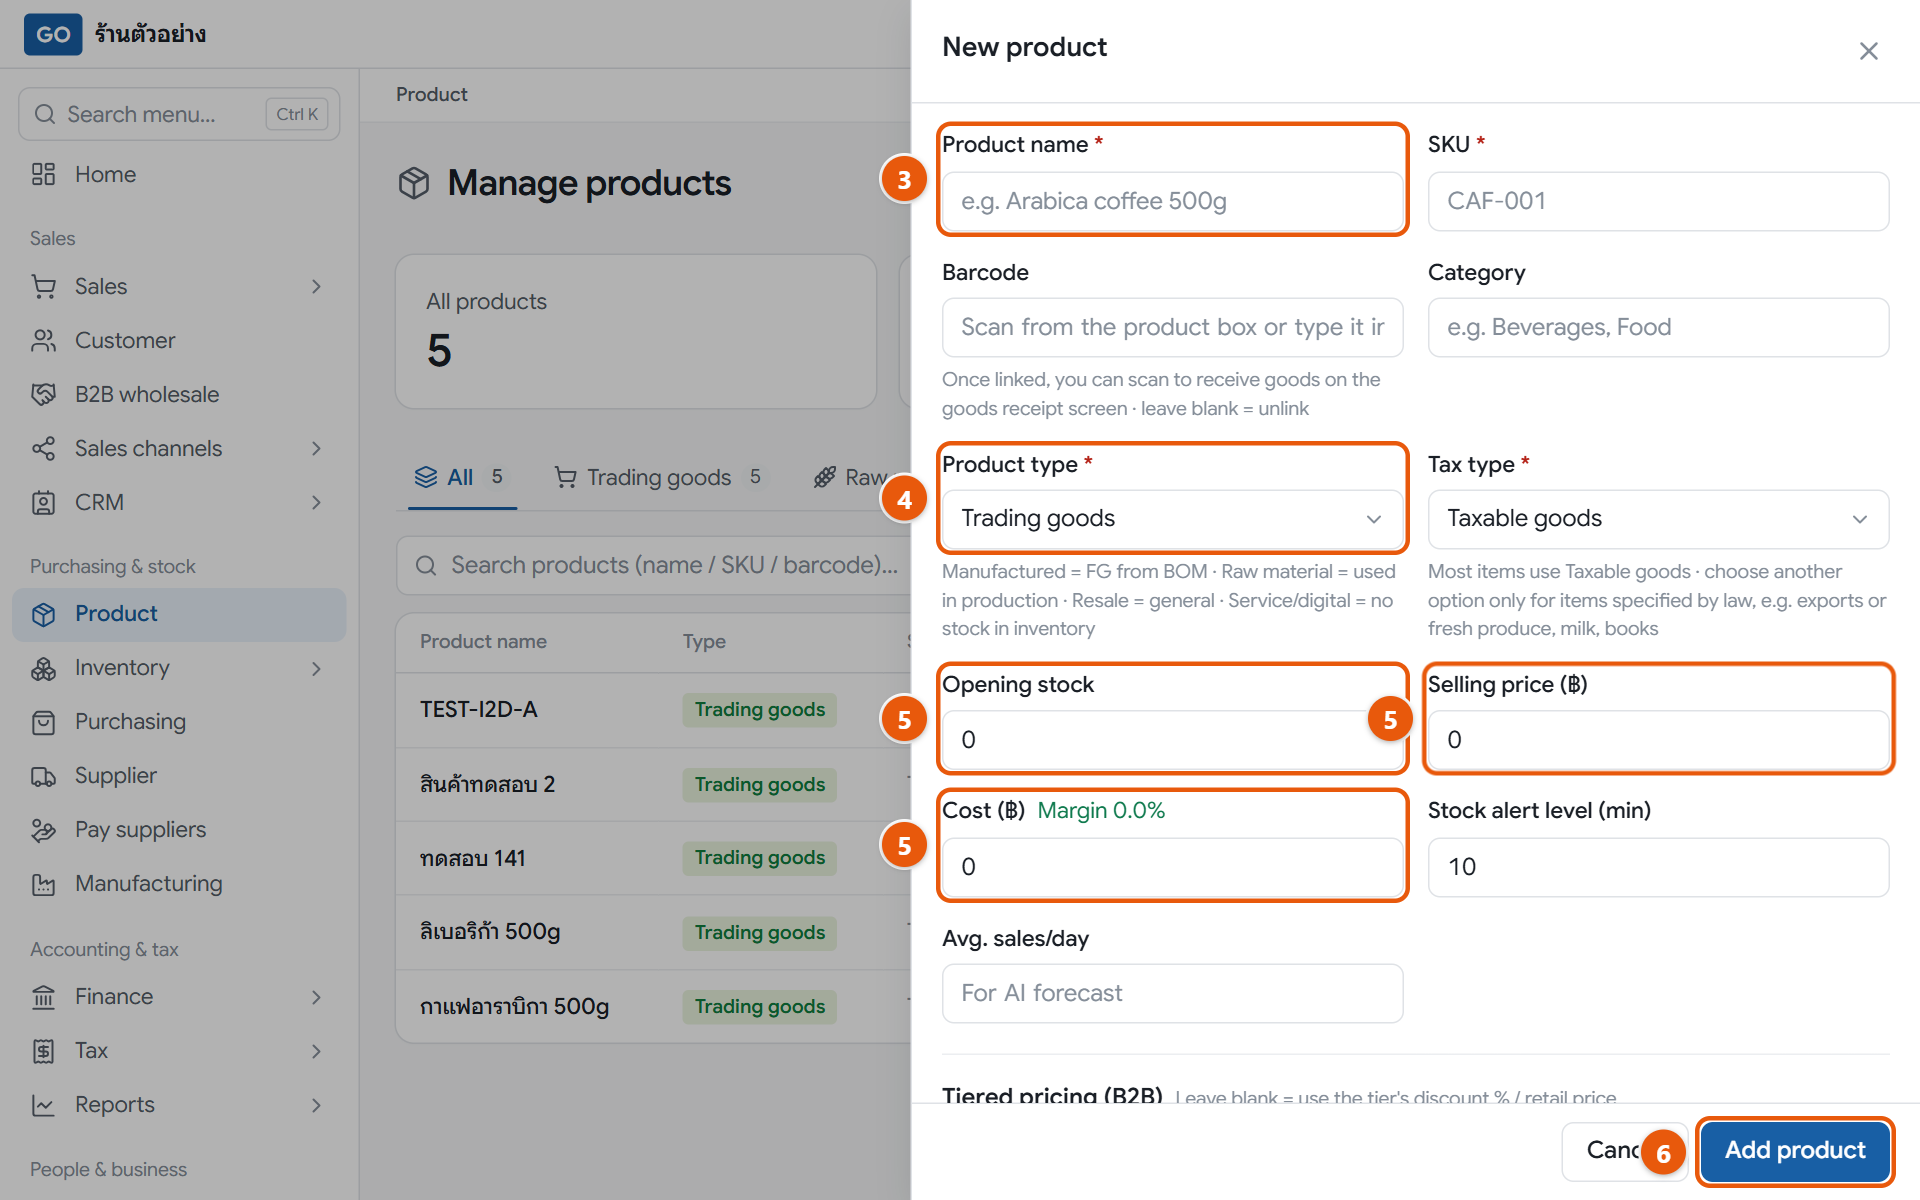
The new product panel
Do this
1If you have several branches, set Branch: to the branch that will sell the item, because products are kept per branch.
2Open Product in the menu and press Add product.
3Fill in Product name and a product code in the SKU box. Both are required.
4Choose a Product type: Trading goods for things you buy and resell, Service/digital for services, courses or files.
5Enter Selling price (฿) and Cost (฿). Leave Opening stock at 0 for now; you will enter quantities in step 9.
6Press Add product at the bottom of the panel, then repeat for every item.
When it worked: The item appears in the table with its selling price, and you can find it by name or code in the search box.
If you get stuck
The add product button is greyed out and asks me to pick a branch
Change Branch: from All branches to a single branch.
Can I import products from Excel?
Not yet. Products are added one at a time.
I added a product by mistake and want to delete it
Products can’t be deleted yet. Tap the product’s row to fix its name or price, then press Save changes.
9
Enter your opening stock
Entering what you have on hand through a stock adjustment keeps a record you can look back on: how much, when, and who entered it.
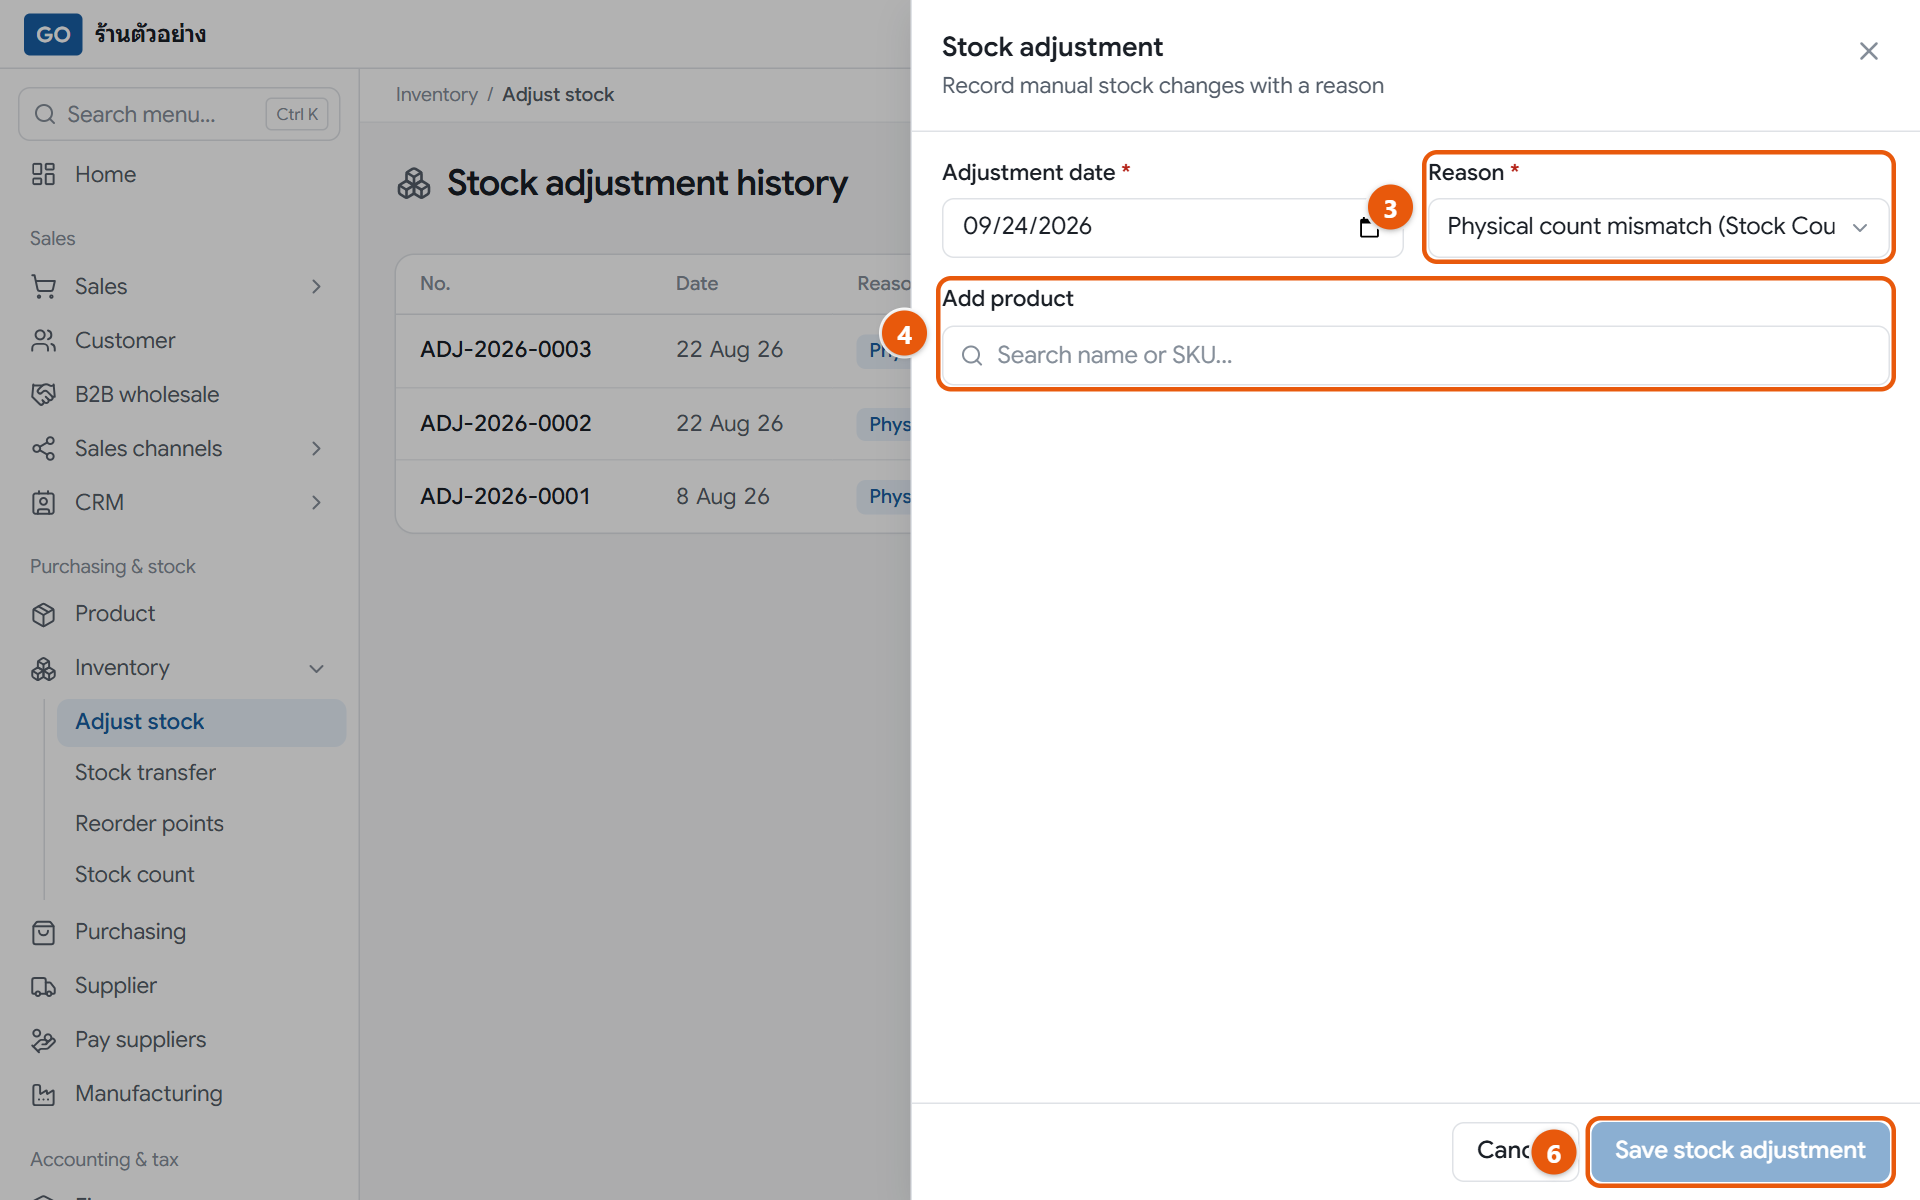
The stock adjustment panel with several opening quantities in one document
Do this
1First count what is actually on the shelves at that branch.
2Open Inventory in the menu and press Adjust stock, then press the Adjust stock button at the top right of the screen.
3In Reason choose Other (specify reason), then type Opening stock in the Reason box that appears.
4Type a product name or code in Add product and pick it from the list. Repeat for every item.
5In Adjust (+ increase / - decrease) enter the counted quantity as a positive number.
6Press Save stock adjustment.
When it worked: A success message shows a document number starting with ADJ, and the Product page now shows the quantities you entered.
If you get stuck
I have hundreds of items; one at a time is too slow
Use Stock count instead. Press New count sheet, then Whole branch to add every item at once, type the counted quantities and press Confirm & post. The program creates the stock adjustment for you.
I already typed opening stock when adding the product
Don’t enter it again; that number is already your opening stock. If it’s wrong, adjust only the difference here, for example -2 if it is 2 too many.
I saved the wrong quantity
Saved adjustments can’t be edited or deleted. Make a new adjustment with the opposite amount, for example -5 if you entered 5 too many.
10
Add your regular customers
Customers who buy on credit or need a tax invoice must be in your list so you can pick them when billing.
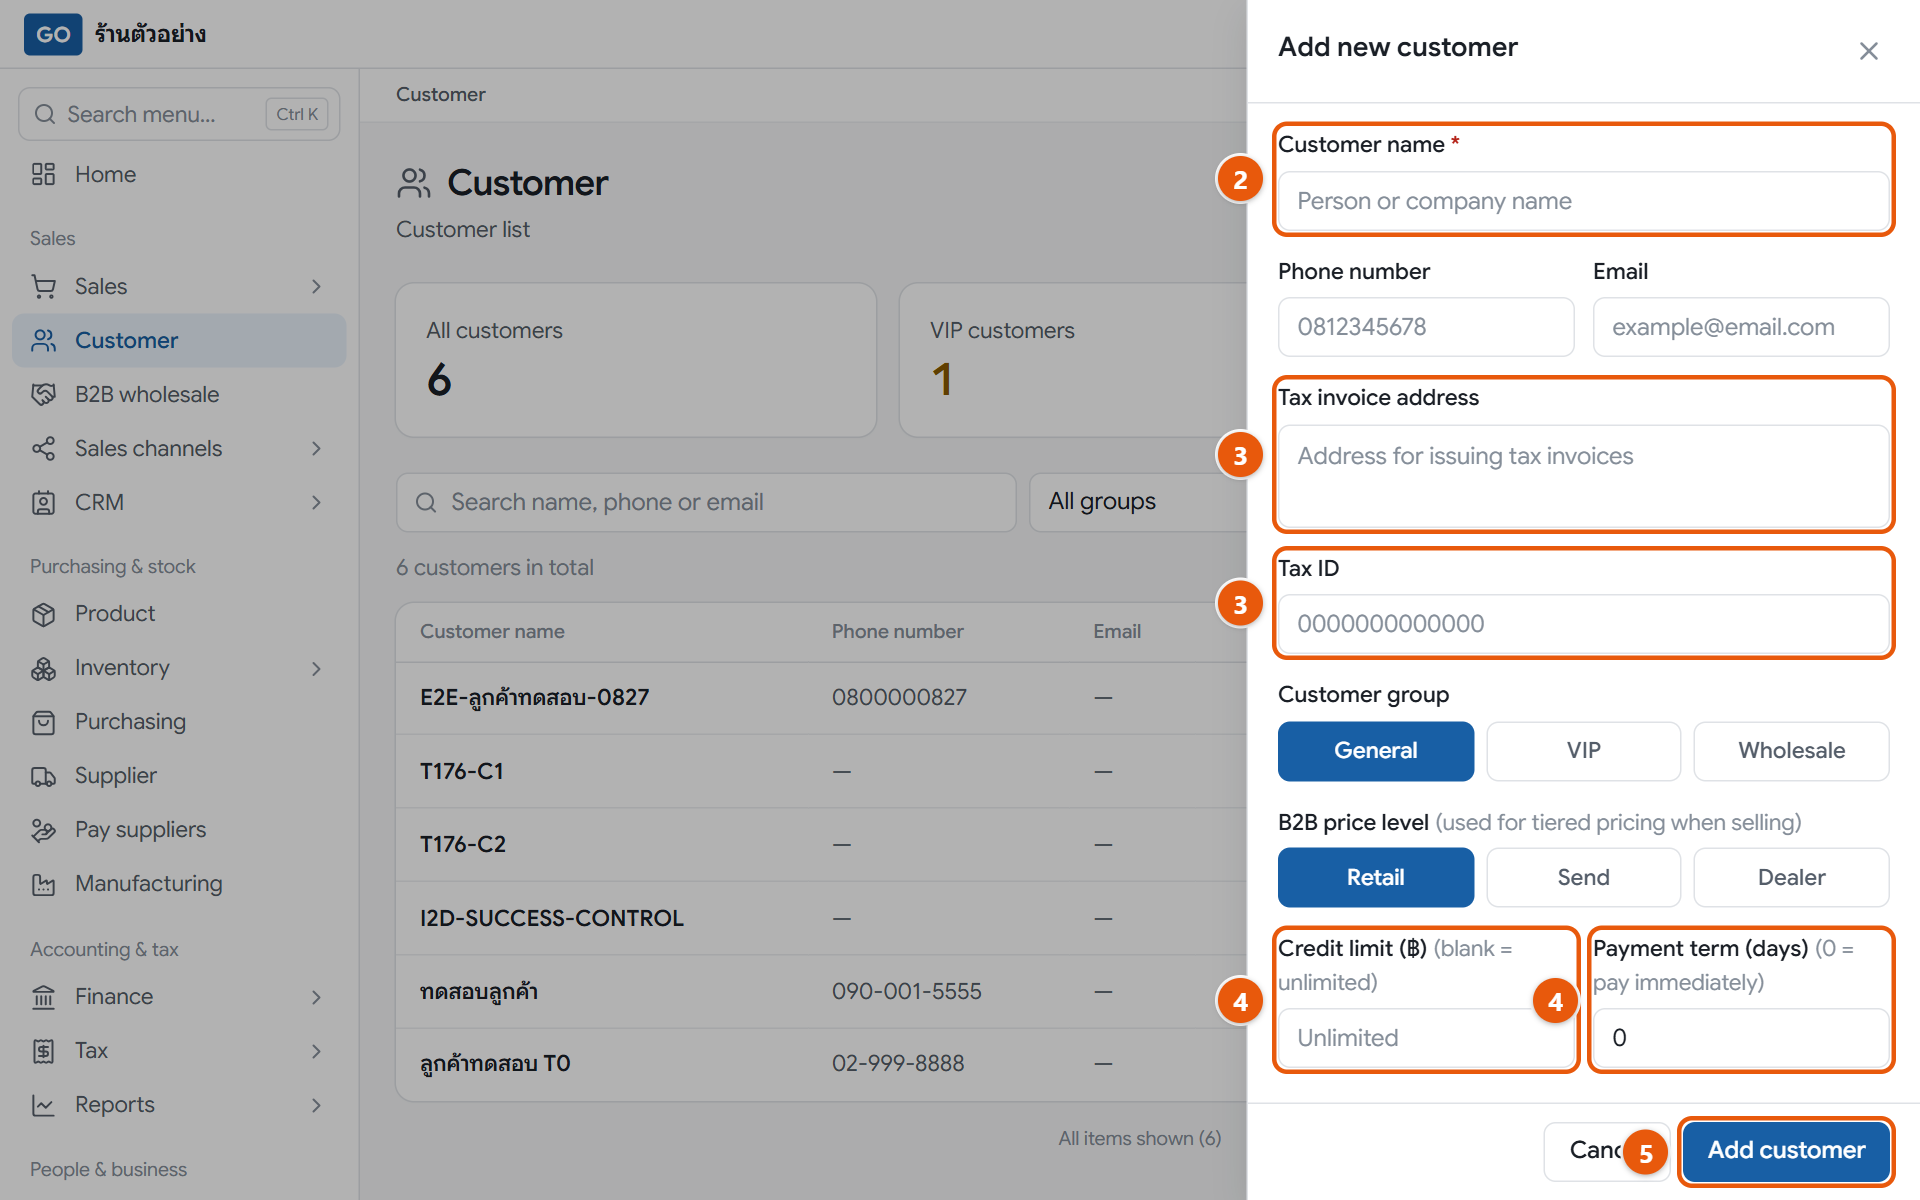
The new customer panel
Do this
1Open Customer in the menu and press Add customer.
2Fill in Customer name. It is the only required field.
3For customers who need tax invoices, fill in Tax invoice address and Tax ID, then choose Customer branch when it appears.
4For customers who can pay later, set Credit limit (฿) and Payment term (days).
5Press Add customer at the bottom of the panel.
When it worked: The customer appears in the list and can be picked on sales documents at every branch.
If you get stuck
Do I need to add walk-in customers?
No. Counter sales don’t need a customer name. Only add regulars, credit customers, or people who ask for tax invoices.
Can I import customers from Excel?
Not yet. Customers are added one by one, and duplicate names aren’t flagged, so search before adding.
I don't see the add customer button
Your role can only view. Owners, managers and sales staff can add customers.
11
Add the suppliers you buy from
Purchase orders and supplier bills pick from this list, and the program uses it to work out purchase VAT and payment due dates.
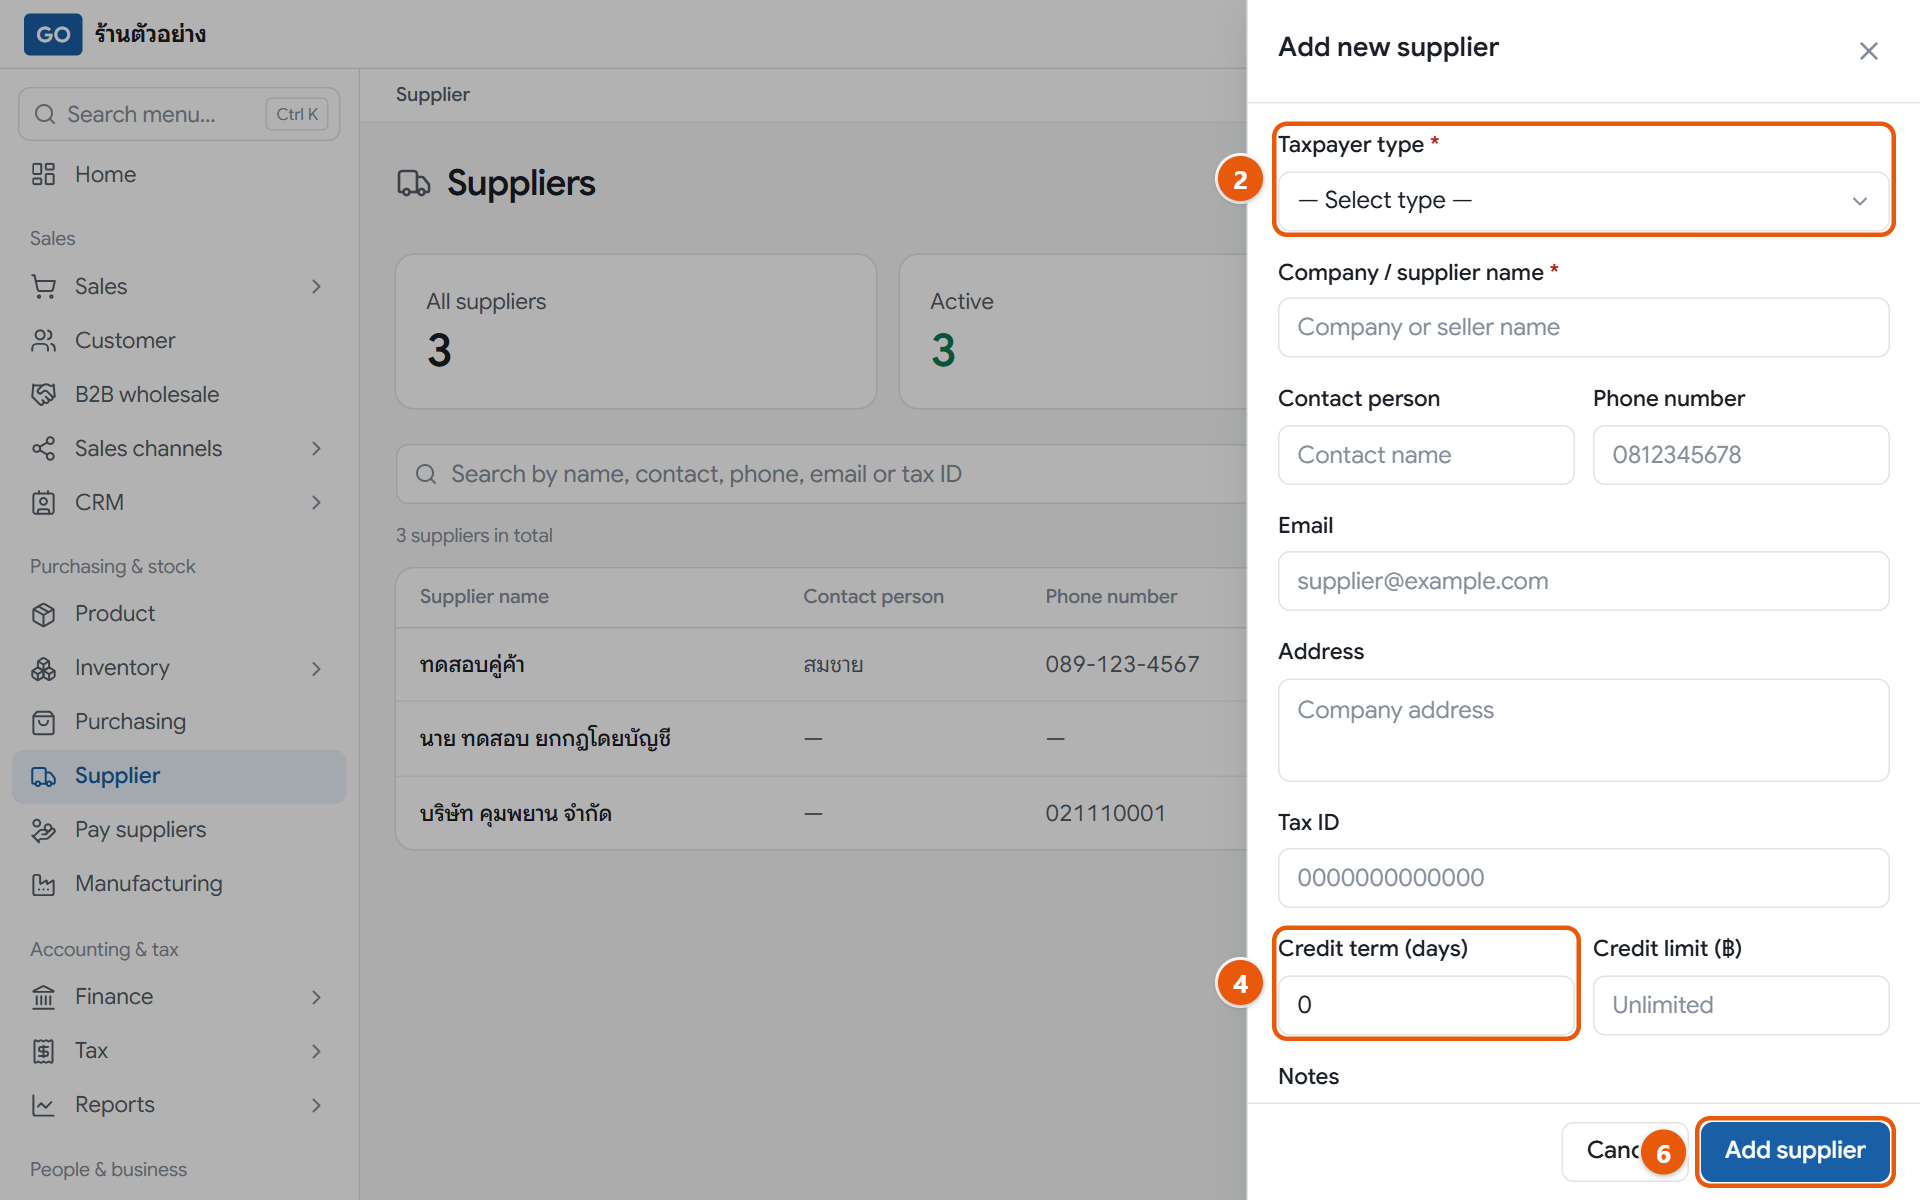
The new supplier panel
Do this
1Open Supplier in the menu and press Add supplier.
2Choose a Taxpayer type: Individual or Juristic person.
3For a person, fill in Title, Name and Last name. For a company, fill in Company / supplier name.
4Enter the Credit term (days). Use 0 if you pay cash.
5If the supplier gives you tax invoices, choose VAT-registered (issues tax invoices). If not, choose Not VAT-registered.
6Press Add supplier at the bottom of the panel.
When it worked: The supplier appears in the table and can be picked right away on purchase orders.
If you get stuck
Do I add suppliers separately for each branch?
No. Add them once and every branch can use them.
I can't delete a supplier
Suppliers that already have purchase orders or bills can’t be deleted. Open it, press Disabled, then press Save instead.
I set the supplier's VAT option wrongly
You can fix it any time. The new setting applies from the next goods receipt; existing bills don’t change.
12
Invite your staff and pick their roles
Each staff member should have their own account. The role you choose decides what they can see and do; for example, cashiers don’t see costs.
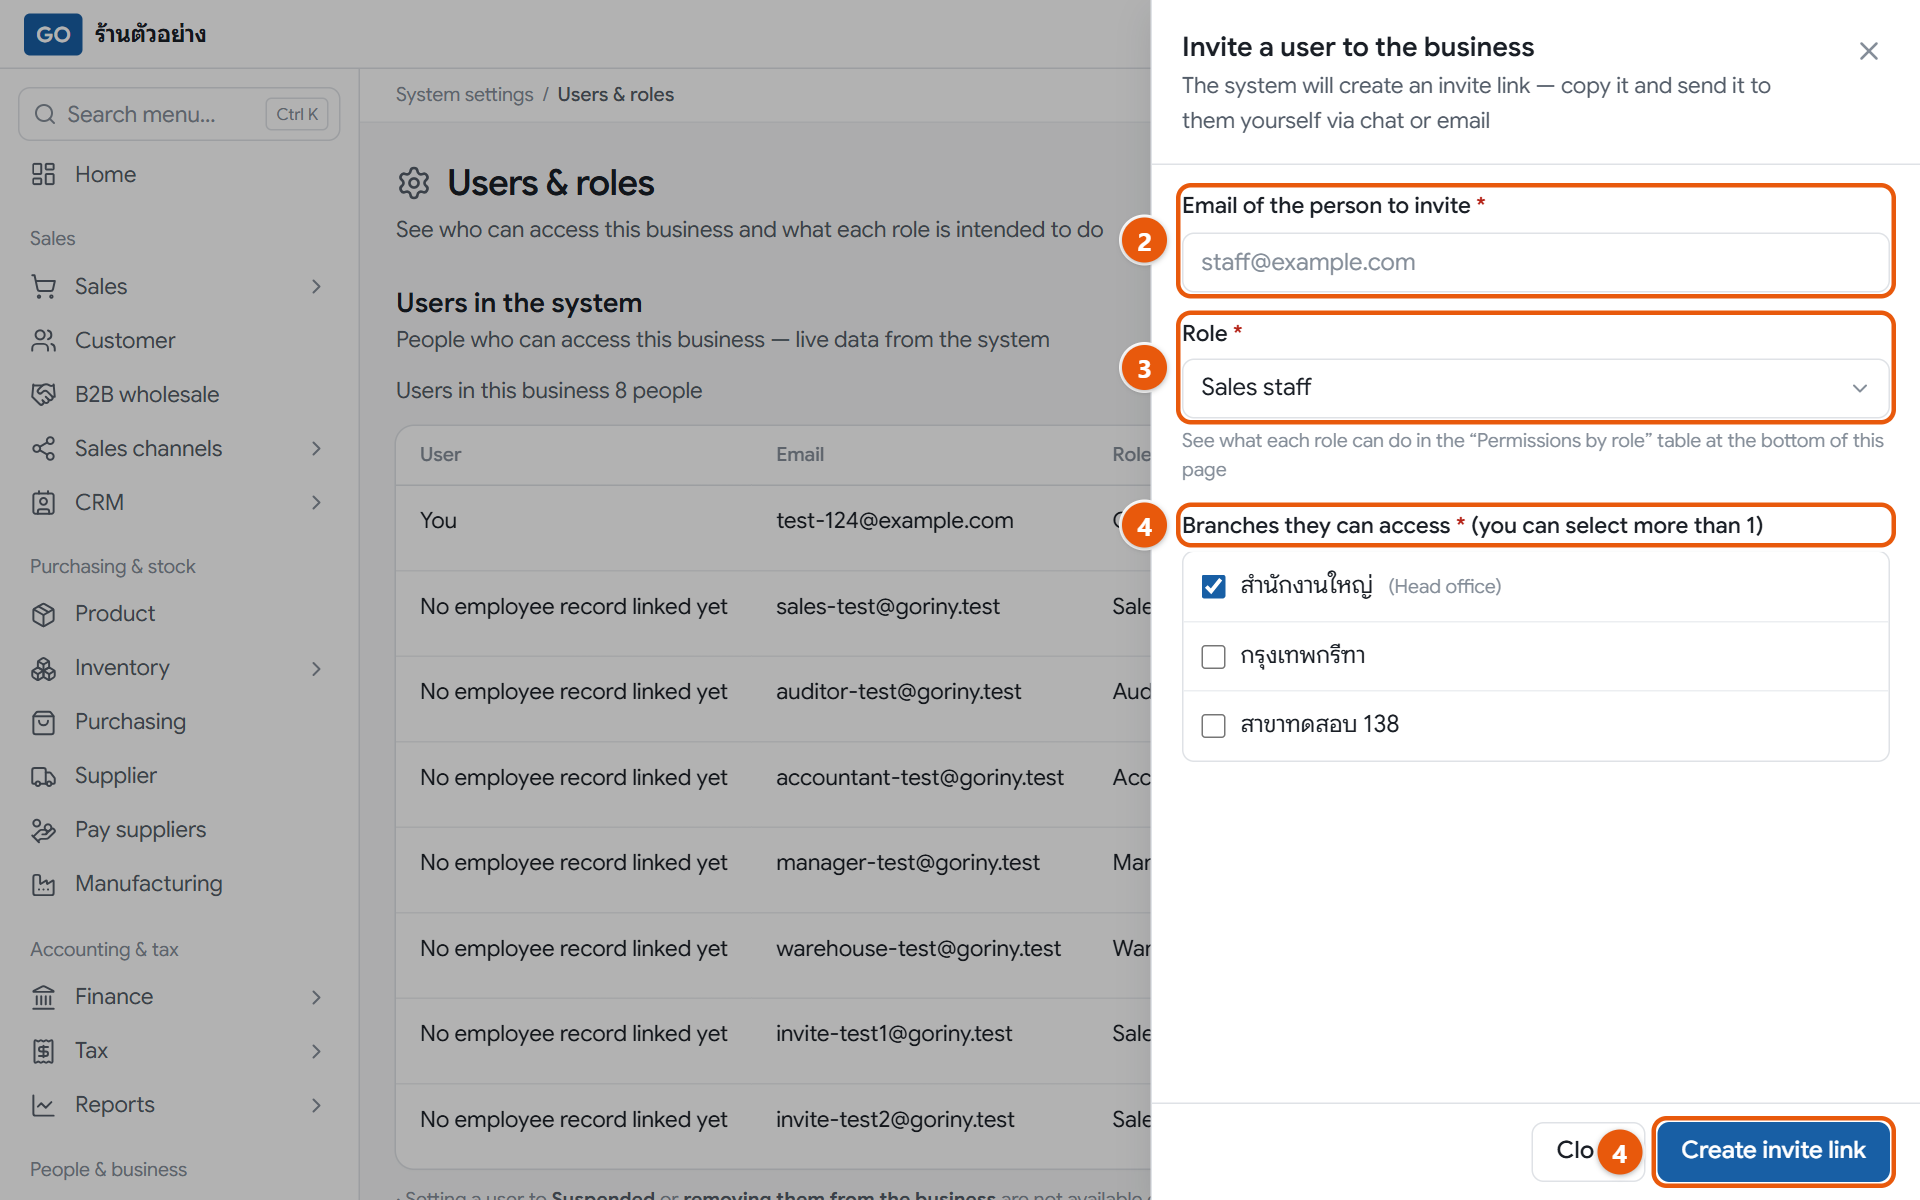
The invite panel with the link to copy
Do this
1Open System settings and press Users & roles.
2Press Invite a user to the business and fill in Email of the person to invite.
3Choose a Role: Sales staff for cashiers, Warehouse staff for stock keepers, Manager for shop leads.
4Tick every branch under Branches they can access, then press Create invite link.
5Press Copy and send the link to your staff yourself by chat or email before closing the box, because the link is shown only once.
When it worked: Your staff member appears in Users in the system with the chosen role, and can start as soon as they open the link and set a password.
If you get stuck
I closed the box and lost the link
The link is shown only once, and the same email can’t be invited again. Contact our team on LINE @791ibitd.
It says the email is already used by another business
One email can belong to only one business. Ask your staff member to use a different email.
I want to change someone’s role later
In Users in the system, press Change role on their row, pick the new role and press Save. It takes effect the next time they open a page.
13
Turn on the 6-digit code from your phone
The owner’s account can see everything in the shop. A 6-digit code from your phone keeps out anyone who learns your password.
Scan the QR code with your phone app, then type the 6-digit code
Do this
1Install Google Authenticator or Microsoft Authenticator on your phone.
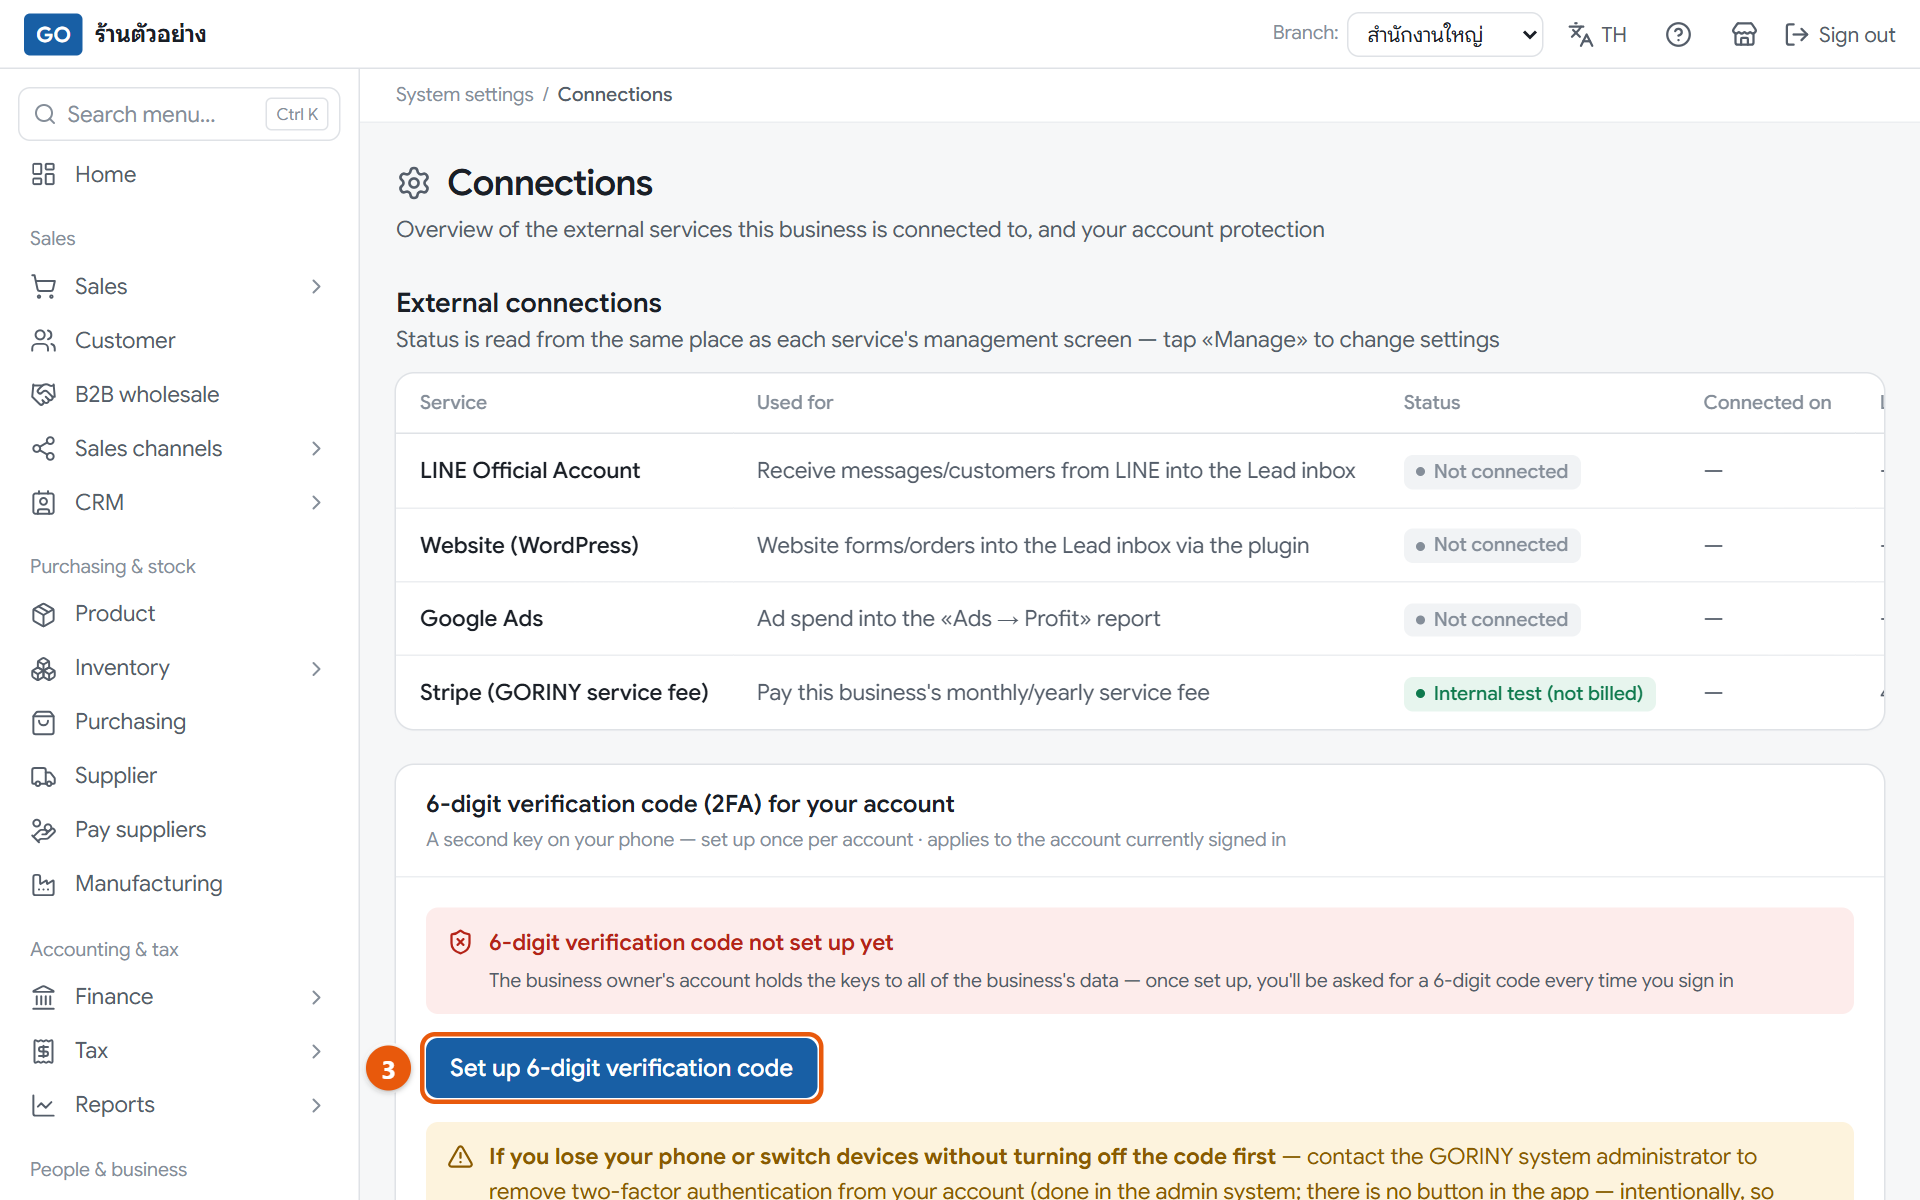
2On a computer, open System settings and press Connections.
3Press Set up 6-digit verification code.
4In the phone app, tap the plus sign and scan the QR code on screen. If it won’t scan, press Show setup key to type it in.
5Type the 6-digit code the app shows, then press Turn on.
When it worked: A message says setup is complete. From now on, every time you sign in you will be asked for the 6-digit code after your password.
If you get stuck
It says the code is wrong or expired
The code changes every 30 seconds. Type the latest one, and set your phone’s clock to automatic.
What if I lose or change my phone?
There is no button to remove it yourself; you must contact our team on LINE @791ibitd. So it’s a good idea to press Add another device now and set up a backup phone.
Can my staff turn this on too?
Not yet. This page is for the shop owner only.
14
Make your first backup and test it
The system already backs up your data, but keeping your own copy is extra peace of mind, and it’s worth checking the file really works.
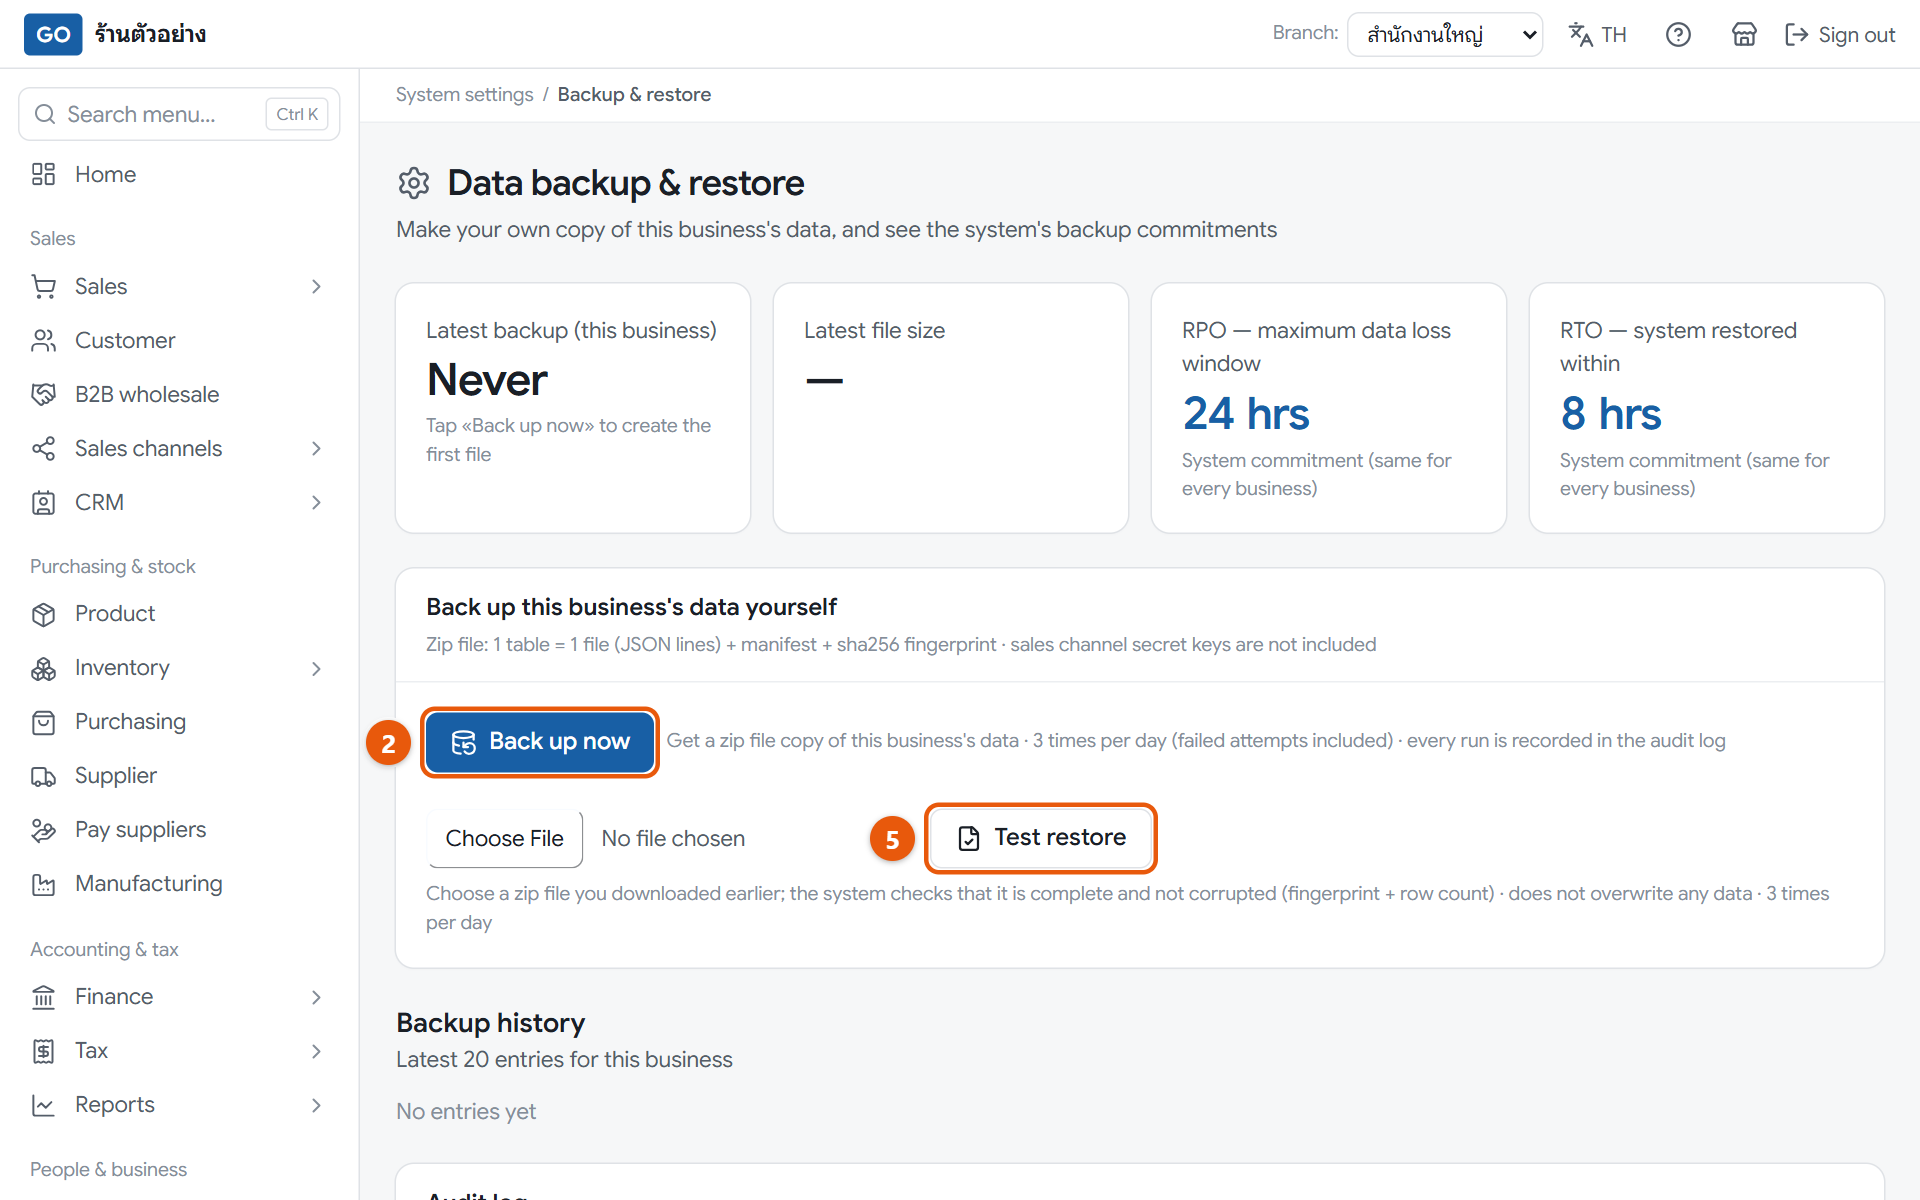
The backup page and the file test result
Do this
1Open System settings and press Backup & restore.
2Press Back up now, then press Confirm, create backup.
3Wait for your browser to download the zip file, then keep it somewhere safe, because it contains customer and staff personal data.
4Choose the zip file you just downloaded in the file picker below.
5Press Test restore and read the result.
When it worked: A new entry appears in the backup history, and the test says the file is complete and not corrupted, with every table marked Complete.
If you get stuck
Will the test restore overwrite my shop data?
No. It only checks the file and never touches your data. There is no button yet to load a file back into the system; if data is really lost, contact our team.
It says it can only be done 3 times in 24 hours
Wait until 24 hours have passed since the first try in that period, then try again.
The result says the fingerprint doesn’t match
The file was changed or damaged. Don’t unzip and re-zip it; make a new backup and keep that file instead.
Selling every day
Daily work
15
Sell at the counter with the touch-screen POS
The POS screen is the fastest way to sell: scan, take payment, done. Every bill belongs to the seller’s shift, so at closing time you can check the cash drawer against sales.
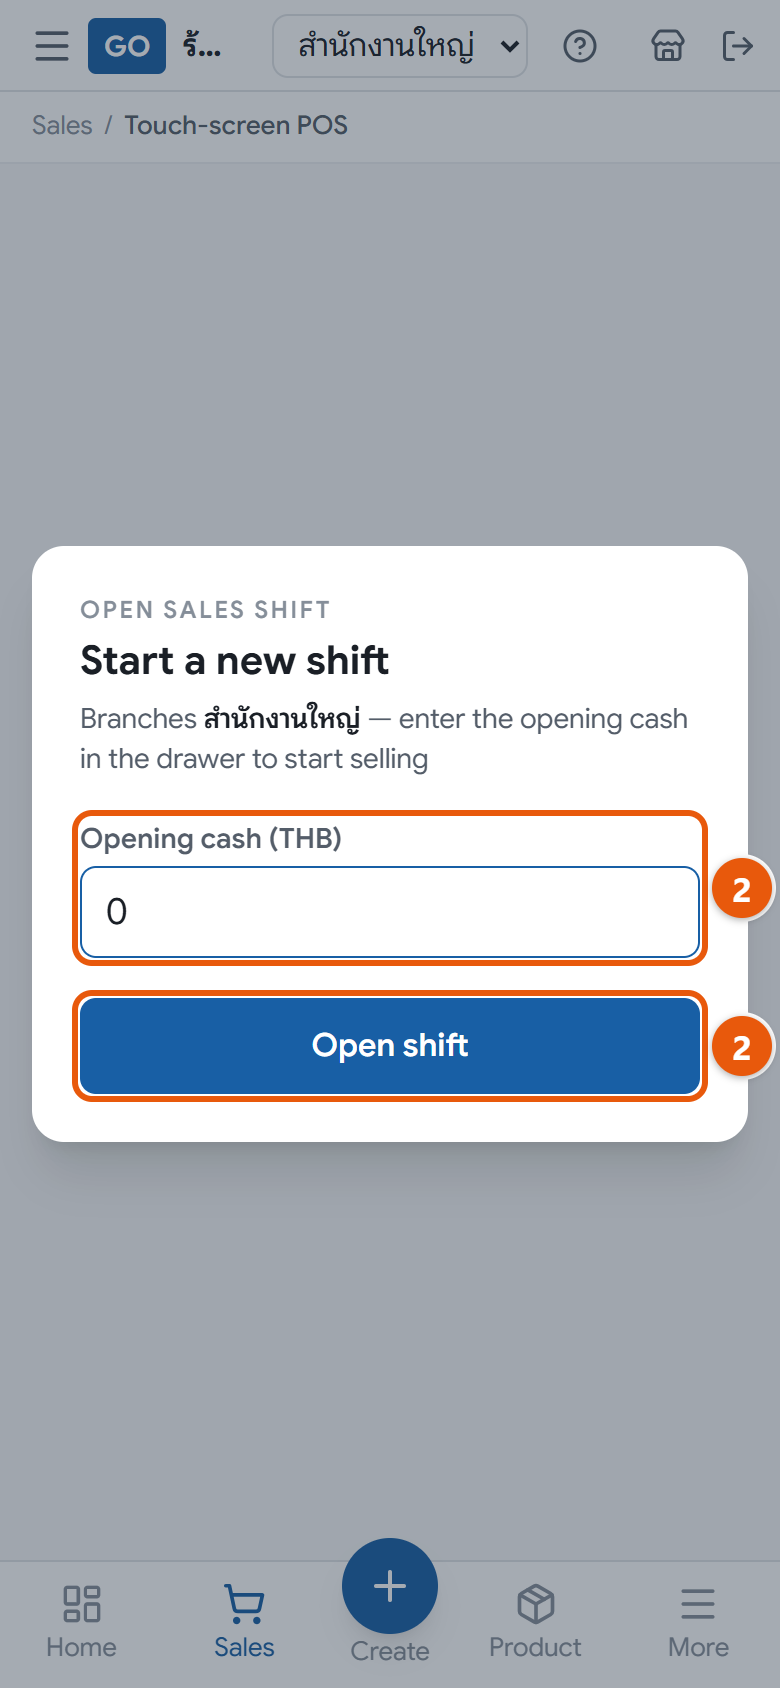
The POS on a phone: the start-a-new-shift window, where you enter the opening cash before selling
Do this
1The first time, the account used for selling must be linked to an employee. The owner opens HR then Employee, opens the seller’s record (add them first if needed, see step 25), picks the account under Sign-in account and presses Link account. Then open Touch-screen POS from the menu. On a phone, just tap Sales on the bottom bar.
2The Start a new shift window appears. Count the change in the drawer, enter it in Opening cash (THB), then press Open shift.
3Scan a barcode or type the product code in the scan box at the top and press Enter, or pick from Add product, enter a quantity and press the plus button.
4Choose how the customer pays, such as Cash or Bank transfer. For cash, enter Amount received and read the Change worked out for you.
5Press Pay. If the customer wants a receipt, press Print slip or Full A4 in the Latest bill bar.
6At closing time, count the drawer, press Close shift + Z-report, enter Actual cash counted (THB) and press Close shift.
When it worked: After each sale a message shows the receipt number and stock drops straight away. When you close the shift, a summary shows whether the drawer is exact, over or short.
If you get stuck
I can't open a shift; it says I'm not a salesperson of this business
The signed-in account isn’t linked to an employee yet. The owner opens that employee on the Employee page and presses Link account under Sign-in account. Each account can be linked to one employee only. If the account isn’t in the list, invite it to the business first (step 12).
I scanned a barcode and it says the product isn’t found
The POS scan box only matches the product code (SKU); it doesn’t read barcodes linked when receiving goods. Check the product code on the Product page, or pick the item from Add product instead.
I don’t see Close shift + Z-report
The sales staff role can sell but can’t close shifts, and the POS only closes the shift of the account that is signed in. If your staff need to close their own shifts, message LINE @791ibitd and our team will help.
16
Issue sales documents, from quotation to receipt
Customers who want a quotation, buy on credit or need a full tax invoice must be billed here, because the POS can’t pick a customer.
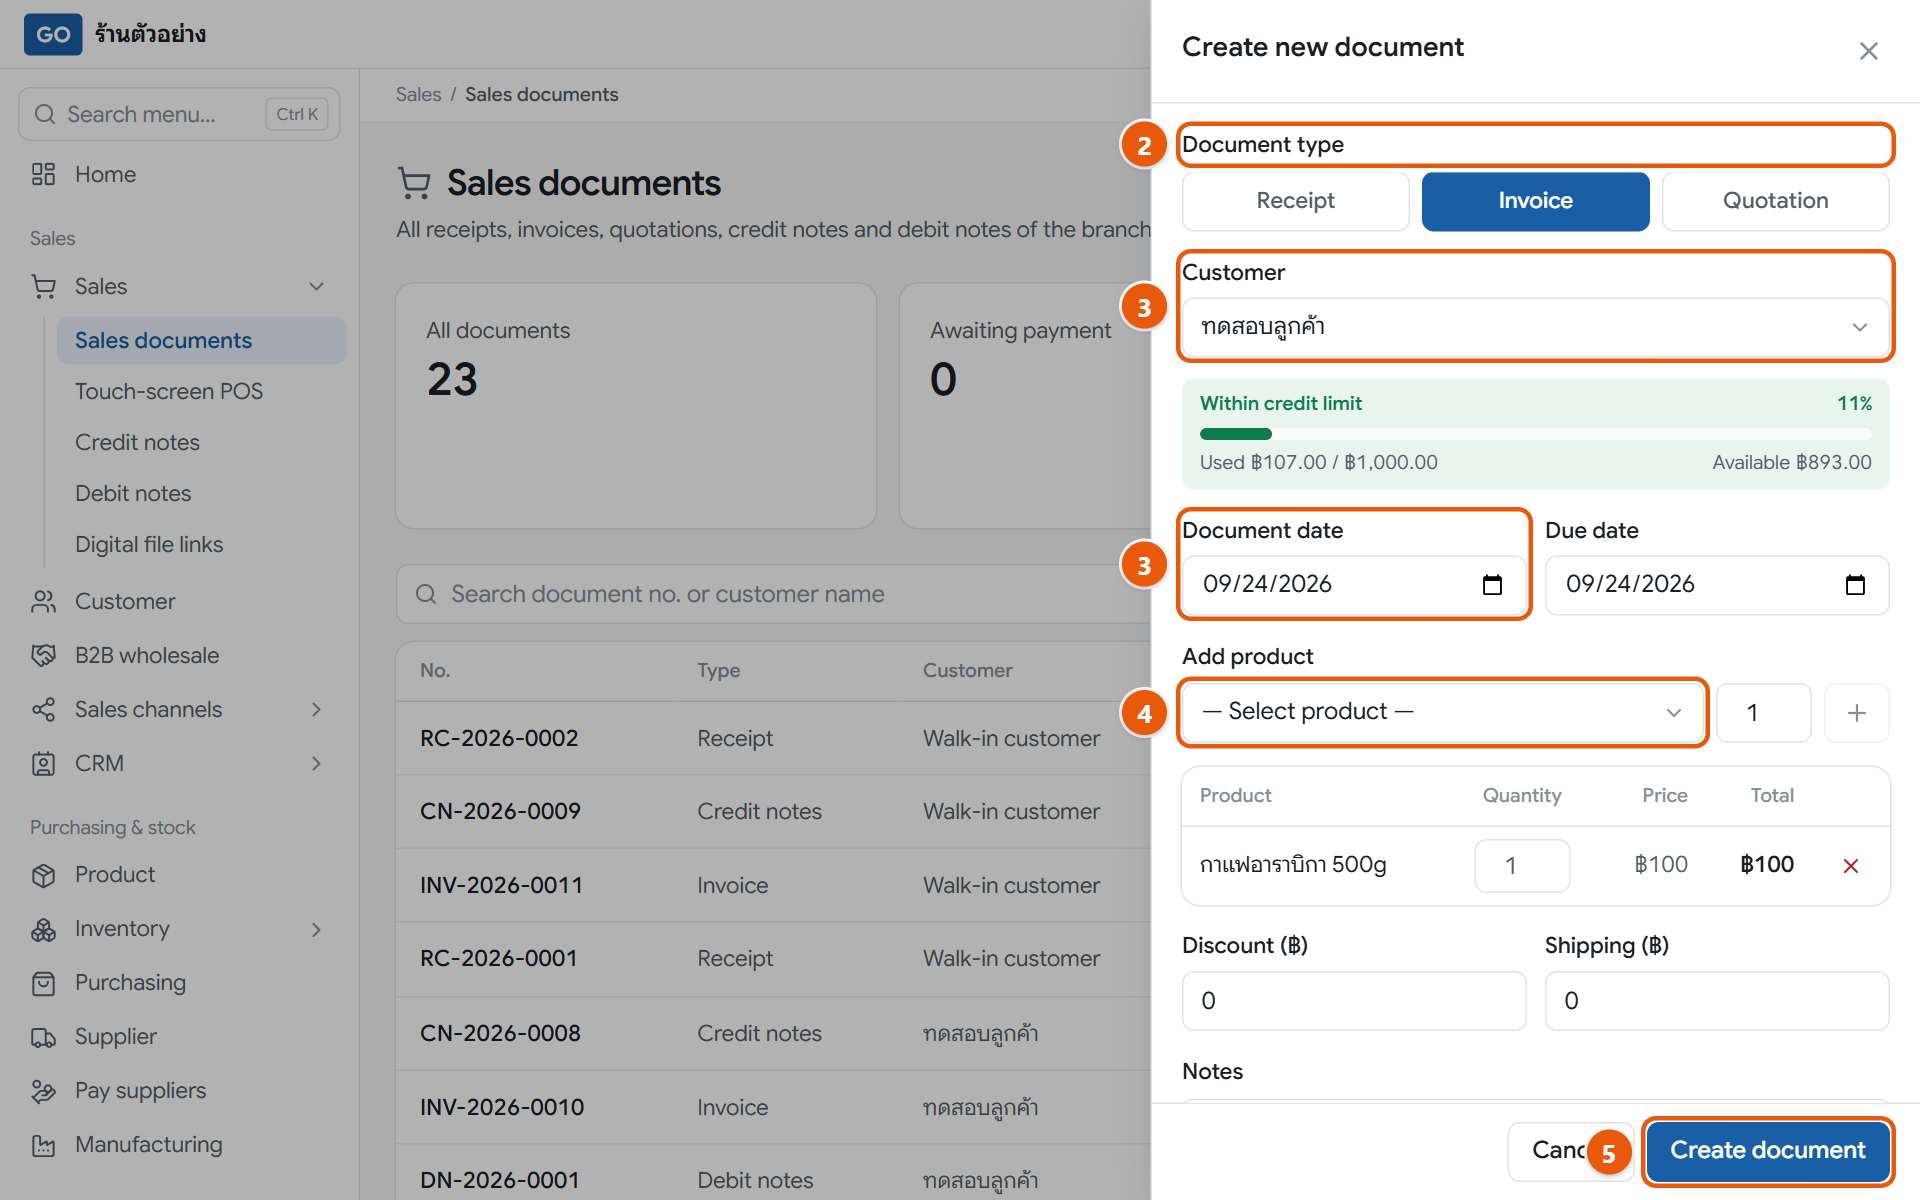
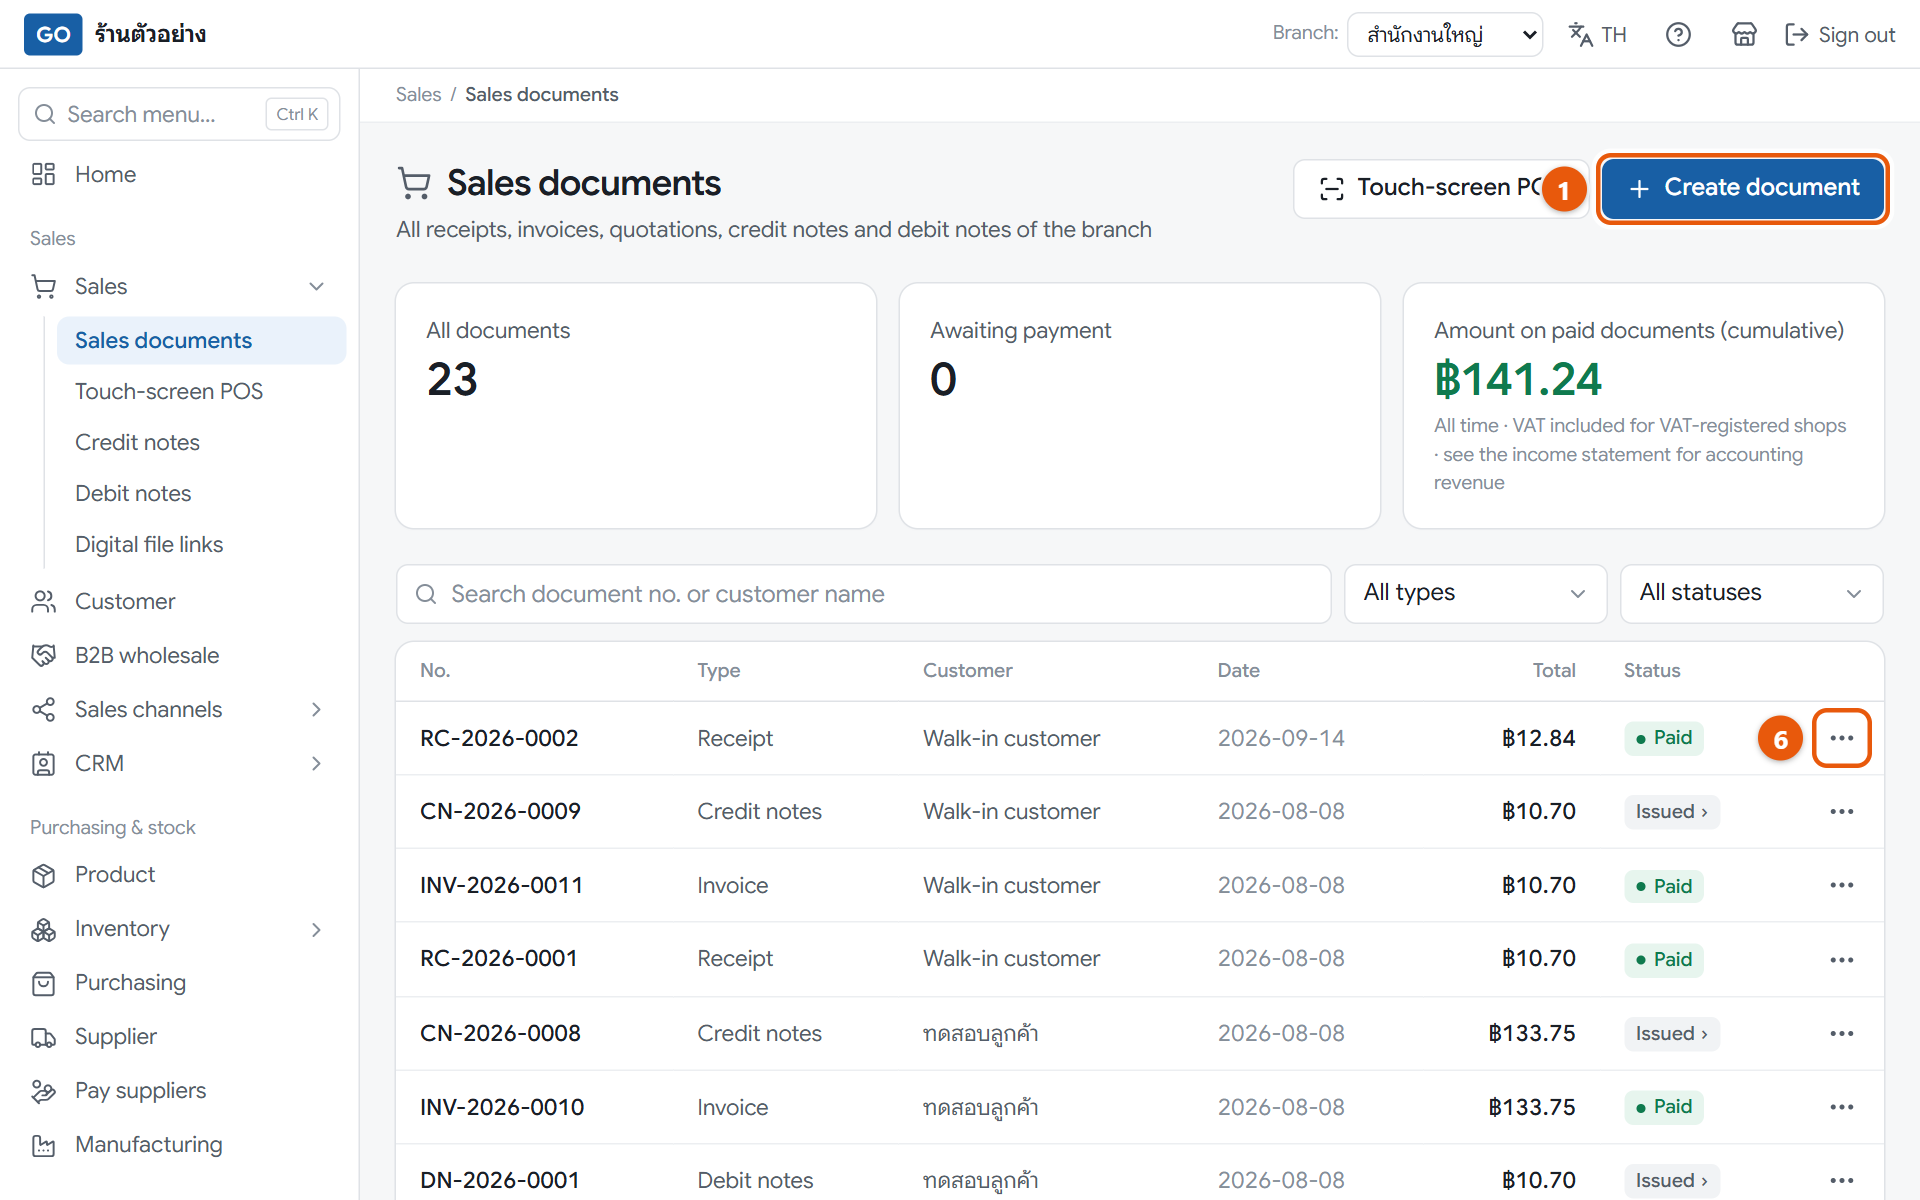
The new document panel with invoice, customer and items filled in, before pressing createThe sales documents list with the create button, status tags and the three-dot button at the end of each row
Do this
1Open Sales documents in the menu and press Create document.
2Under Document type, choose Quotation to quote a price, Invoice if the customer pays later, or Receipt if you have been paid.
3Pick a name in Customer (always pick one for customers who need a tax invoice), then check Document date and Due date.
4In Add product, pick an item, enter the quantity and press the plus button; repeat for each item. Add a Discount (฿) or Shipping (฿) if needed.
5Check the totals at the bottom, then press Create document at the bottom of the panel.
6When the customer pays an invoice, press the three-dot button on its row, choose Receive payment, enter Amount received (THB), choose a Payment method and press Save payment.
When it worked: The new document appears at the top of the table with its number. A receipt shows Paid; an invoice shows Outstanding until fully paid. Print it with Print in the three-dot menu.
If you get stuck
The customer accepted my quotation. How do I turn it into an invoice?
There is no convert button yet. Press Create document again, choose Invoice or Receipt and enter the same items. Quotations don’t touch stock or the accounts.
I can’t press create and red text says there isn’t enough stock
Lower the quantity to what you have, or receive stock first (step 19). Stock can’t go below zero.
I made a mistake on a bill. Can I edit it?
No. For a quotation press Delete. For an unpaid receipt or invoice press Cancel, then Void document, and issue a new one. If it has been paid, use a credit or debit note (step 17).
17
Returns, discounts after the sale, or charging extra
Issued bills can’t be edited. When a customer returns goods, gets a discount afterwards, or you undercharged, issue a credit or debit note against the original bill so sales, tax and stock stay correct.
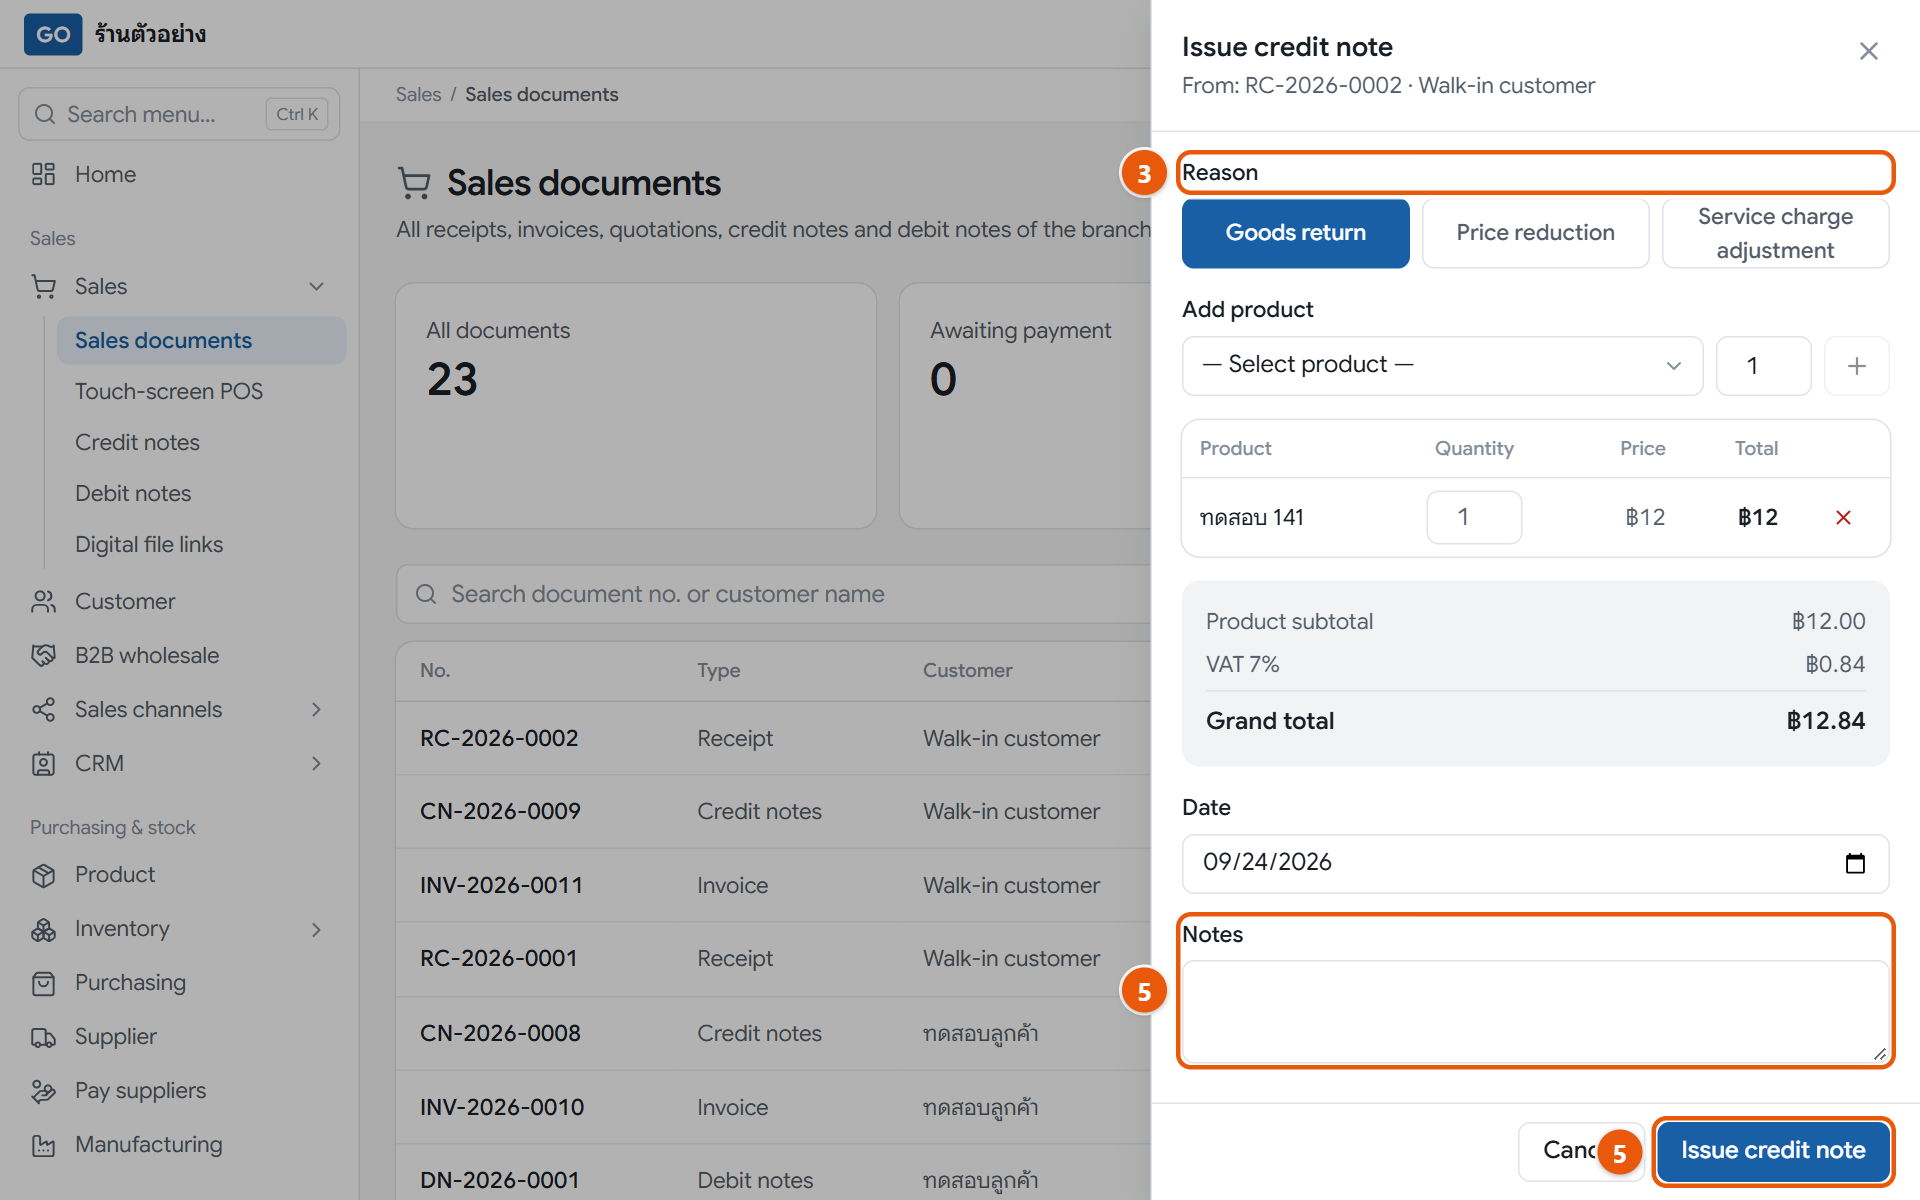
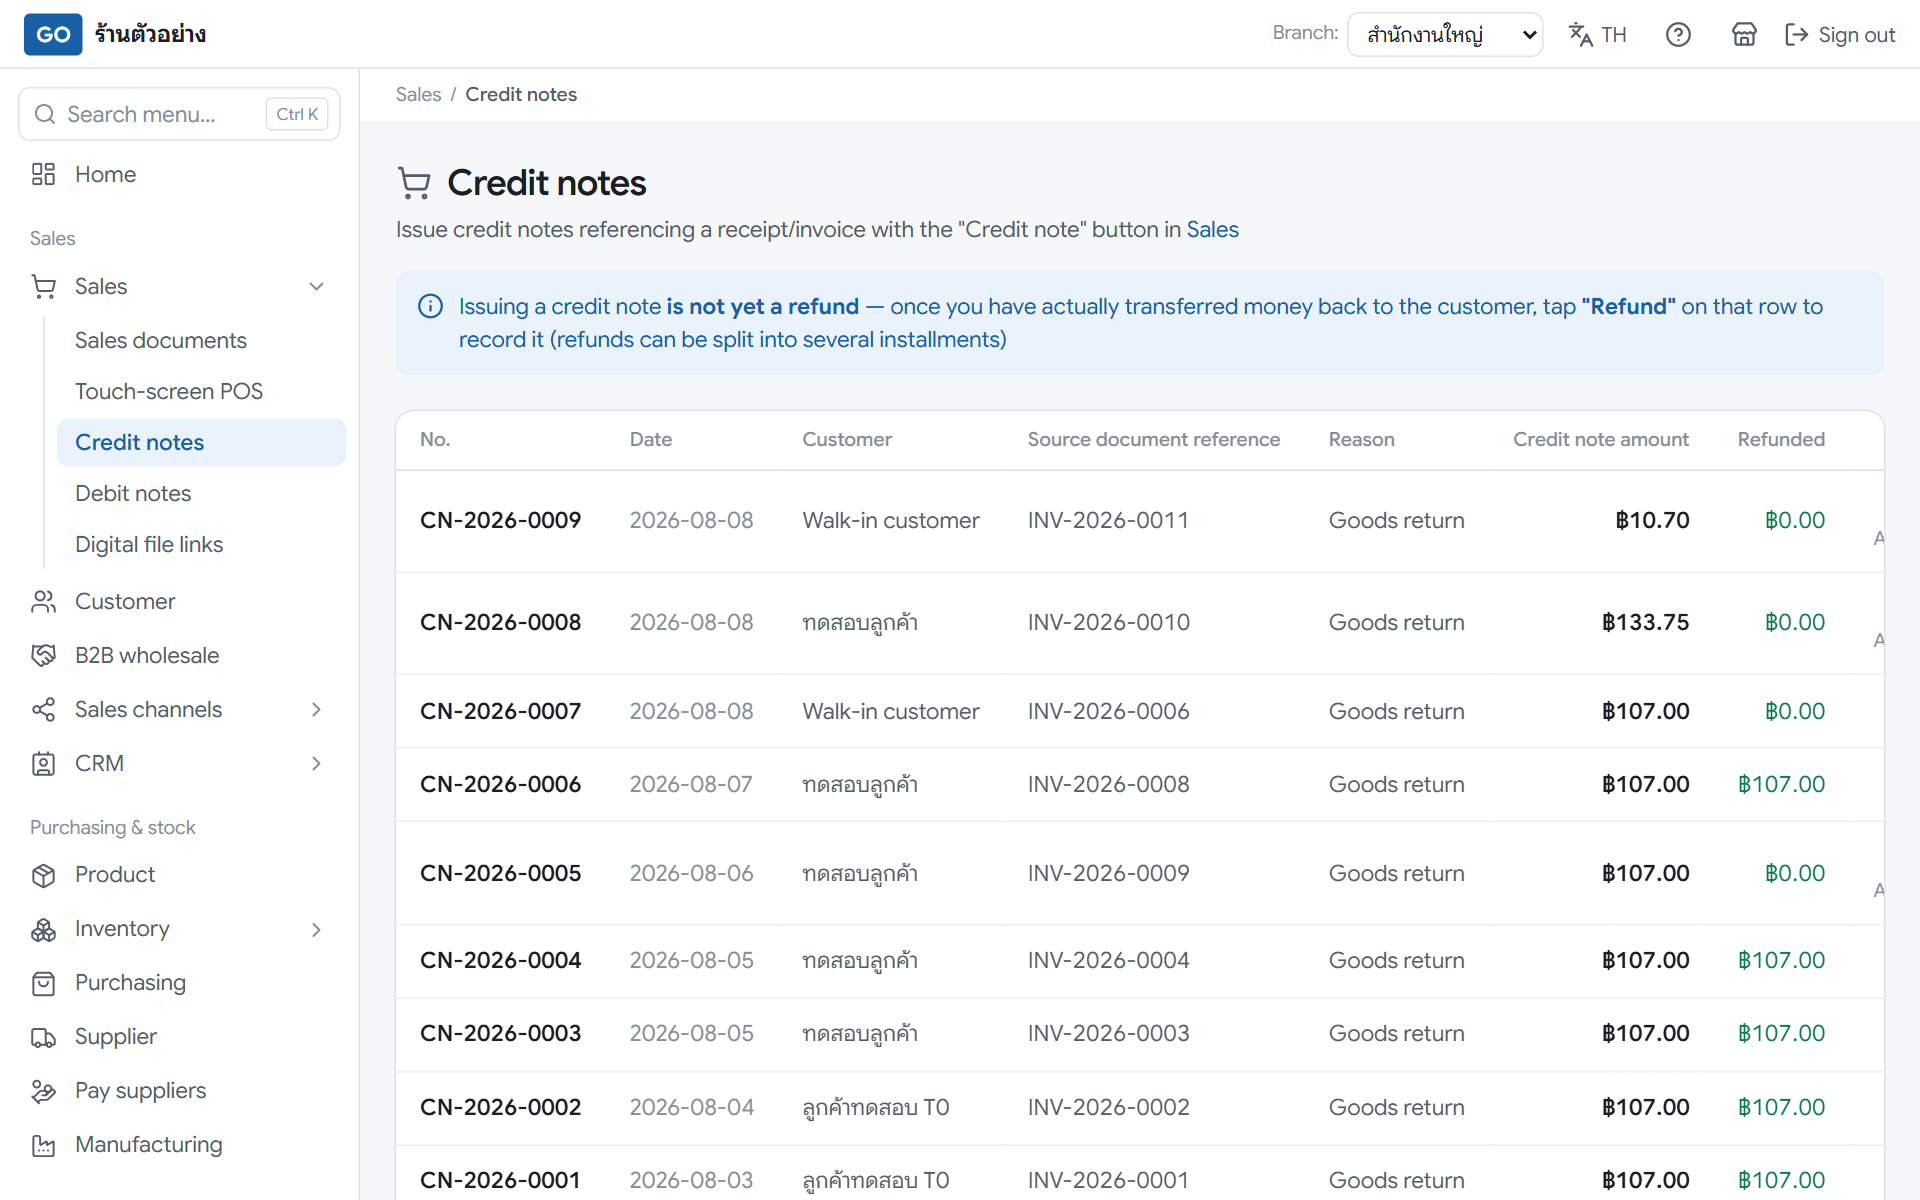
The credit note panel opened from an existing receipt with goods return selected, before issuingThe credit notes page showing refunded amounts, balances and the refund button
Do this
1Open Sales documents, find the original receipt or invoice and press the three-dot button on its row.
2For a return or a price cut, press Credit notes. To charge more, press Debit notes.
3On a credit note, under Reason choose Goods return and set the quantities actually returned. If you choose Price reduction, enter the Amount reduced (before VAT).
4On a debit note, enter the Additional amount charged (before VAT). VAT is added at the original bill’s rate.
5Fill in Date and Notes, then press Issue credit note or Issue debit note at the bottom of the panel.
6If the original was an invoice the customer already paid and you transfer money back, go to Credit notes in the menu, press Refund, then Save refund.
When it worked: The new note appears in the table tagged Issued, returned goods go back into stock, and the original invoice’s balance goes down or up accordingly.
If you get stuck
It says I must open a shift first
The original is a cash receipt, so the refund or extra cash goes through your shift’s drawer. Open a shift in Touch-screen POS with your own account at the same branch as the receipt, then come back and issue the note.
I don’t see Credit notes in the three-dot menu
It only appears on receipts and invoices that aren’t voided, and only for the owner, manager or accountant roles. Sales staff can’t issue it.
I issued the wrong note. Can I void it?
Credit and debit notes can’t be voided. Issue the opposite note against the original bill to reverse it; for example, if you charged too much extra, issue a credit note.
18
Check today’s sales and the morning summary on Home
A few seconds on Home each morning tells you how sales are going, who owes you, and what to deal with first today.
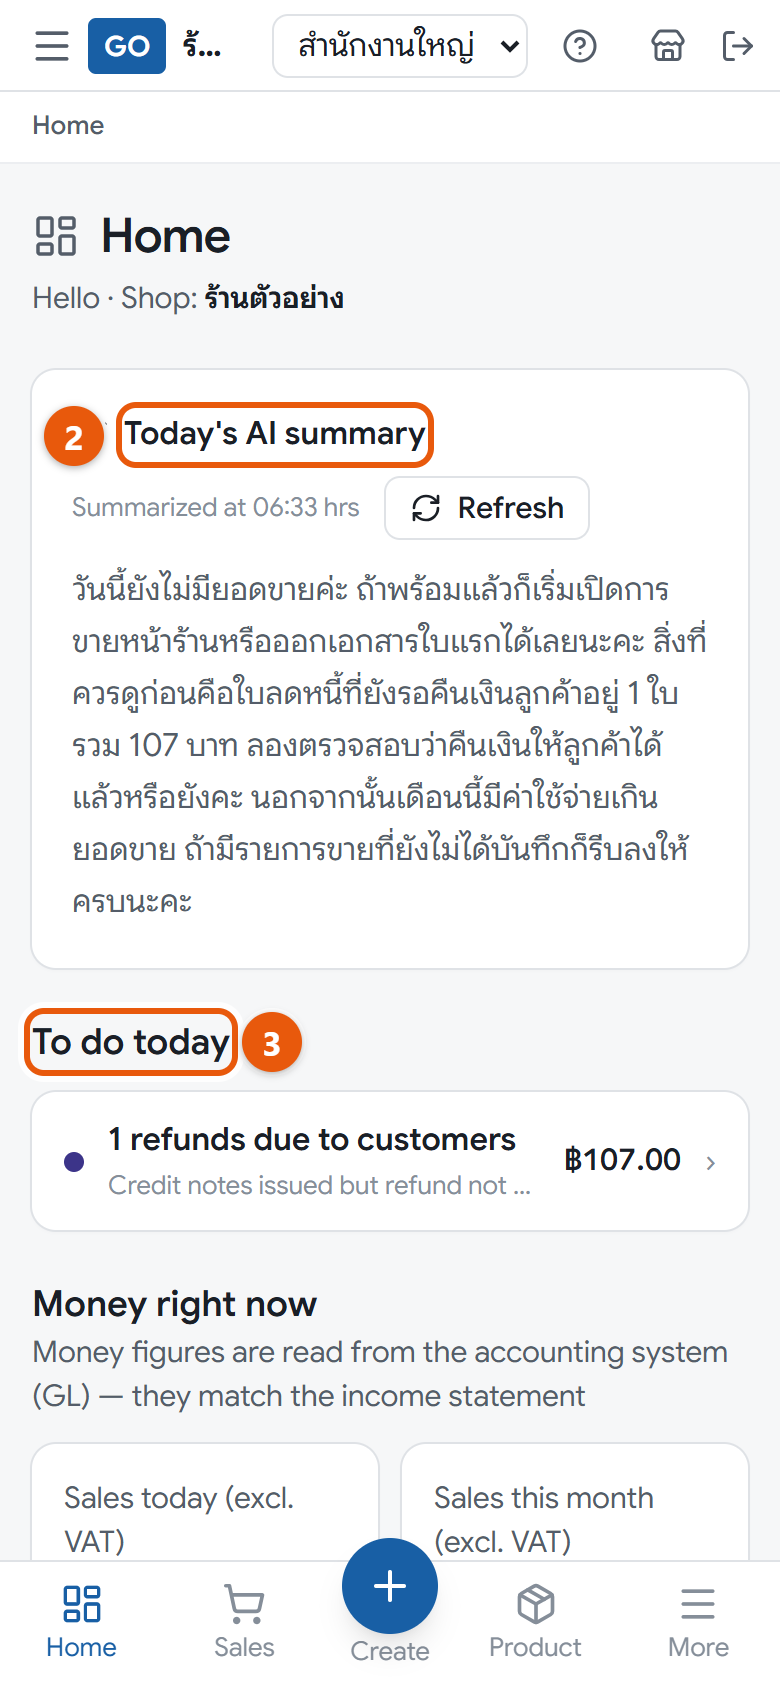
Home on a phone with the AI summary, today’s to-dos and money figures
Do this
1Open Home in the menu; it is also the first page you see after signing in.
2Read Today's AI summary. For a summary based on the latest figures, press Refresh.
3Look at To do today and tap a line to go to the page that handles it, such as overdue receivables or low stock.
4Look at Money right now. The today’s sales card compares with the same day last week, not yesterday.
5With several branches, change Branch: in the top bar, or choose All branches for combined figures.
6Use the Shortcuts buttons, such as POS or New sales document, to start work straight away.
When it worked: You see sales, receivables, payables and open tasks for the selected branch. When nothing is pending it says Nothing to do right now.
If you get stuck
Today’s sales don’t match the cash in the drawer
That’s normal. This figure comes from the accounts: billed sales before VAT, including credit sales not yet collected, not cash received. For the drawer, look at the shift-closing summary.
The AI summary doesn’t match the cards below
The summary was made at the time shown in Summarized at. Press Refresh to redo it; the whole shop can refresh up to 20 times a day.
Some cards are missing
Your role isn’t allowed to see that figure, so the card is hidden. It isn’t an error.
Buying, paying and stock
Weekly work
19
Order from suppliers and receive goods
A purchase order tells the supplier what you want. When the goods arrive, the program adds the stock, updates the cost and creates the bill you owe the supplier.
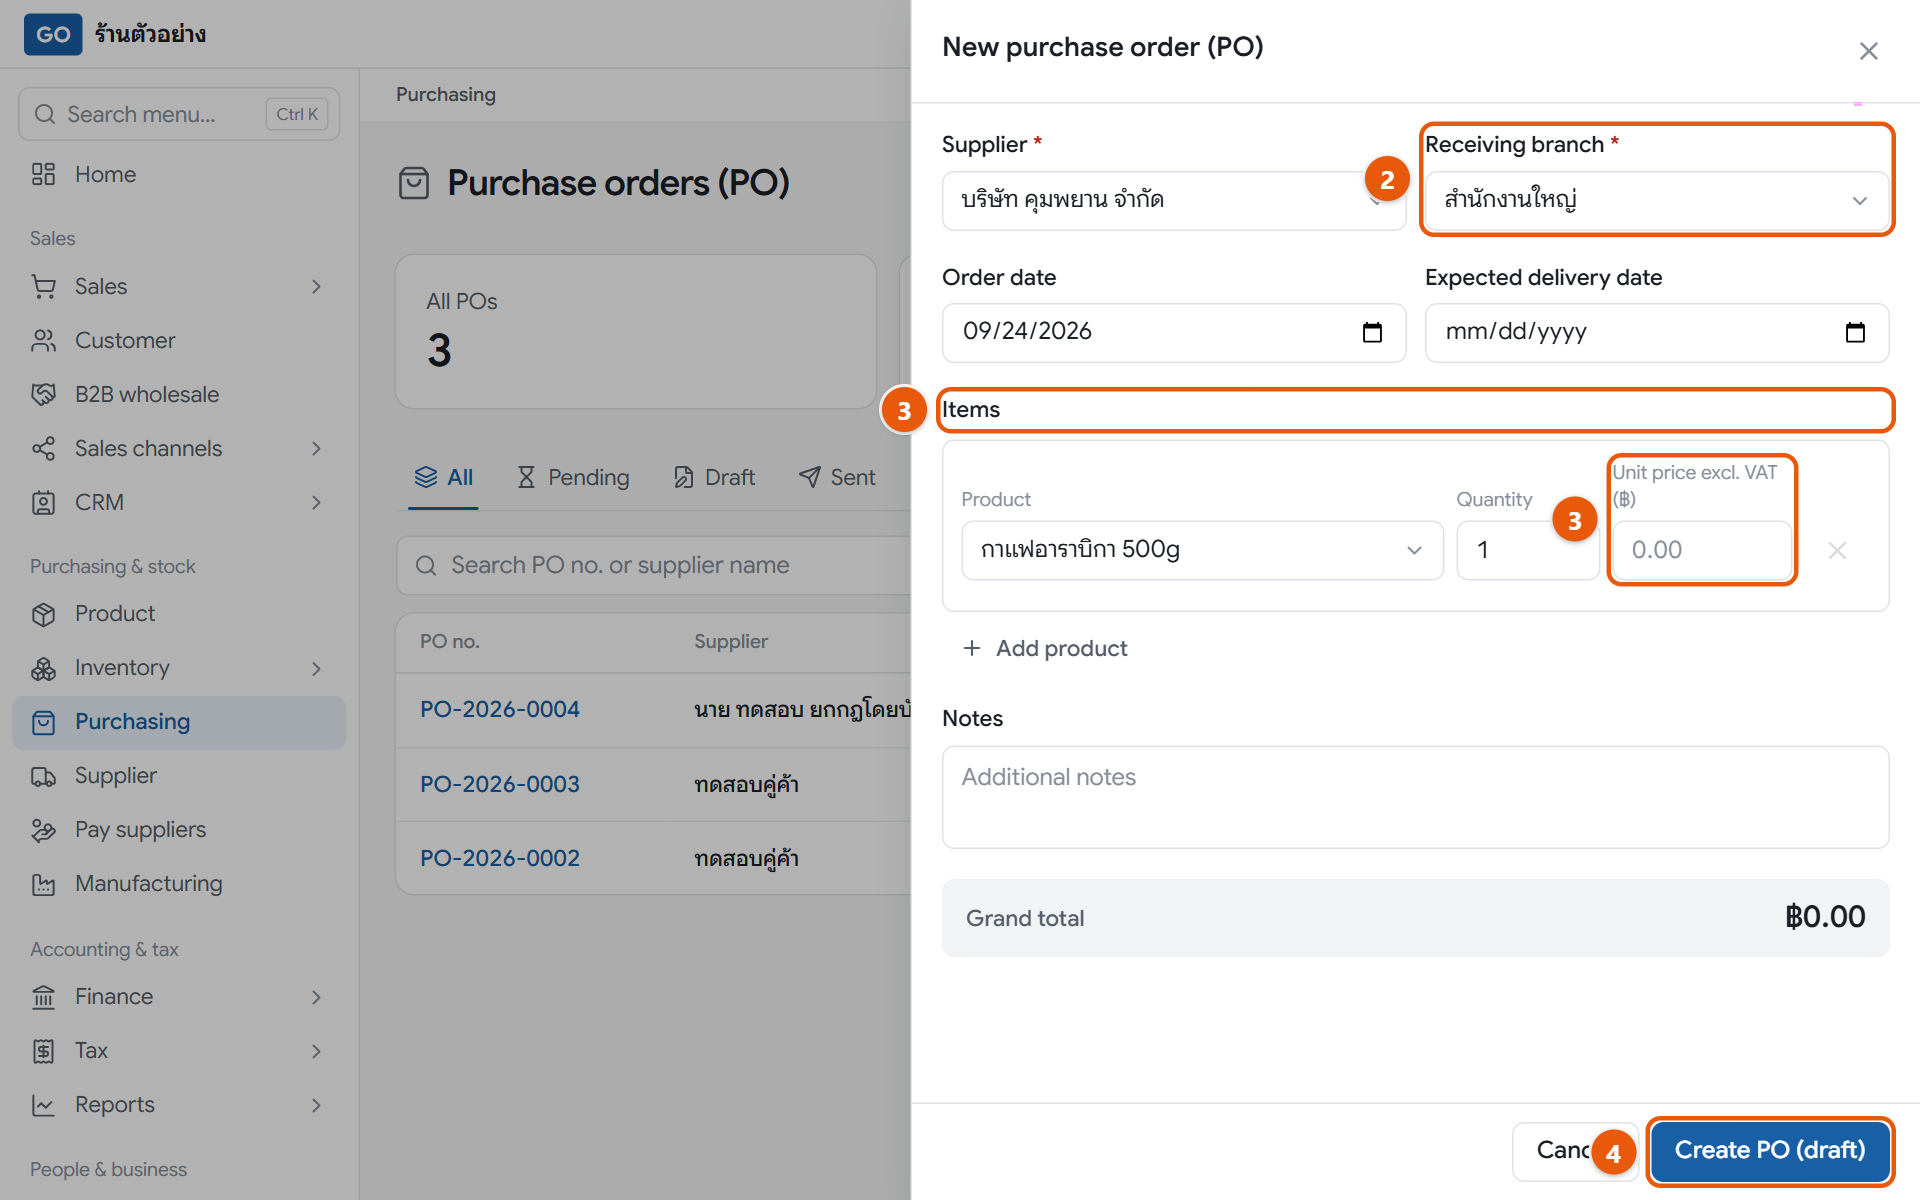
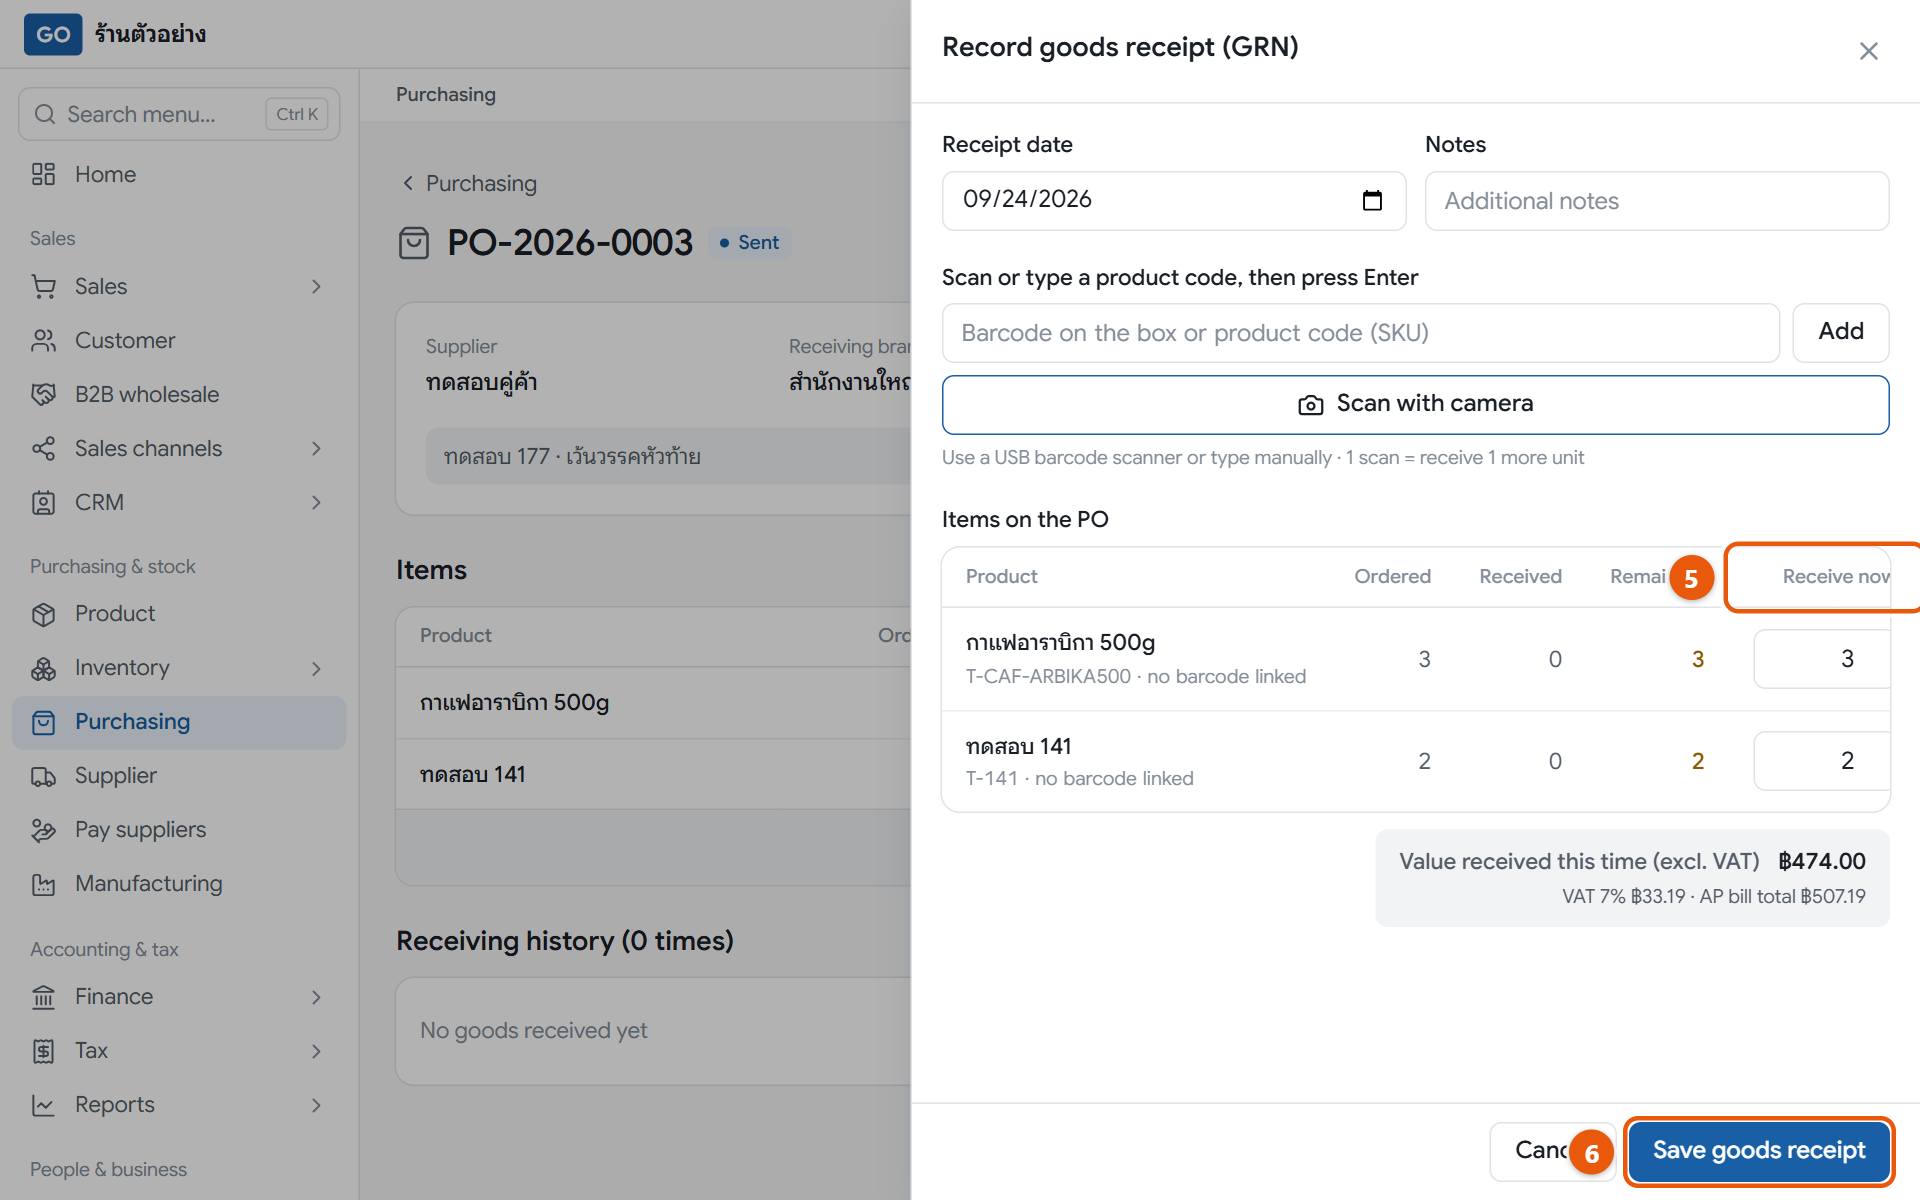
The new purchase order panel with a supplier and items filled in, before pressing createThe receiving panel of a sent PO, with outstanding quantities pre-filled, before saving
Do this
1Open Purchasing in the menu and press New PO.
2Pick the supplier in the Supplier box and choose the Receiving branch. If the supplier isn’t listed, add it first (step 11).
3Under Items, pick a product and enter the Quantity and Unit price excl. VAT (฿). Press Add product for more lines.
4Press Create PO (draft), then Mark as sent to supplier. Send it to the supplier yourself: press Print document and save it as a PDF.
5When the goods arrive, open that PO, press Receive goods (GRN) and set Receive now to what actually arrived.
6Press Save goods receipt.
When it worked: A message shows the goods receipt number and the supplier bill number, stock goes up straight away, and the PO shows Done if everything arrived or Partially received if some is still to come.
If you get stuck
I don’t see Receive goods (GRN)
The PO is still a draft. Press Mark as sent to supplier first and the receive button will appear.
Only part of the order came, or more than I ordered
If only part came, enter what arrived and receive again when the rest comes. Extra goods can’t be received on this PO; create a new PO for them.
The supplier charged a different price from the PO
Change Unit price excl. VAT (฿) in the receiving panel before saving. The cost and the supplier bill use the corrected price.
20
Pay your suppliers
Each time you receive goods, the program creates the bill you owe. Recording payments as you make them shows who you still owe and helps you pay on time.
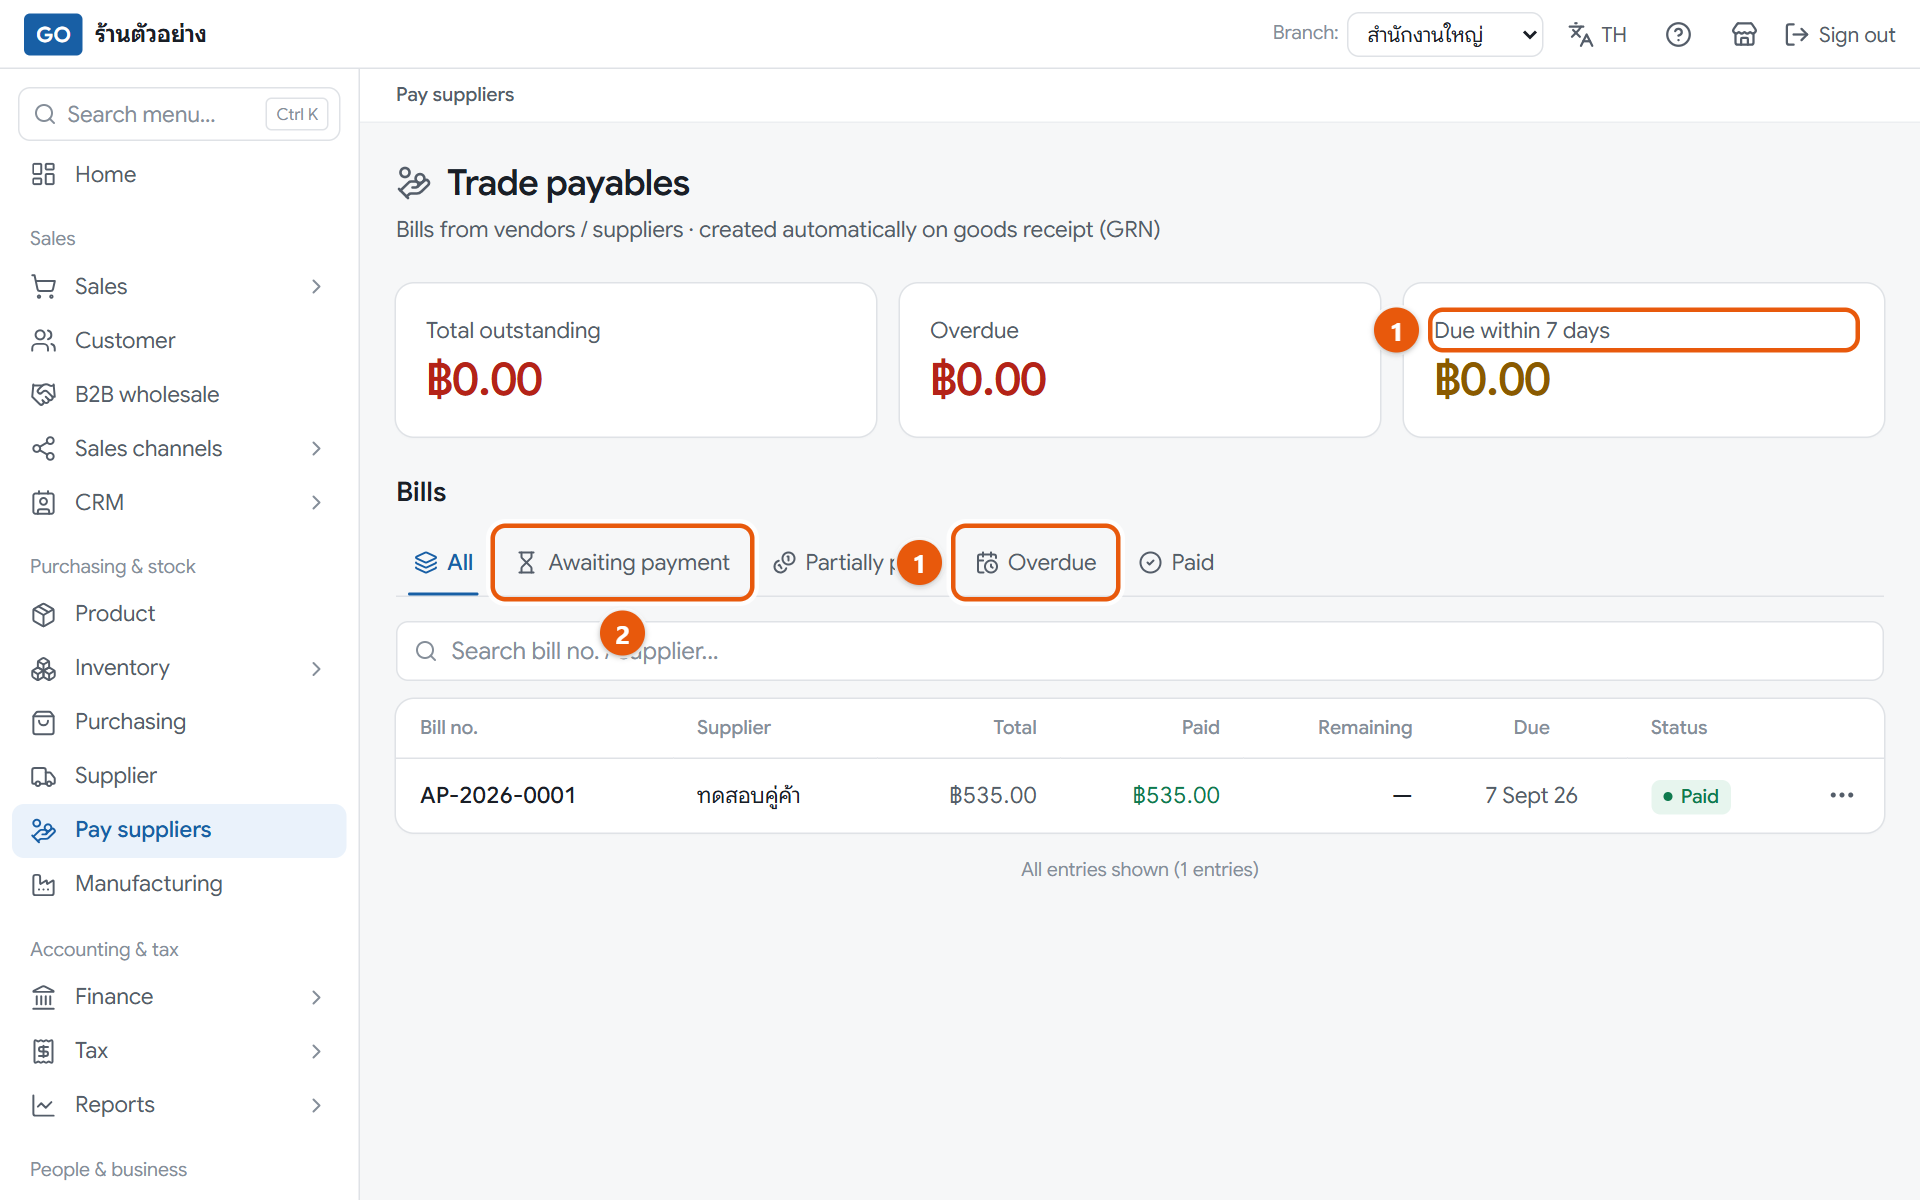
The pay suppliers page with balance cards, status tabs and the bill list
Do this
1Open Pay suppliers in the menu and check the Overdue and Due within 7 days cards.
2Press the Awaiting payment tab, then the three-dot button on the bill you want to pay, and choose View details.
3If you are VAT-registered and have the supplier’s tax invoice, press Enter tax invoice, fill in Tax invoice no. and Tax invoice date from it, then press Save.
4Press Record payment. Payment amount (gross) (THB) is pre-filled with the balance; if you are paying part of it, change it to the amount paid.
5Choose the Payment method, and fill in the Payment date and Reference no. / cheque no. if you have one.
6Press Save payment. If the bill has withholding tax set up, the button reads Save + issue 50 Tawi and takes you to the certificate to print.
When it worked: The bill shows Paid or Partially paid, and the payment appears in the bill’s payment history.
If you get stuck
I can’t find a supplier bill
Bills only come from receiving goods on a purchase order; you can’t create one yourself. If goods were received but no bill appeared, message LINE @791ibitd. Costs without a purchase order, such as rent, go in step 21.
A bill is past due but still says awaiting payment
The overdue status doesn’t update itself on screen yet. Look at the days-overdue text under the due date, or the Payables aging report at the bottom of the list.
I don’t see Record payment
Only the owner and accountant see this button. Managers and warehouse staff can view bills but can’t record payments.
21
Record other expenses and see who owes you
Rent, electricity, delivery and other costs that don’t come from a purchase order must be recorded here so your profit is right. The same page shows which customers still owe you.
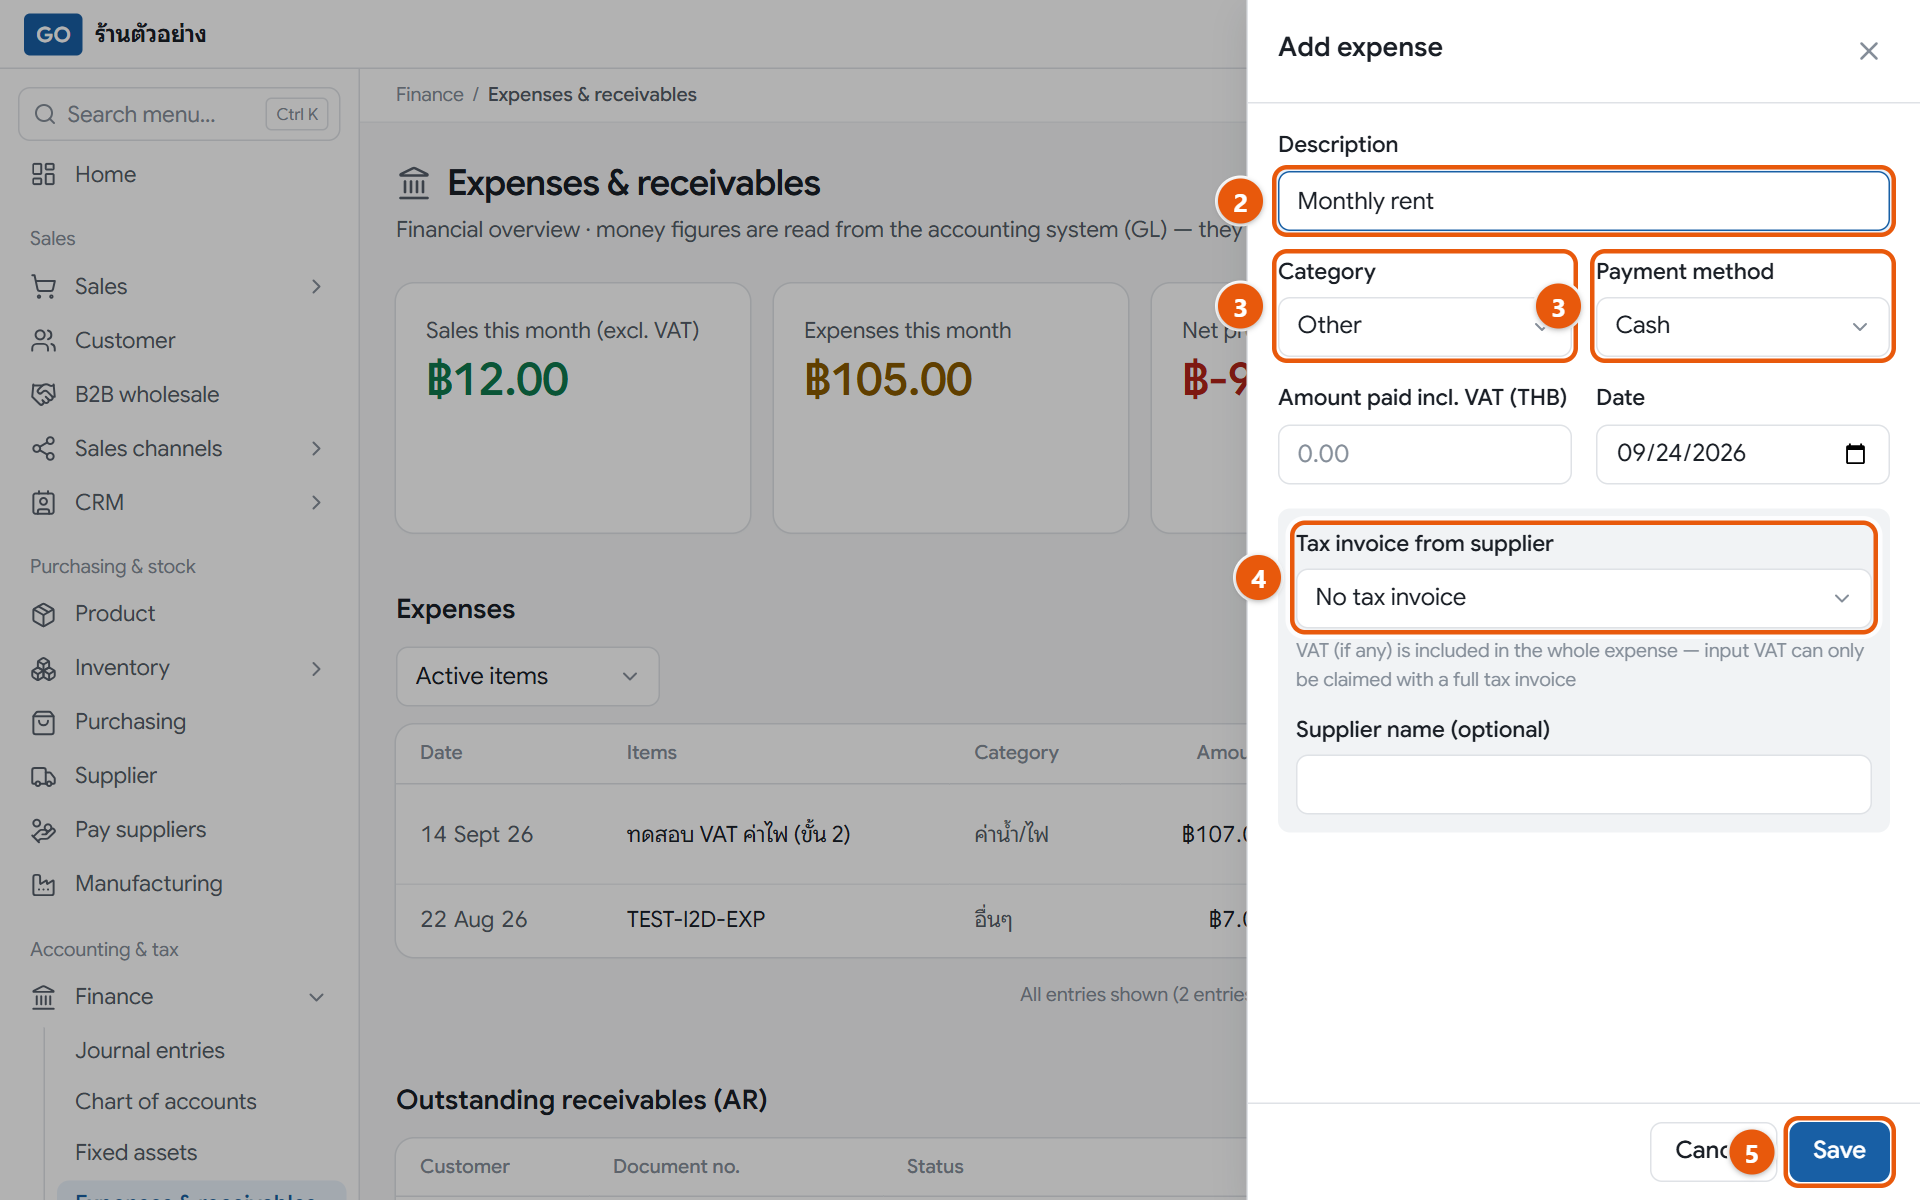
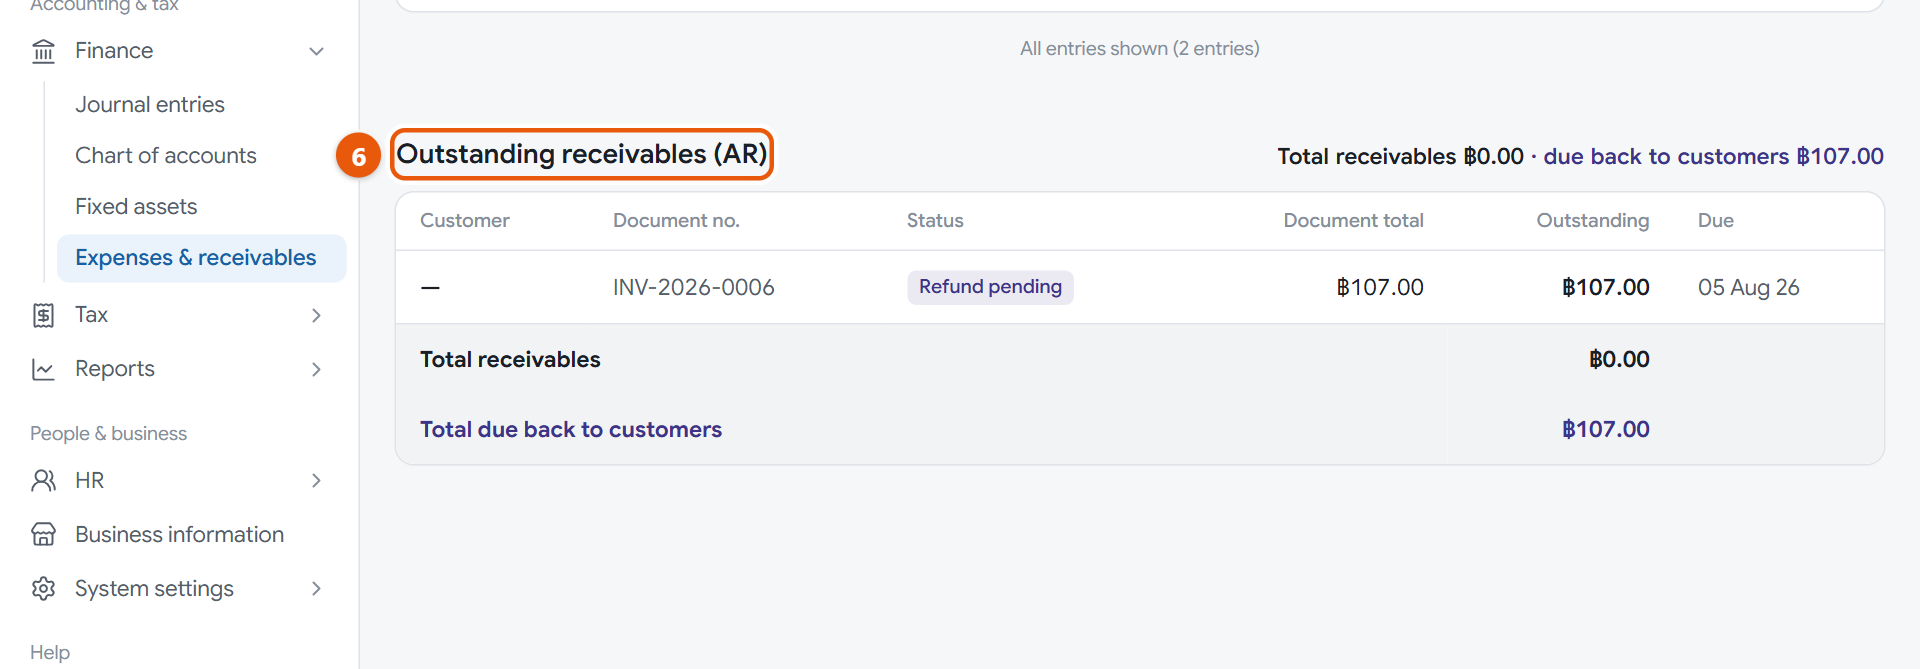
The add expense panel with the description filled in, before savingThe outstanding receivables table, showing each document with its balance and due date
Do this
1Open Finance in the menu and press Expenses & receivables. With several branches, first set Branch: to the branch that paid.
2Press Add expense and fill in Description, for example monthly rent.
3Choose a Category and Payment method, then enter the amount and the Date. VAT-registered shops see the amount box as Amount paid incl. VAT (THB); enter the total on the receipt.
4If you are VAT-registered and have a full tax invoice, under Tax invoice from supplier choose Full tax invoice (VAT claimable), then fill in the supplier’s invoice number, date, name and tax ID from it.
5Press Save. The accounting entry is made for you.
6Scroll down to Outstanding receivables (AR) to see who owes how much. Rows with a red background are overdue.
When it worked: The expense appears in the table with its category, and the Expenses this month and Net profit cards update straight away.
If you get stuck
I recorded an expense wrongly
It can’t be edited or deleted. Press the three-dot button on its row, choose Cancel, then Void expense, and press Add expense to record it again.
Do I also record supplier bill payments here?
No. Bills from received goods are paid under Pay suppliers (step 20). Recording them here too would count the cost twice.
A customer has paid. How do I clear it from the receivables table?
This table is view-only. Receive the payment in Sales documents: press the invoice’s three-dot button and choose Receive payment (step 16).
22
Transfer stock between branches
Moving goods with a transfer document keeps both branches’ stock right and records who sent and received what, and when.
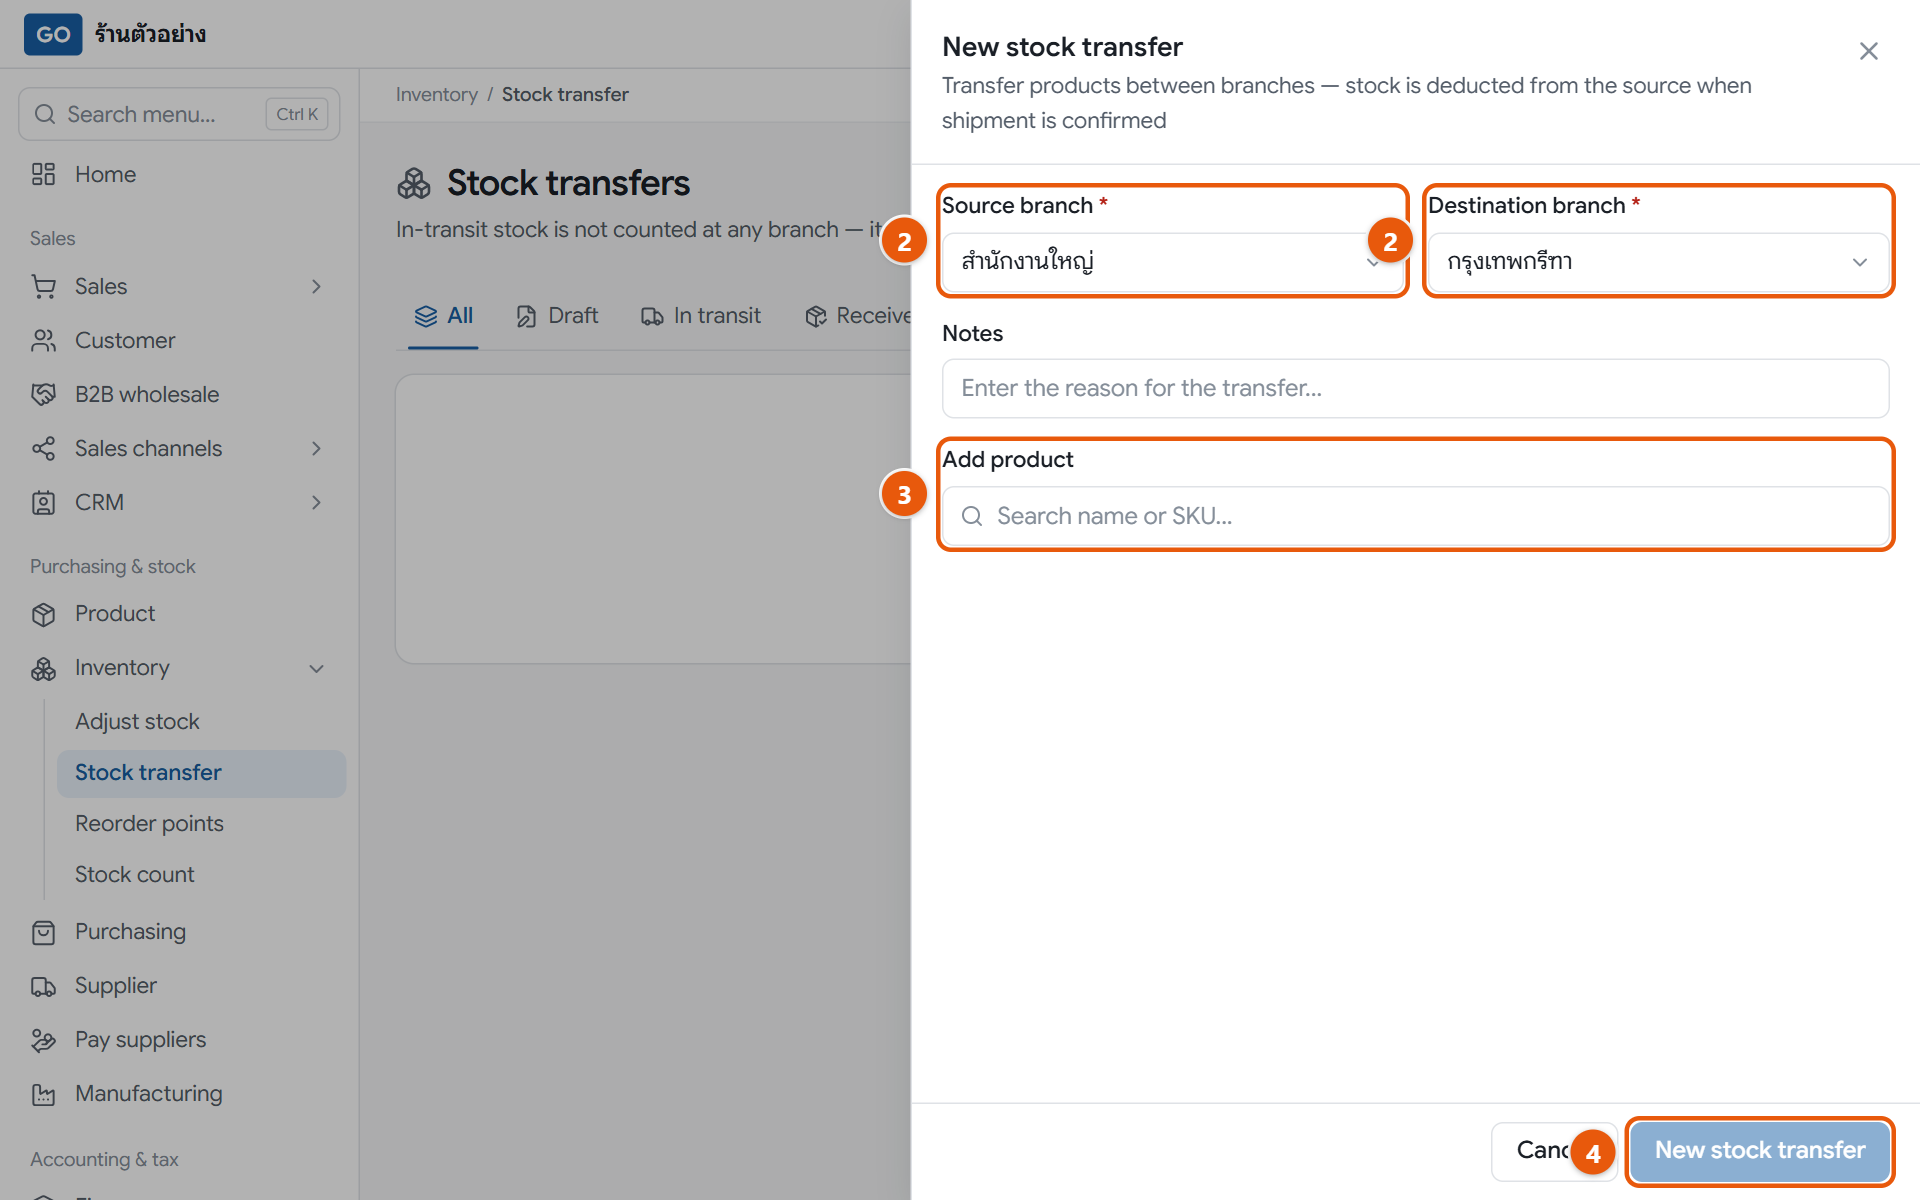
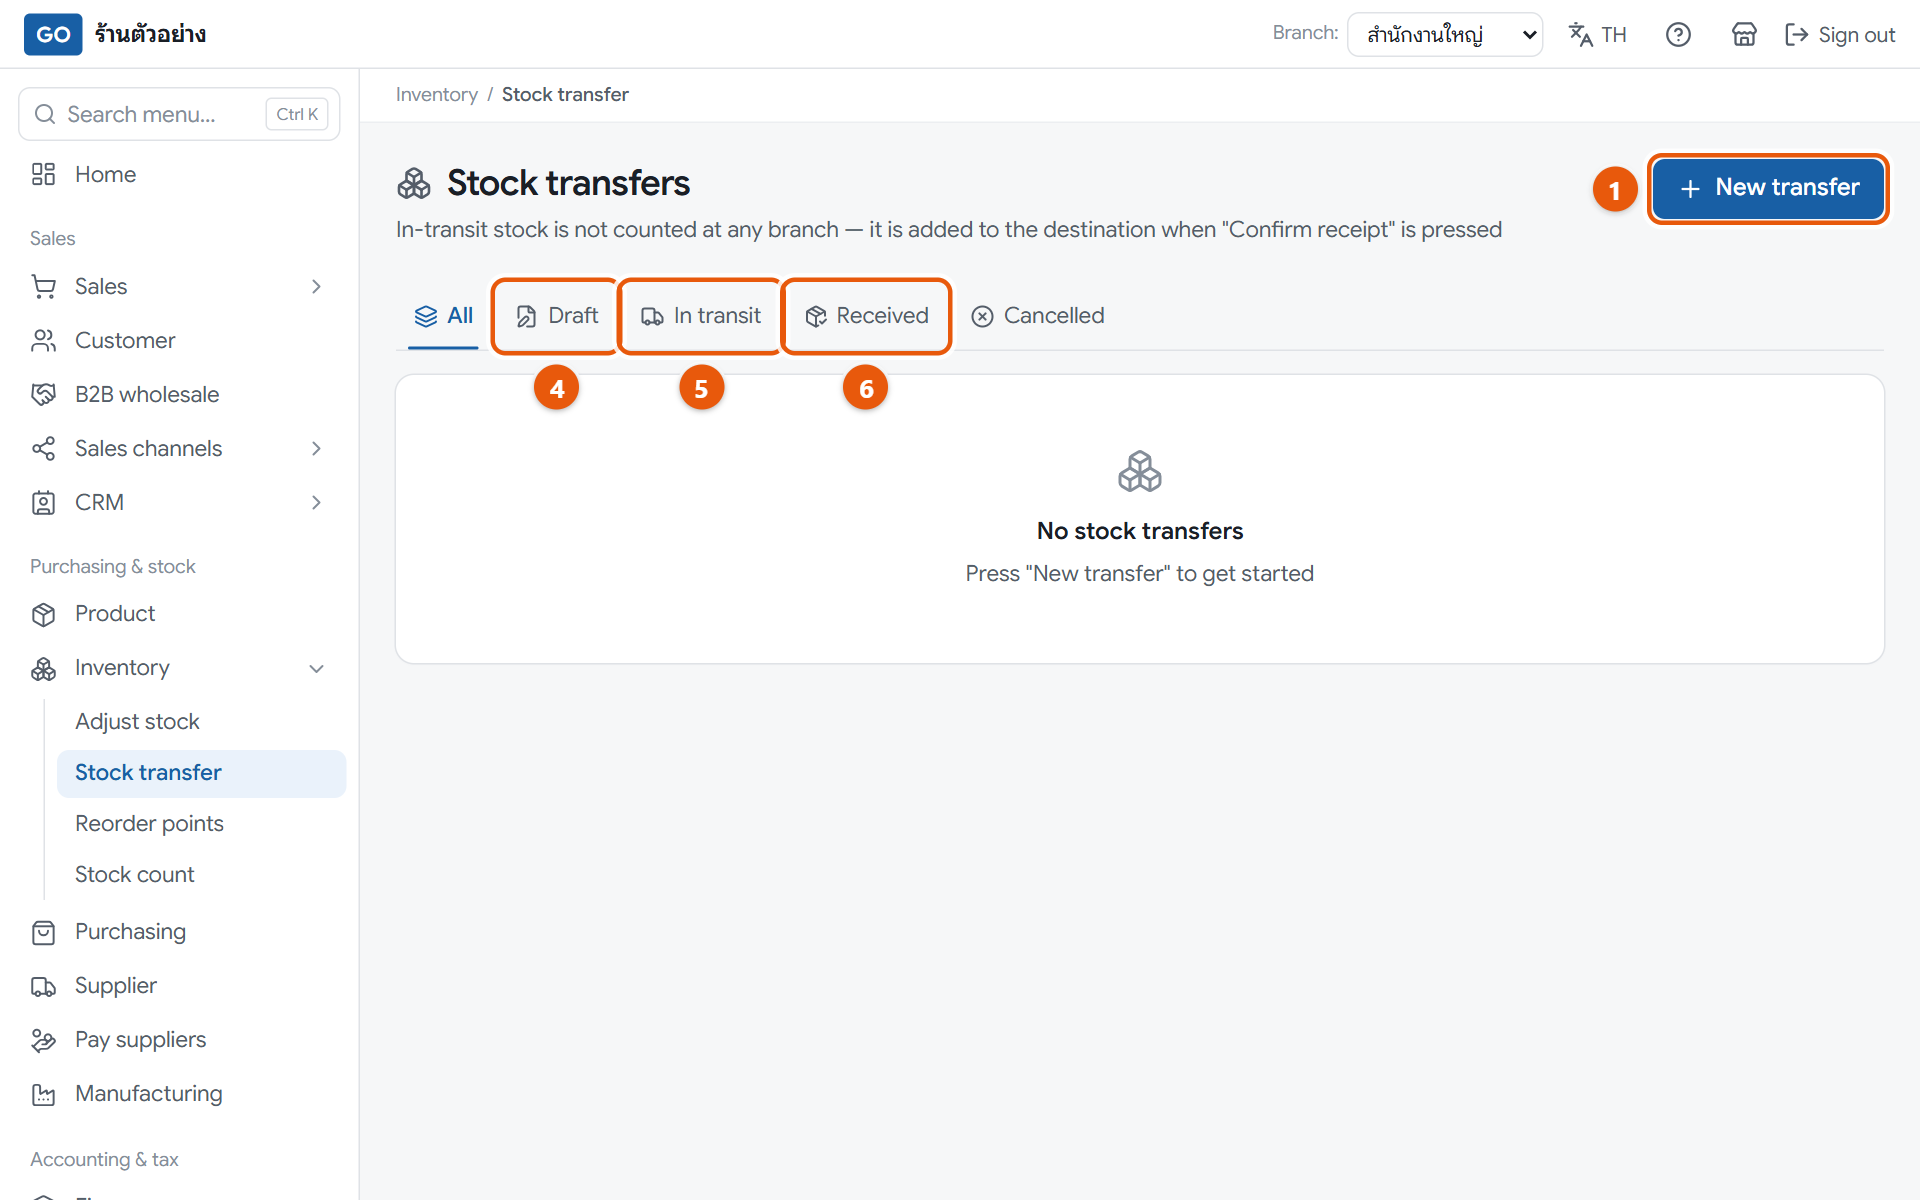
The new stock transfer panel with the source and destination chosen, before creatingThe stock transfers page with the draft, in transit and received tabs
Do this
1Open Inventory in the menu, press Stock transfer, then New transfer.
2Choose the Source branch and the Destination branch.
3Type a product name or code in Add product, pick it, and enter the Transfer qty for each item.
4Press New stock transfer. It is saved as a draft and stock doesn’t move yet.
5When the goods leave, press the send button for the source branch at the top right, then OK. Stock is taken off the source branch.
6When the goods arrive, someone at the destination branch opens the same transfer, presses the receive button for that branch, then OK.
When it worked: The transfer shows Received, and the stock has moved from the source to the destination branch.
If you get stuck
The quantity box turns red and says Exceeds stock
You can’t send more than the source branch has. Lower the quantity.
The destination branch can’t receive
The person receiving must have access to the destination branch, and the transfer must already be sent. Ask someone at the destination branch to receive it.
Not everything arrived
Receiving always takes the full quantity on the transfer. Receive it first, then reduce the missing amount under Adjust stock at the destination branch with the reason Lost goods.
23
Count your stock regularly
Losses, damage and receiving mistakes slowly pull the program’s figures away from what is really on the shelf. Count every month and let the program correct them.
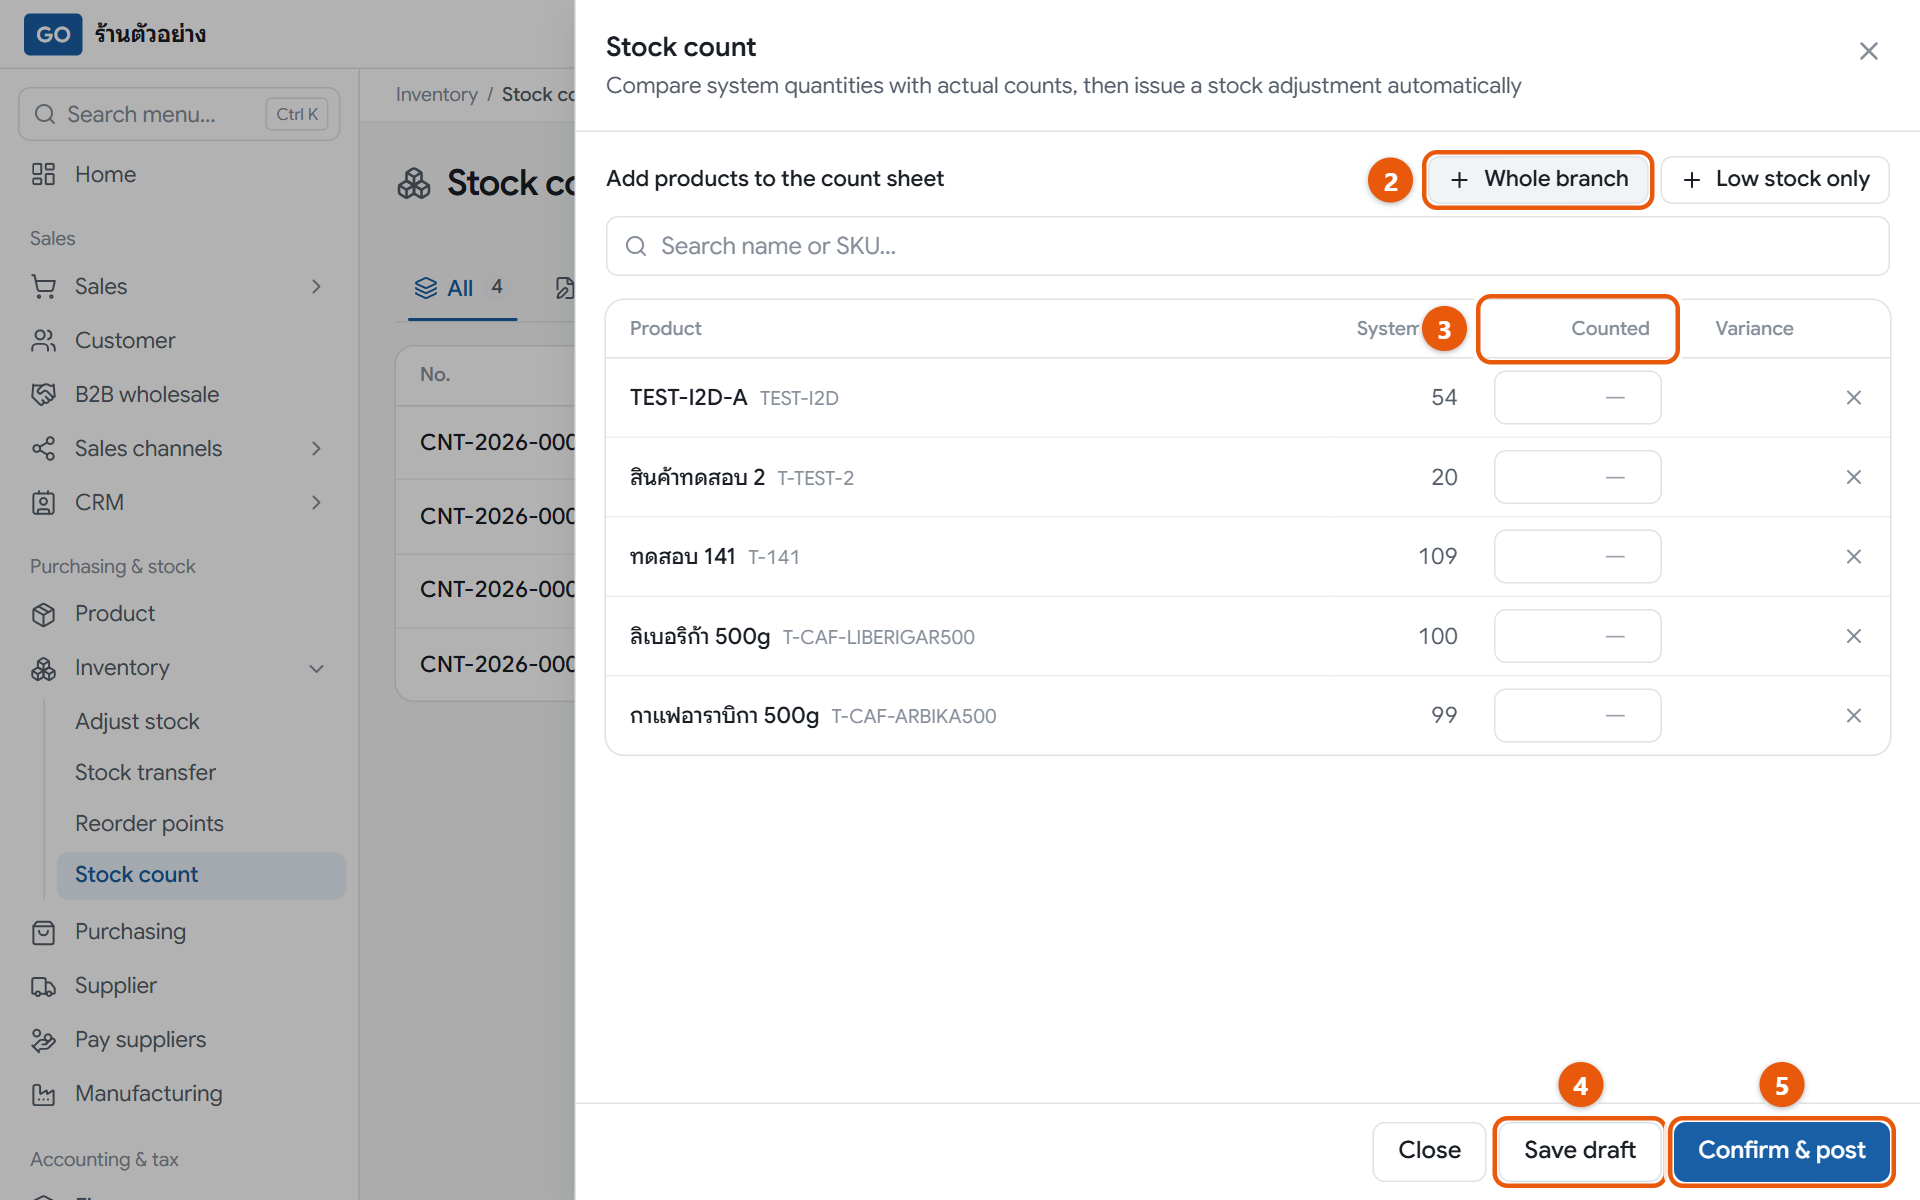
A new count sheet with the whole branch added and Counted boxes to fill, before saving
Do this
1Set Branch: to the branch you are counting, then open Inventory and press Stock count.
2Press New count sheet, then Whole branch to add every item, or Low stock only to count just the items running low.
3Count what is on the shelves and type it in Counted. Leave items you haven’t counted blank.
4Not finished? Press Save draft and reopen the same sheet later to carry on.
5When you finish, press Confirm & post, check the summary of differences, then press Confirm and issue adjustment.
When it worked: You see Stock adjustment issued with its number, the count sheet shows Adjusted, and the program’s stock now equals what you counted.
If you get stuck
It says there are no differences and makes no adjustment
Everything you counted matches the program. If you no longer need the sheet, press Void count sheet.
I closed the panel and lost the numbers I typed
Numbers are only kept when you press Save draft. For a big count, save the draft every so often.
Can I count while the shop is still selling?
When you confirm, stock is set to the numbers you counted, so anything sold after you counted an item won’t be deducted. Count while the shop is closed, or confirm as soon as you finish.
24
Set reorder points so you’re warned before running out
Tell the program at what level each item should be reordered, and it lists everything running low with a suggested quantity, so you don’t have to check the shelves yourself.
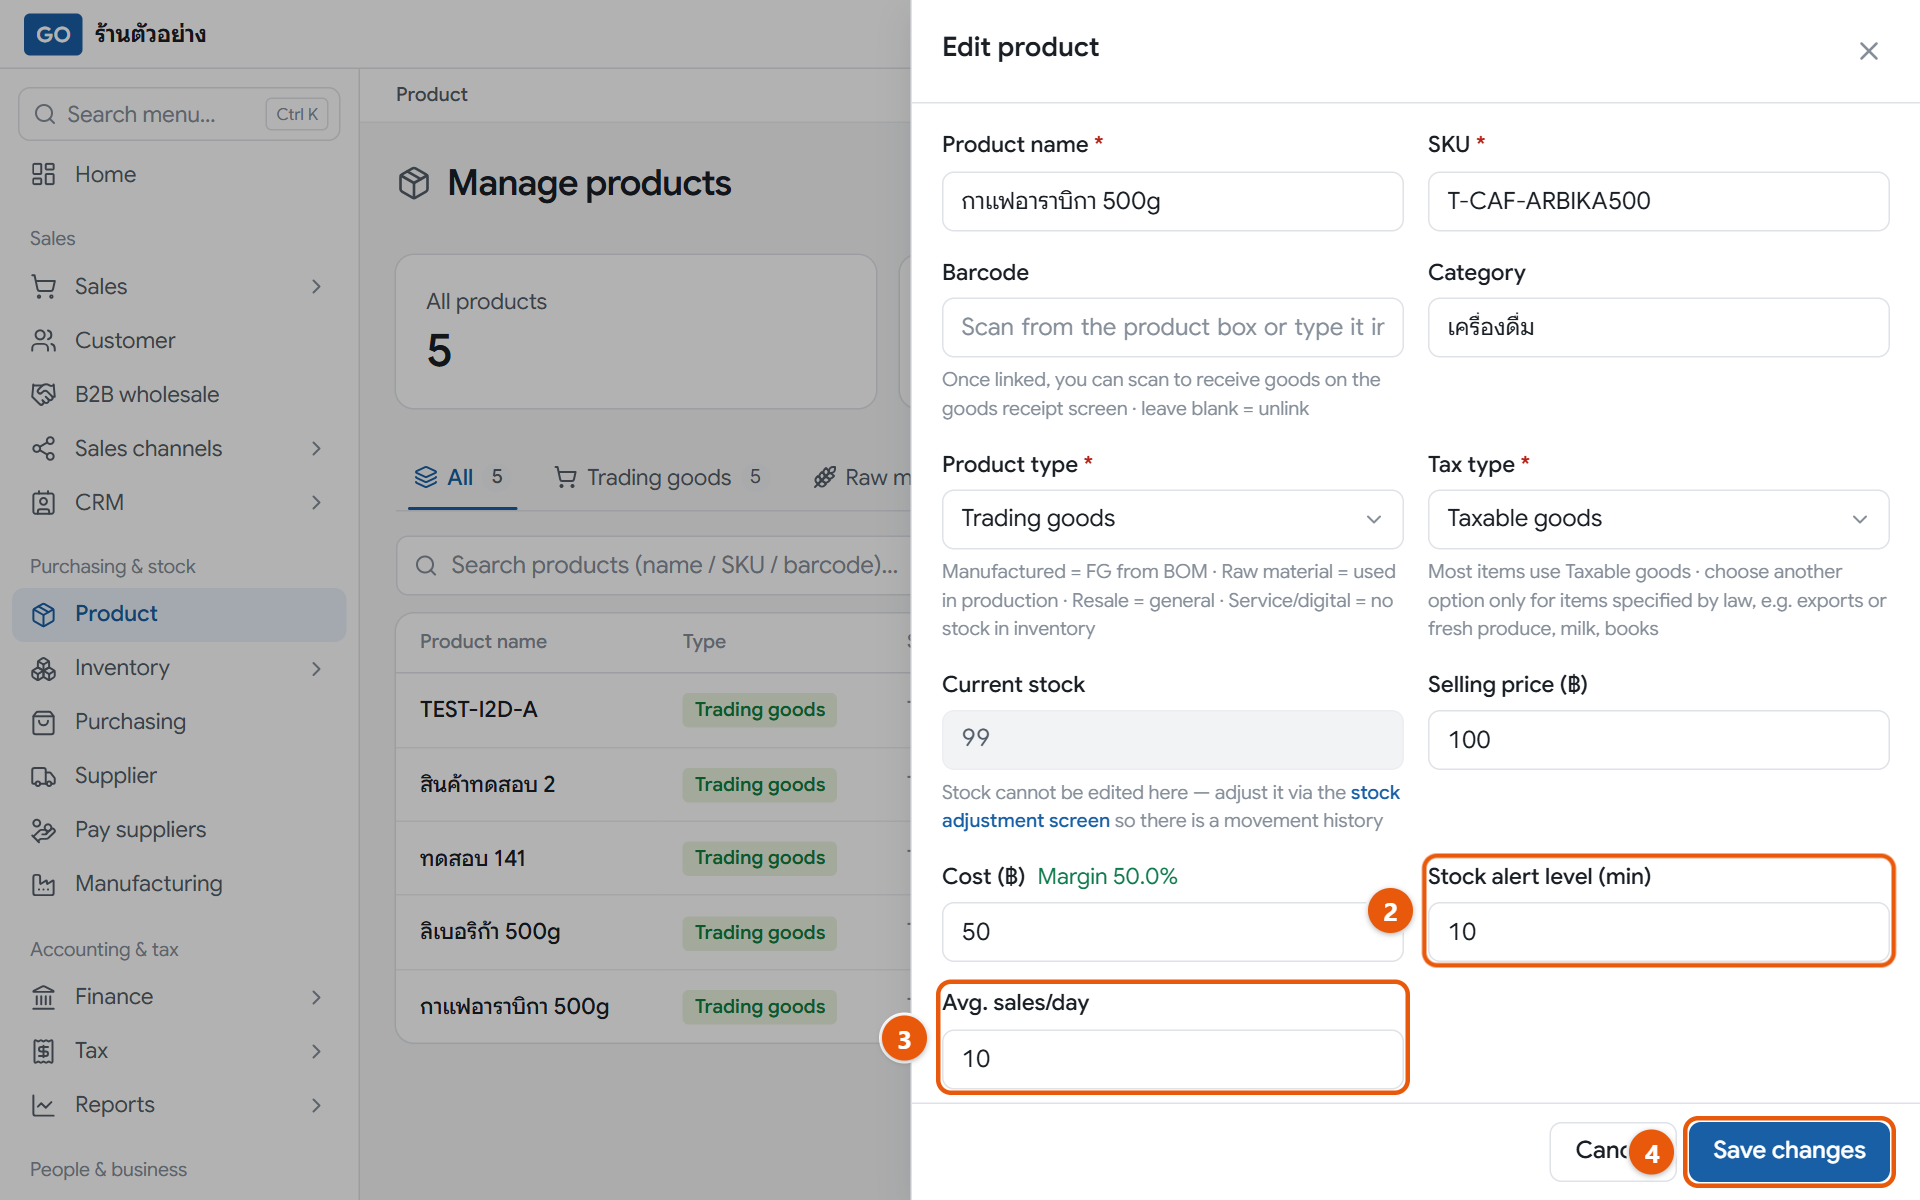
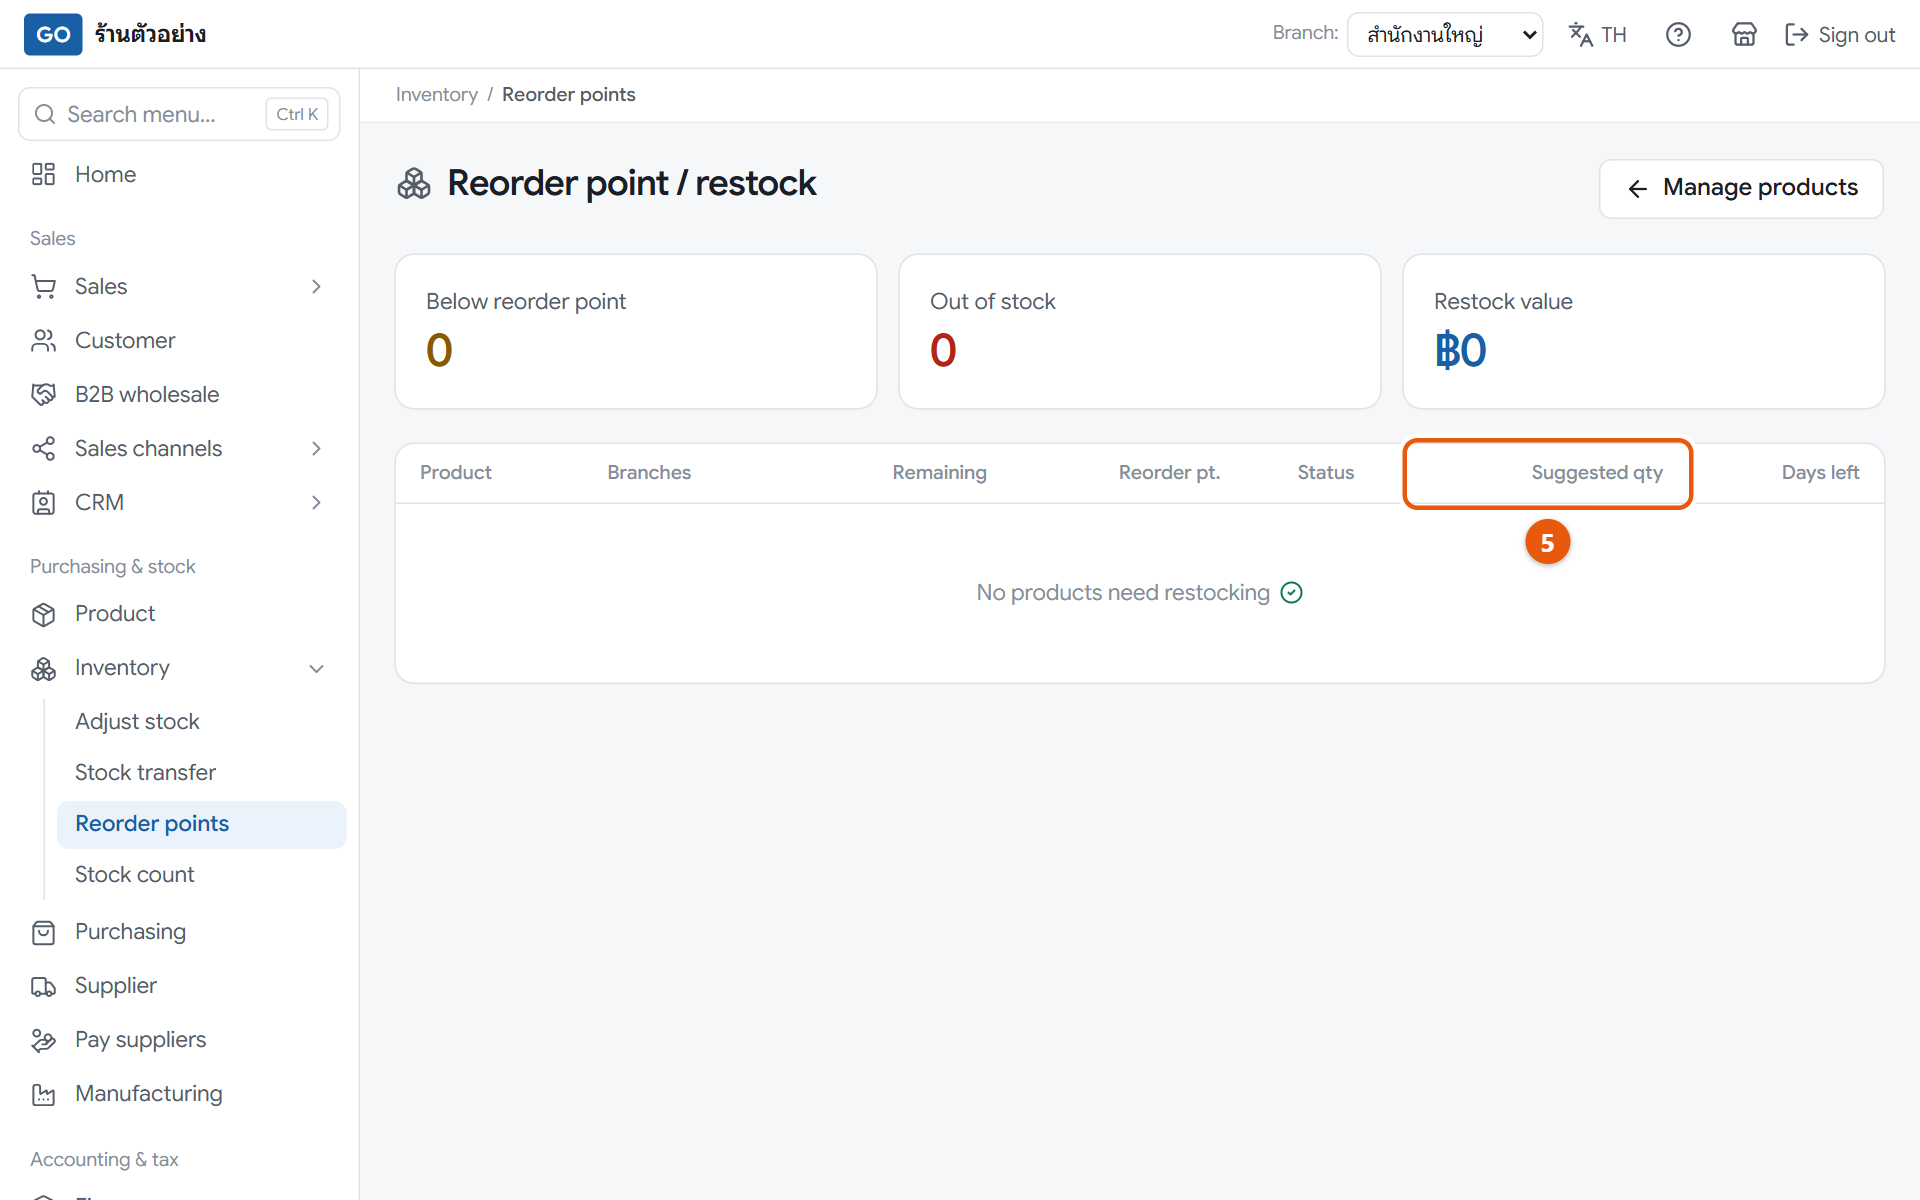
The product edit panel showing the alert level and average daily sales fields, before savingThe reorder page with summary cards on top. Nothing is below its alert level in this picture; when something is, it appears in the table with a suggested quantity
Do this
1Open Product in the menu and tap the row of the item you want alerts for.
2Enter the Stock alert level (min): the quantity at which you should reorder, for example 10.
3If you know how many sell per day, enter Avg. sales/day too, and the suggested order will cover 14 days of sales.
4Press Save changes.
5Open Inventory and press Reorder points, then check the Suggested qty column for each item.
6Use those numbers to order under Purchasing with New PO (step 19). This page doesn’t order for you.
When it worked: Items at or below their alert level appear on the reorder page, and Home shows a low-stock line under To do today.
If you get stuck
An item has run out but isn’t on the reorder page
Its alert level is 0; set it above 0. Service and digital items have no stock, so they never appear here.
I already ordered it. Why is it still listed?
This page only looks at stock you actually have. The item leaves the list once you receive the goods (step 19).
The suggested quantity looks odd
With an average set, it is daily sales × 14 minus what is left. Without one, it suggests topping up to the alert level. Check both fields on the product.
Staff and payroll
If you have employees
25
Add your employees
The program works out pay, social security and withholding tax from the employee details you enter here. If details are missing, the figures later on will be wrong too.
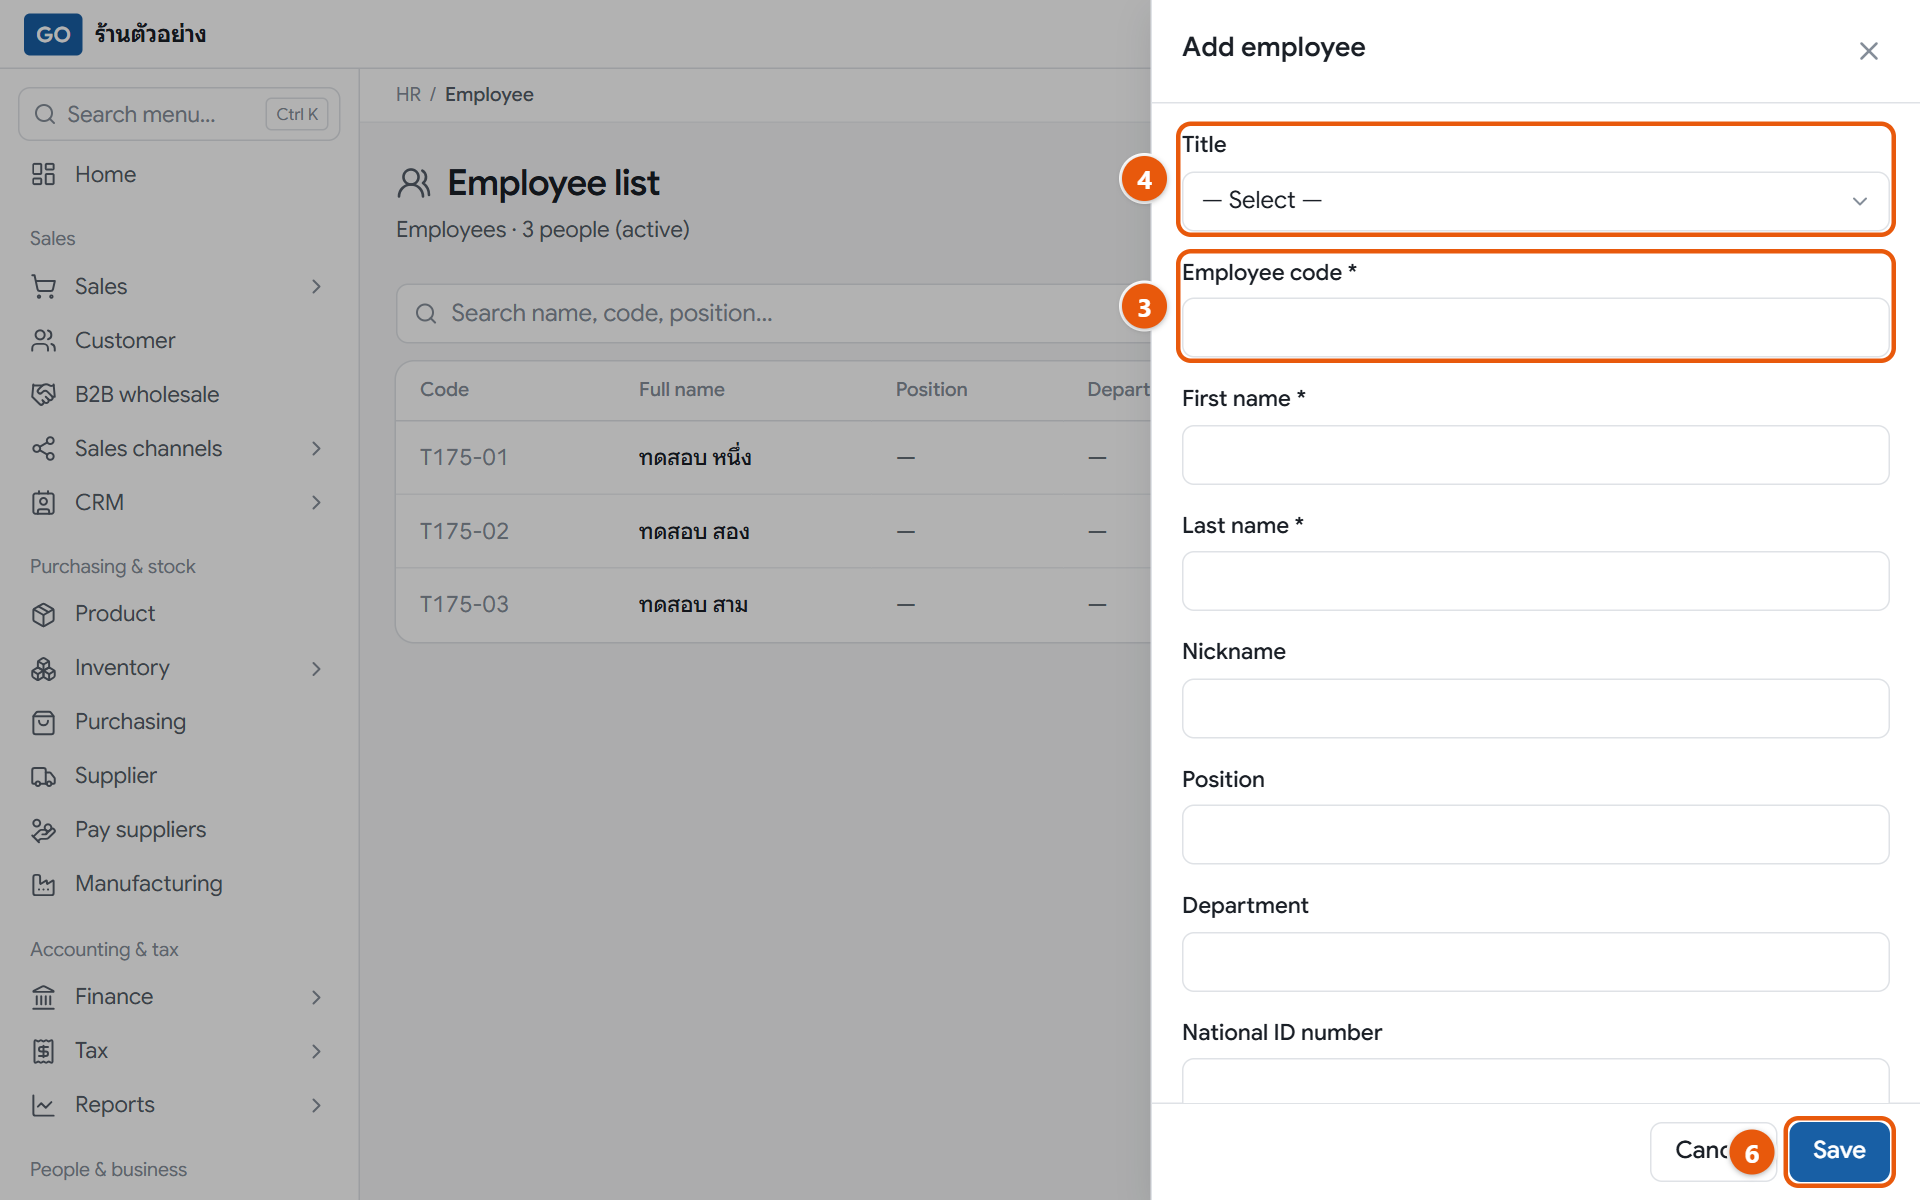
The new employee panel
Do this
1If you have several branches, set Branch: to the branch where the person works, because employees are kept per branch.
2Open HR in the menu, press Employee, then press Add employee.
3Fill in Employee code *, First name *, Last name * and Start date *. If you use a fingerprint scanner, use the same code as in the scanner.
4Choose a Title and enter the 13-digit National ID number. Both are needed when you make the payroll tax filing file.
5Choose a Wage type of Monthly or Daily, then enter the Base salary or Daily wage (THB). Registered with social security is already ticked for you.
6Press Save at the bottom of the panel, then repeat for everyone.
When it worked: The employee appears in the list with the status Active and can be picked on the attendance, shift and leave pages.
If you get stuck
I don't see the employee menu, or it says I have no access
This page shows salaries, so only the owner, accountant and auditor can open it. Managers can still use the attendance, shift and leave pages.
It says the employee code is already used in this branch
Codes can't repeat within a branch. Choose a code nobody is using yet.
An employee has left and I want to delete them
You can't delete them. Open their record, press Edit, change Status to Resigned, fill in End date and press Save. Their history stays intact.
26
Set up work shifts and your shop's holidays
The program uses shift hours to work out overtime and spot absences, and uses holidays to pay holiday work and avoid counting those days as absences.
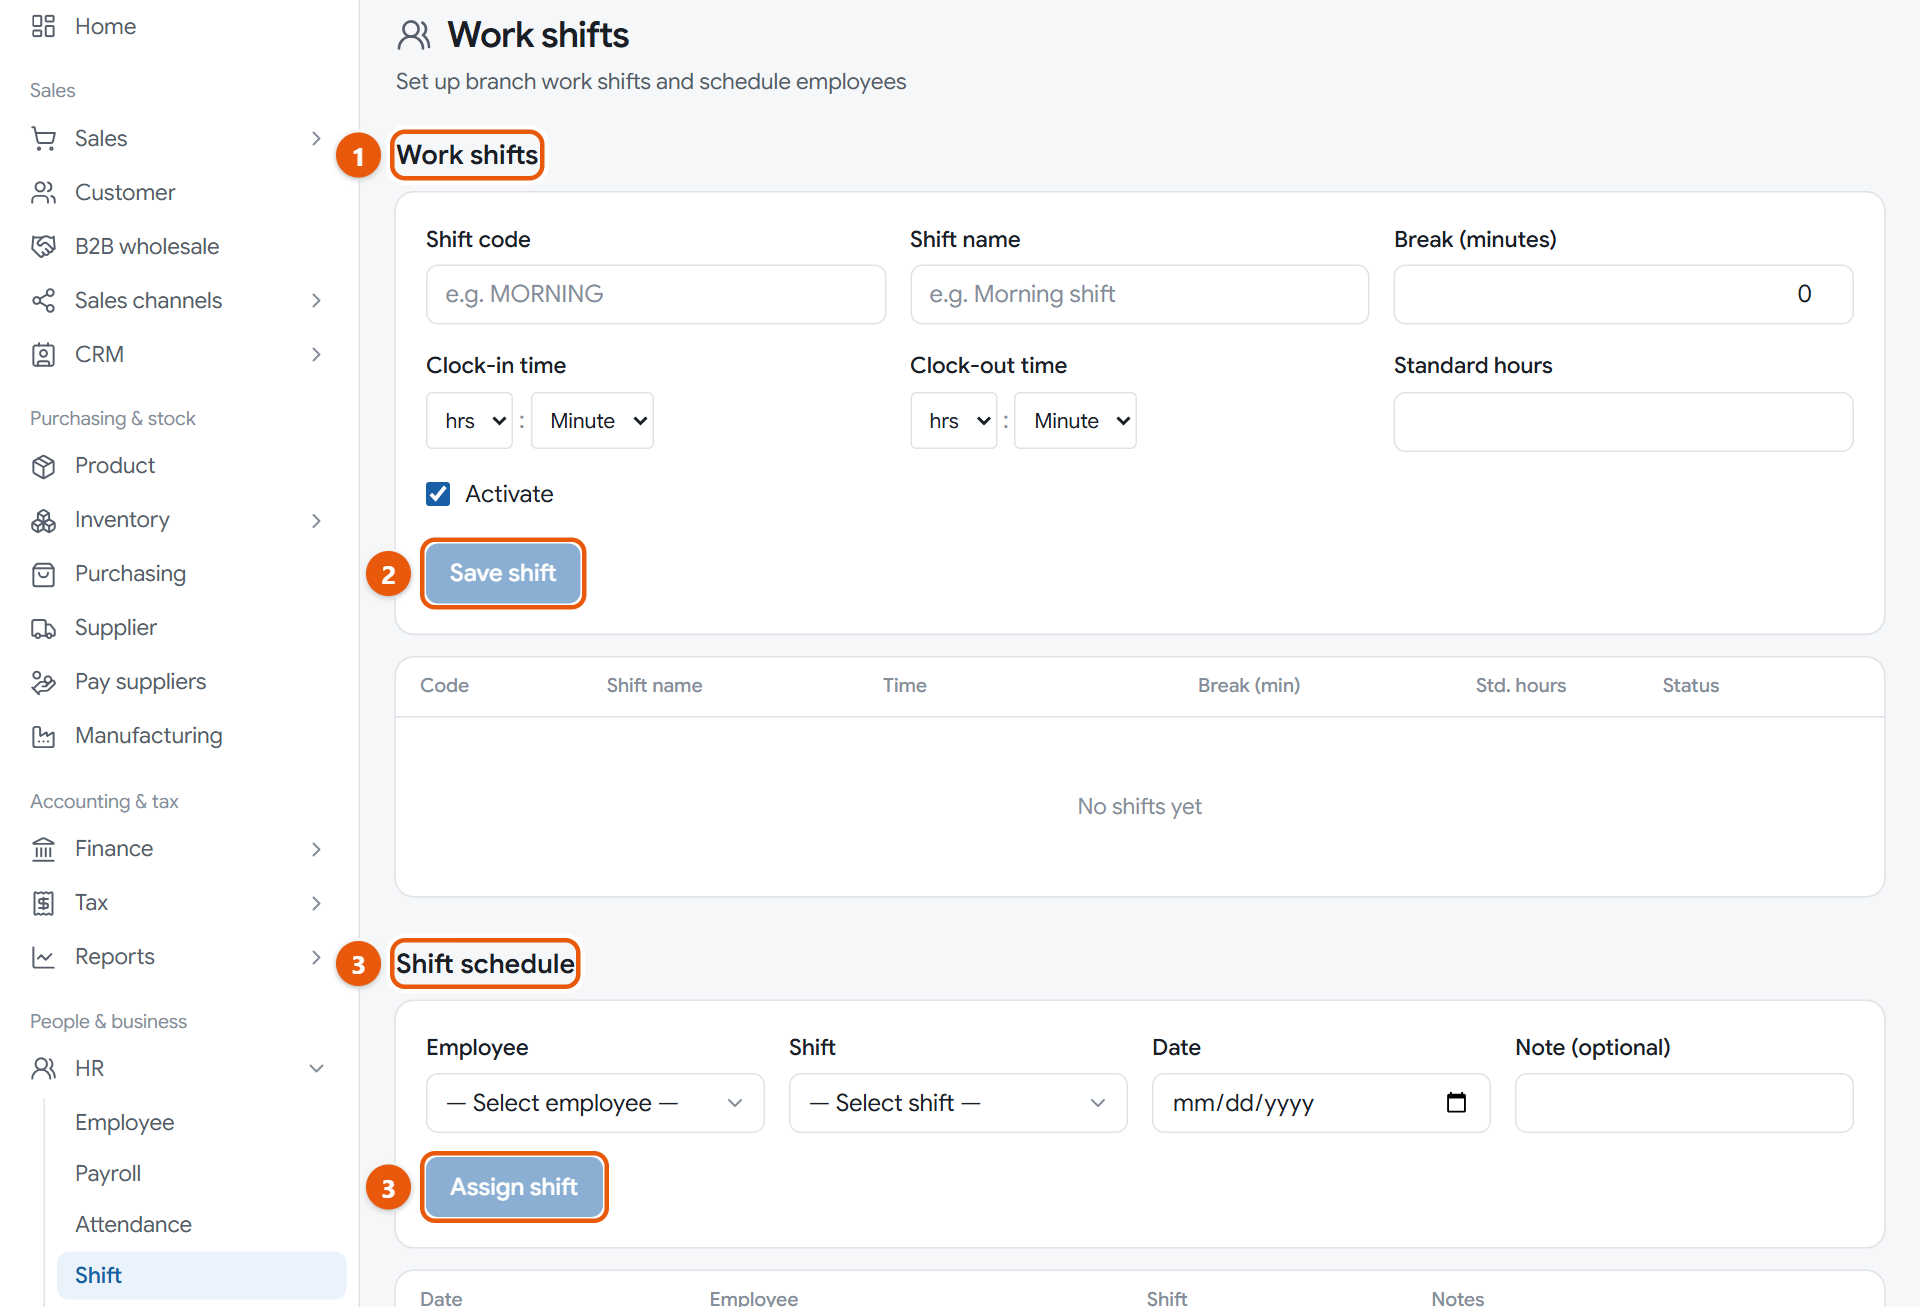
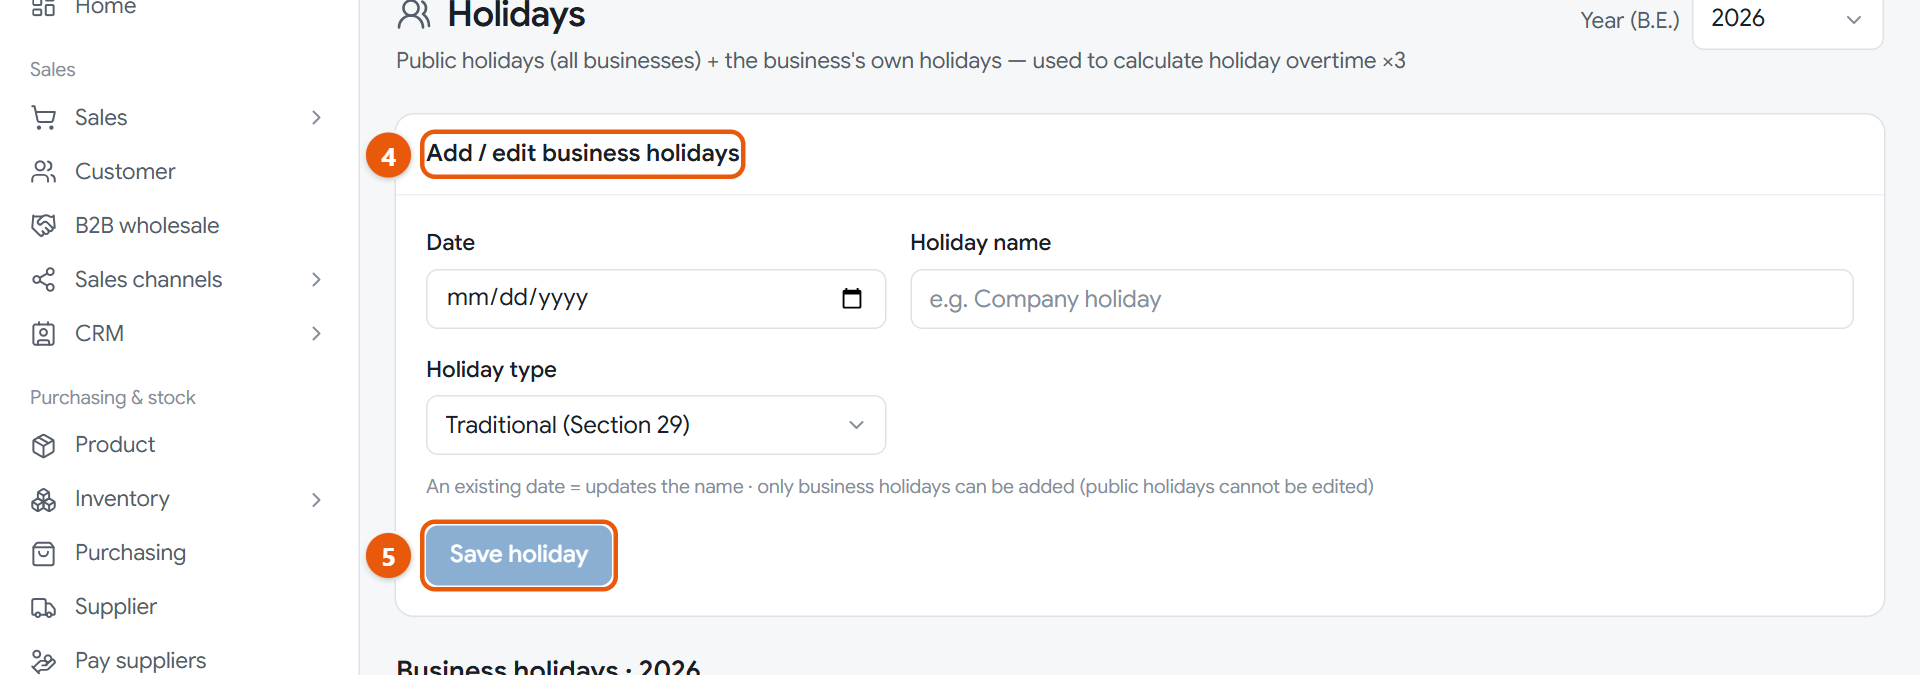
The shift page, with shift setup and the shift scheduleThe holiday page, with public holidays and your shop's own
Do this
1Open HR in the menu and press Shift. In Work shifts, fill in Shift code, Shift name, Clock-in time, Clock-out time and Break (minutes).
2Type the Standard hours yourself (a suggested figure is shown under the box), then press Save shift.
3In Shift schedule, choose the Employee, Shift and Date, then press Assign shift. Do one person and one day at a time.
4Open Holidays. Public holidays are already there. For extra shop holidays, in Add / edit business holidays choose the Date, fill in the Holiday name and choose a Holiday type.
5Press Save holiday.
When it worked: The new shift shows in the table as Active, the schedule lists employees by date, and the holiday you added appears tagged Business.
If you get stuck
I don't see the shift form or the holiday form
Only the shop owner can use these two sections; other roles only see the lists. Managers can still schedule shifts.
Staff take different weekly days off. Do I add them on the holiday page?
No. Handle each person's weekly day off in the shift schedule by not giving them a shift that day. Use the holiday page only if the whole shop closes on the same day.
I scheduled a shift on the wrong day
Assign a new shift to the same person on the same day to overwrite it, or press the three-dot button at the end of the row and choose Delete.
27
Record attendance, or import your scanner file
Clock-in and clock-out times are where working hours, overtime and absences come from. The program only uses them for pay after you summarise the whole month.
The attendance page, with manual entry and the month's entriesThe scanner file import page, before choosing a file
Do this
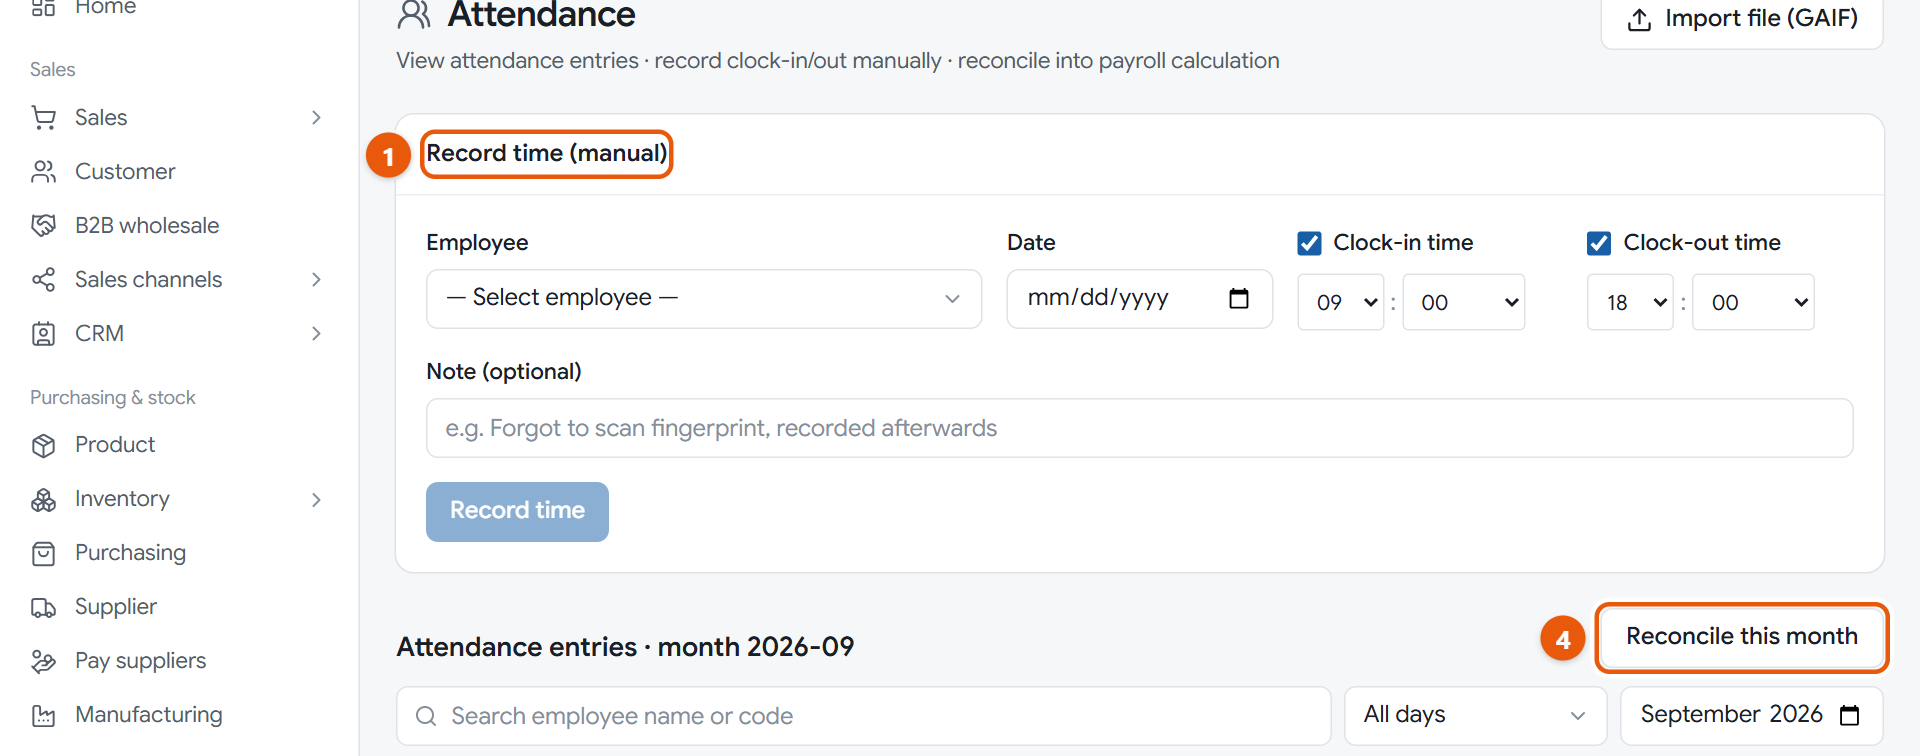
1Open HR in the menu and press Attendance. If someone forgot to scan, use Record time (manual): choose the Employee and Date, set Clock-in time and Clock-out time, then press Record time.
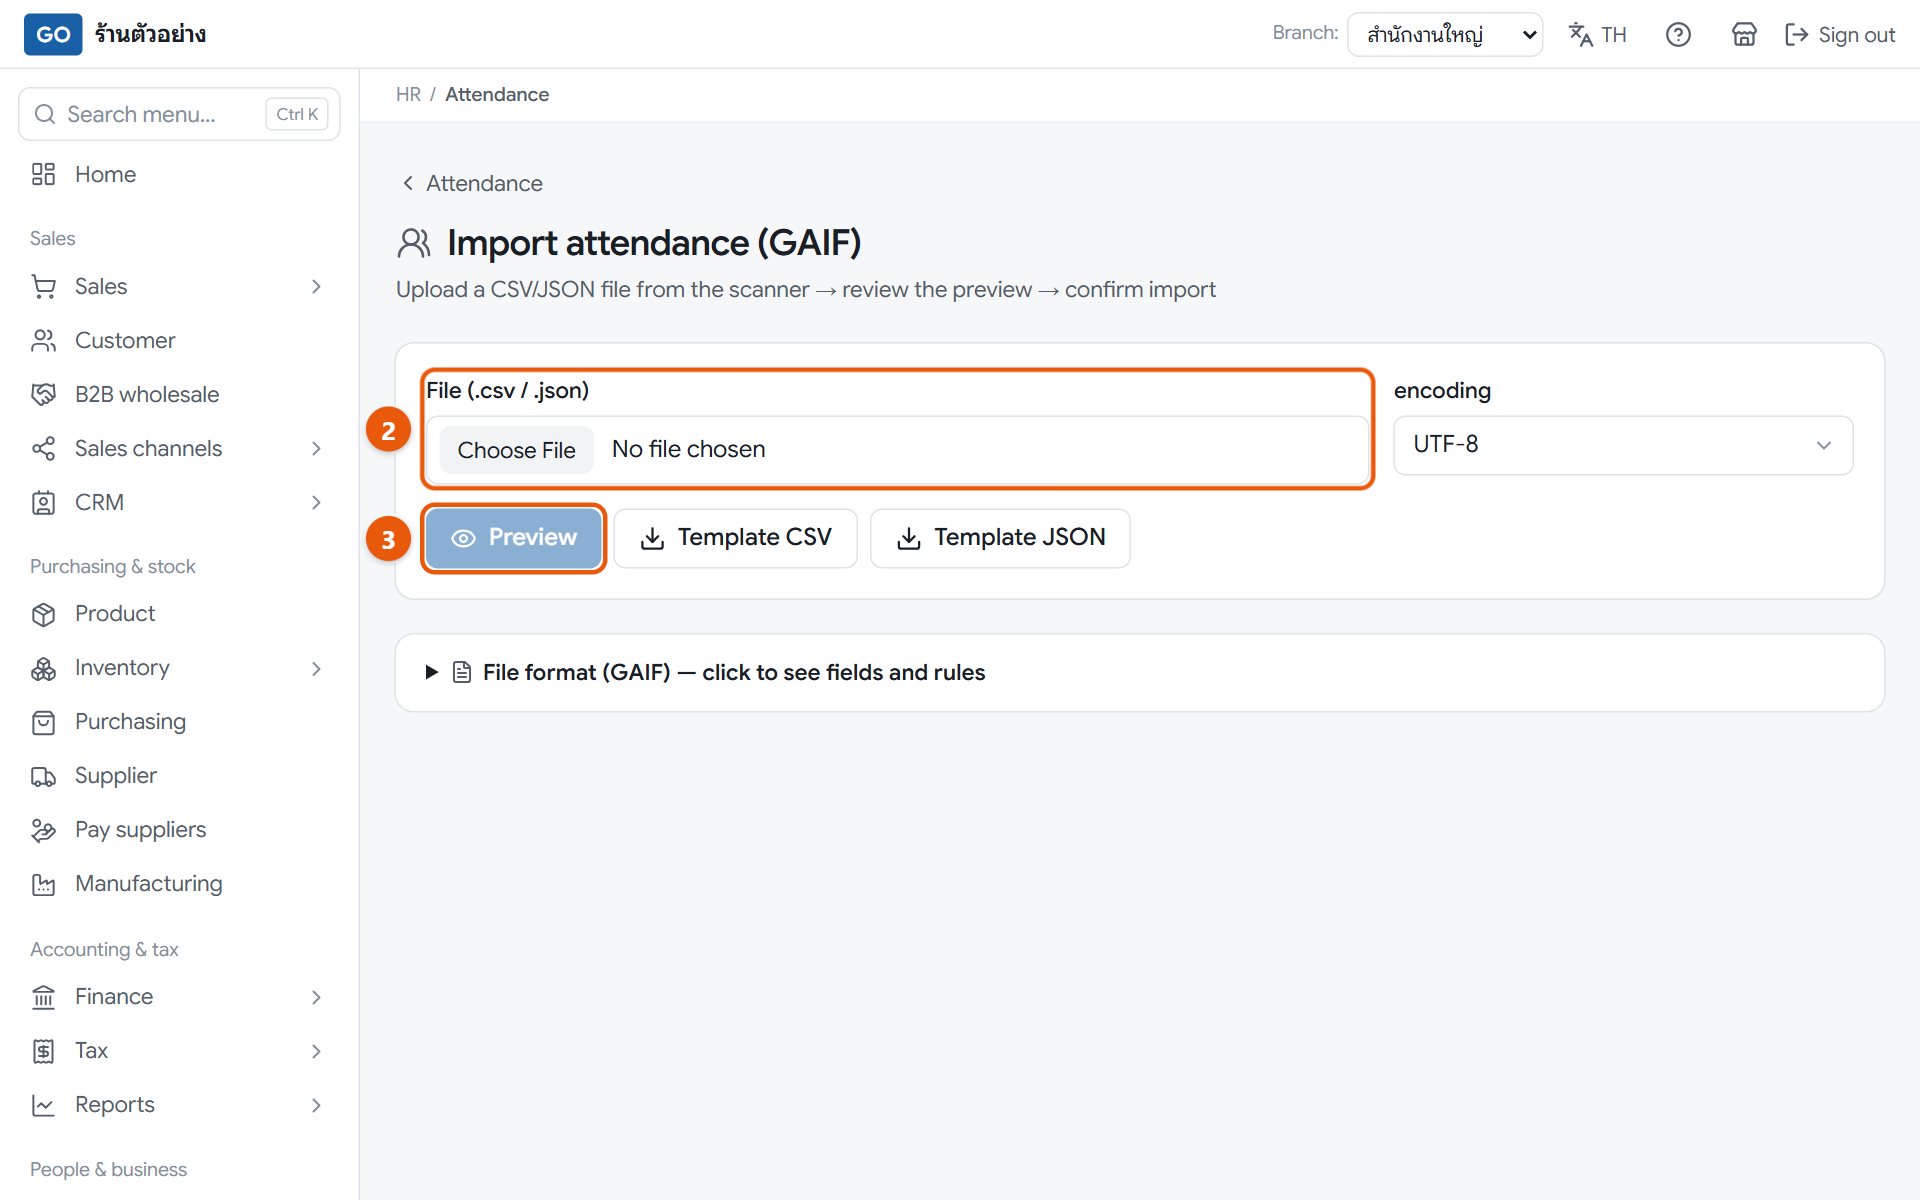
2Using a fingerprint scanner? Press Import file (GAIF) and choose the file in File (.csv / .json).
3Press Preview and check for error rows. If it looks right, press the confirm import button, which shows the number of rows.
4At month end, go back to the attendance page, pick the month above the table, press Reconcile this month and press Confirm.
5Check the status column. Rows marked Absent are days with a shift but no clock times, so check them before running payroll.
When it worked: A message says how many employee-days were reconciled, and the statuses in the table update.
If you get stuck
The import says it cannot find the employee
The code in the file doesn't match an employee code in the chosen branch. Check the branch, then change the Employee code on the Employee page to match the scanner, and import the same file again.
Thai text in the file looks garbled
Change the encoding box to TIS-620 (older Thai scanners) and preview again.
I recorded times but the hours and pay didn't change
You always need to press Reconcile this month first. If payroll was already calculated, go back to the pay run and press Calculate again.
28
Record and approve leave
Approved leave feeds into pay. If a monthly employee takes more than their yearly allowance, the program deducts the extra days for you.
The leave page, with the request form and the leave table
Do this
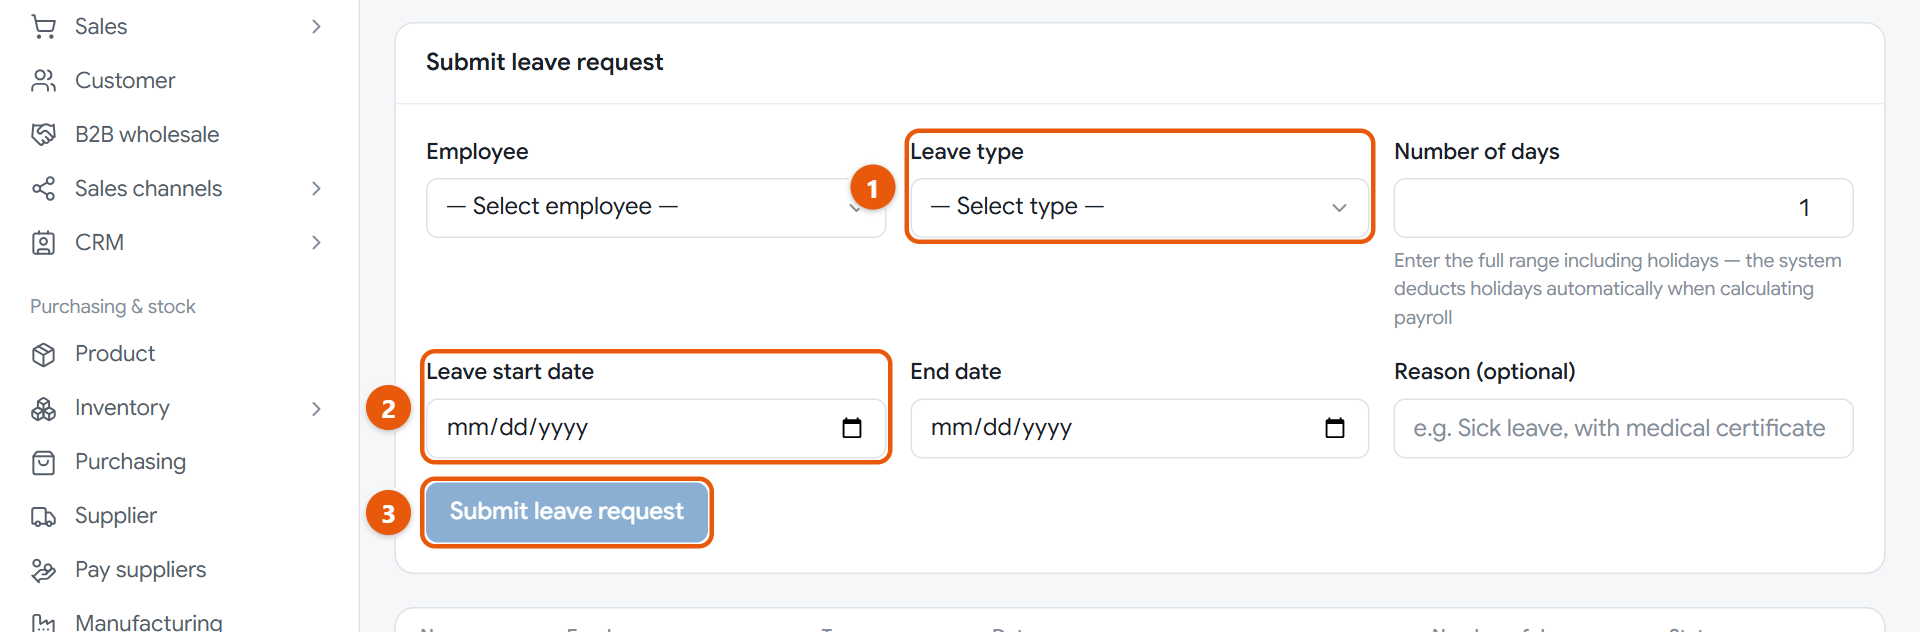
1Open HR in the menu and press Leave. In Submit leave request, choose the Employee and Leave type; the brackets show the yearly allowance.
2Choose the Leave start date and End date. Number of days fills itself in; for half a day, change it to 0.5.
3Press Submit leave request. The request appears in the table as Pending approval.
4Press the three-dot button at the end of the row and choose Approve or Reject.
5If a shift was scheduled on a leave day, go to Shift and delete that shift, otherwise the day counts as an absence.
When it worked: The request shows Approved and is counted when you calculate pay for the month the leave starts.
If you get stuck
I entered a leave request wrongly. Can I fix it?
There is no edit button. If it is still pending, choose Reject on it and submit a new one.
I approved one by mistake
You can't undo an approval yourself yet. Contact our team on LINE @791ibitd before running that month's payroll.
Can staff submit their own leave in the program?
Not yet. The owner or a manager submits it for them on this page.
29
Run payroll and pay your staff
The program combines pay, overtime, social security and withholding tax in one pay run, posts the accounts when you approve it, and prints payslips straight away.
The payroll page with the new pay run window
Do this
1Before you start, reconcile that month's attendance and approve all leave (steps 27 and 28).
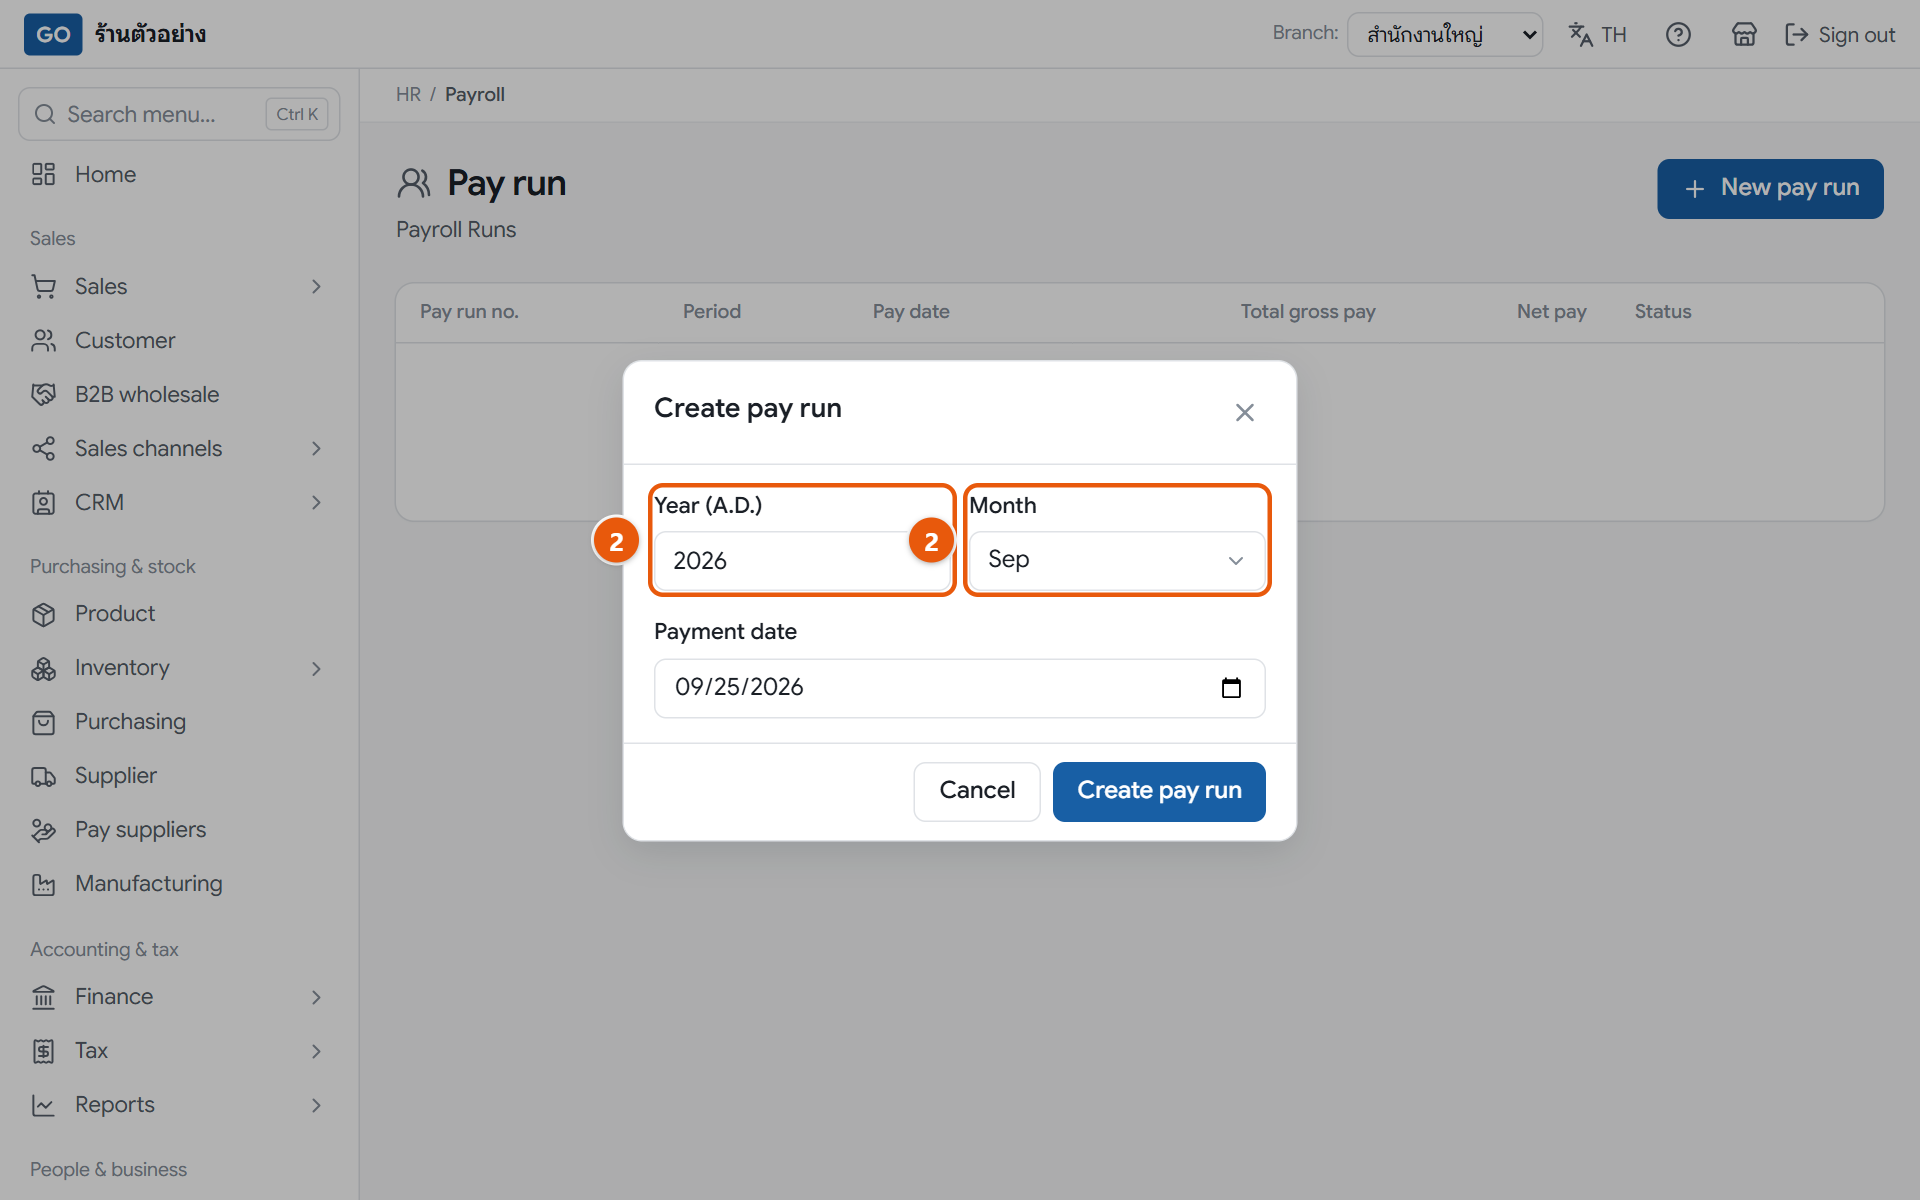
2Open HR in the menu, press Payroll, then press New pay run. Enter the Year (A.D.), choose the Month, check the Payment date, then press Create pay run.
3On the pay run that opens, press Calculate.
4For allowances or deductions, press the three-dot button on the employee row, choose Edit, enter the Allowance or Other deductions with a reason, press Save, then press Calculate again.
5Check everyone's figures, then press Approve and press Approve again in the confirm window. Once approved it can't be changed.
6Press All payslips to print or save them as PDF, then transfer each net pay amount to your staff yourself.
When it worked: The pay run shows Approved, the payroll is posted to the accounts on the payment date, and the tax figures are ready for P.N.D.1 in step 32.
If you get stuck
The approve button can't be pressed
The pay run has not been calculated yet, so total income is still 0. Press Calculate first.
I added an employee after creating the pay run and they aren't in it
The pay run takes its list of names only when it is created, and you can't create the same month twice. Contact our team on LINE @791ibitd, and next time add all employees before creating the pay run.
Can I file social security from here?
Not yet. The program works out the social security amounts but does not produce a submission file, so you submit to the Social Security Office yourself.
Month end: tax and your numbers
Every month
30
Check your sales and purchase tax reports
VAT-registered shops must keep a sales tax report and a purchase tax report every month for each branch. The program builds them from your documents and shows which ones make the totals differ from the P.P.30.
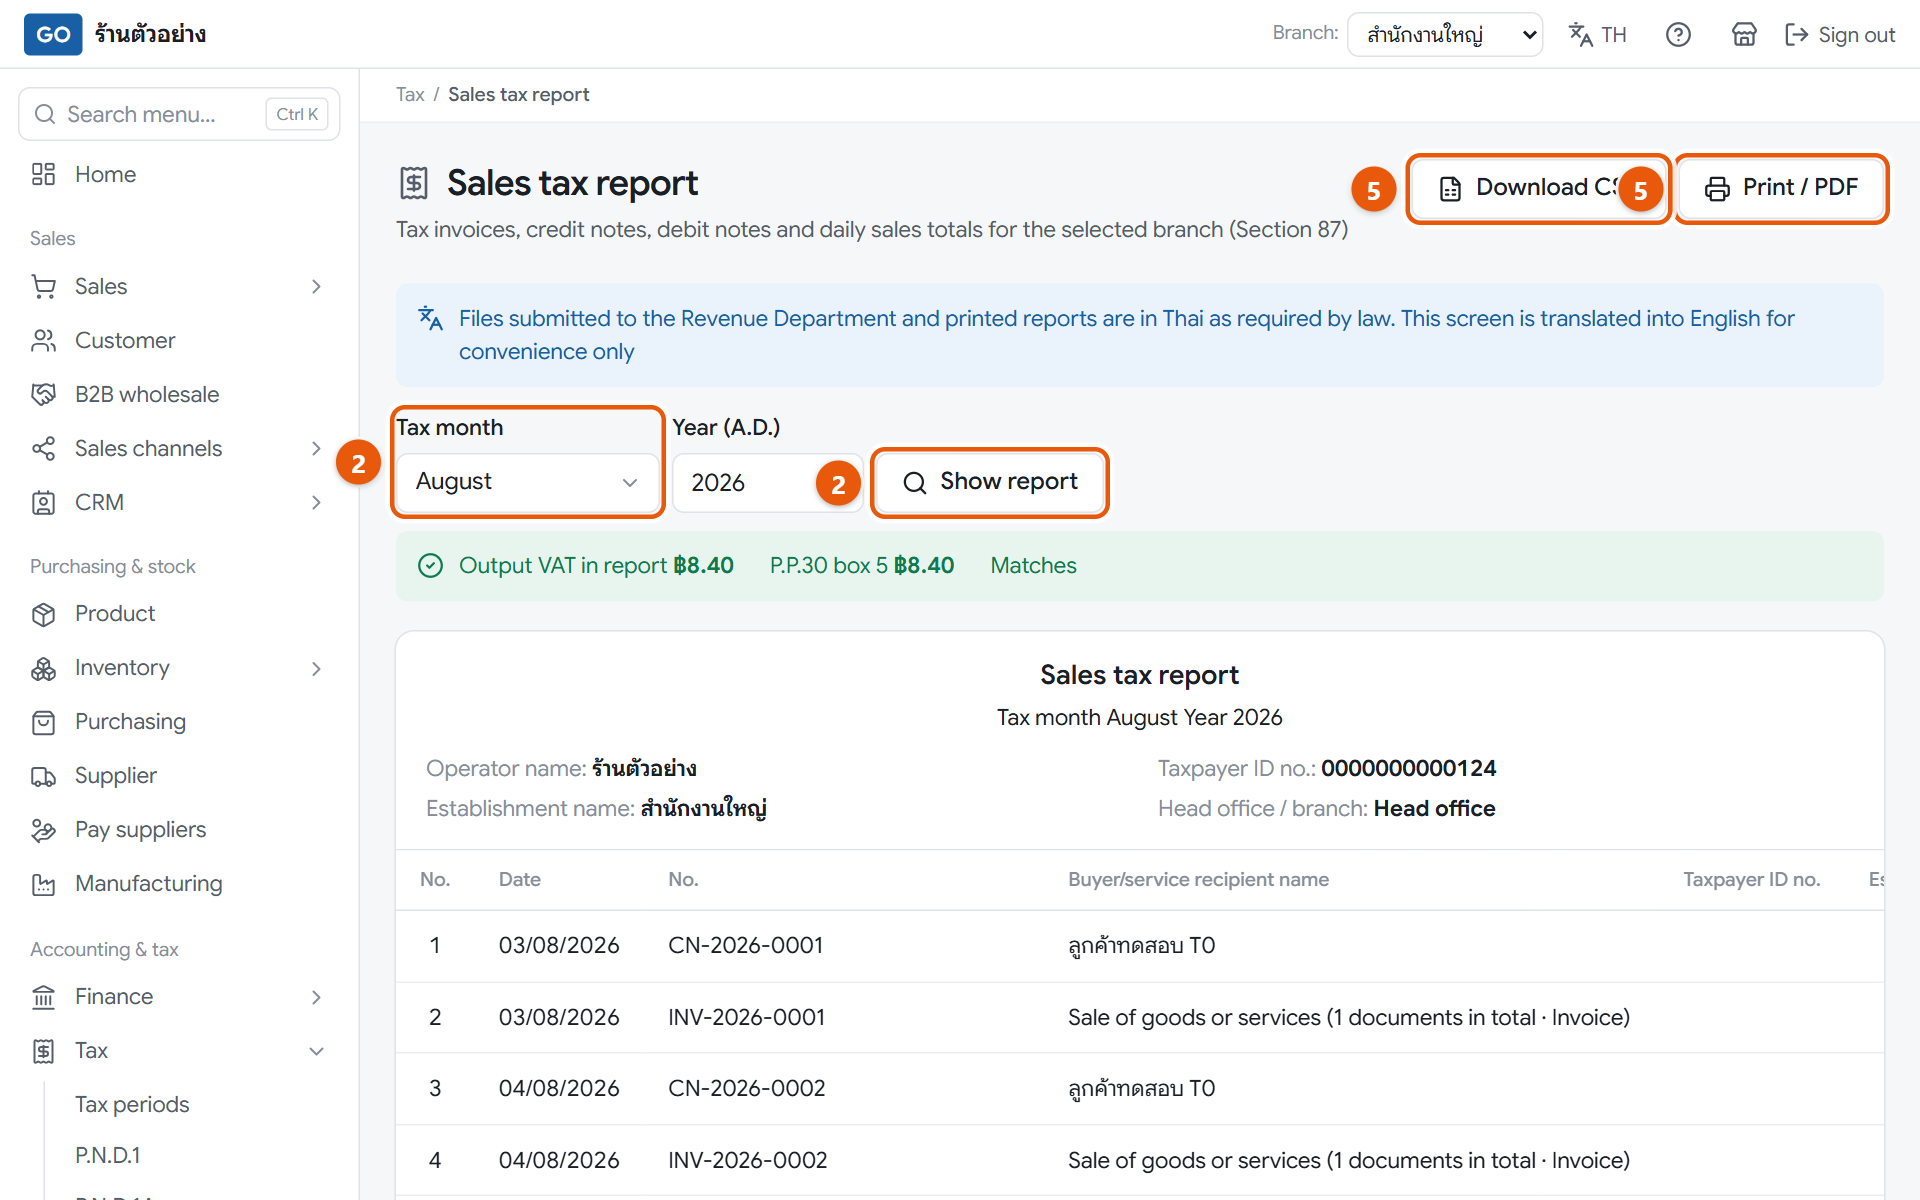
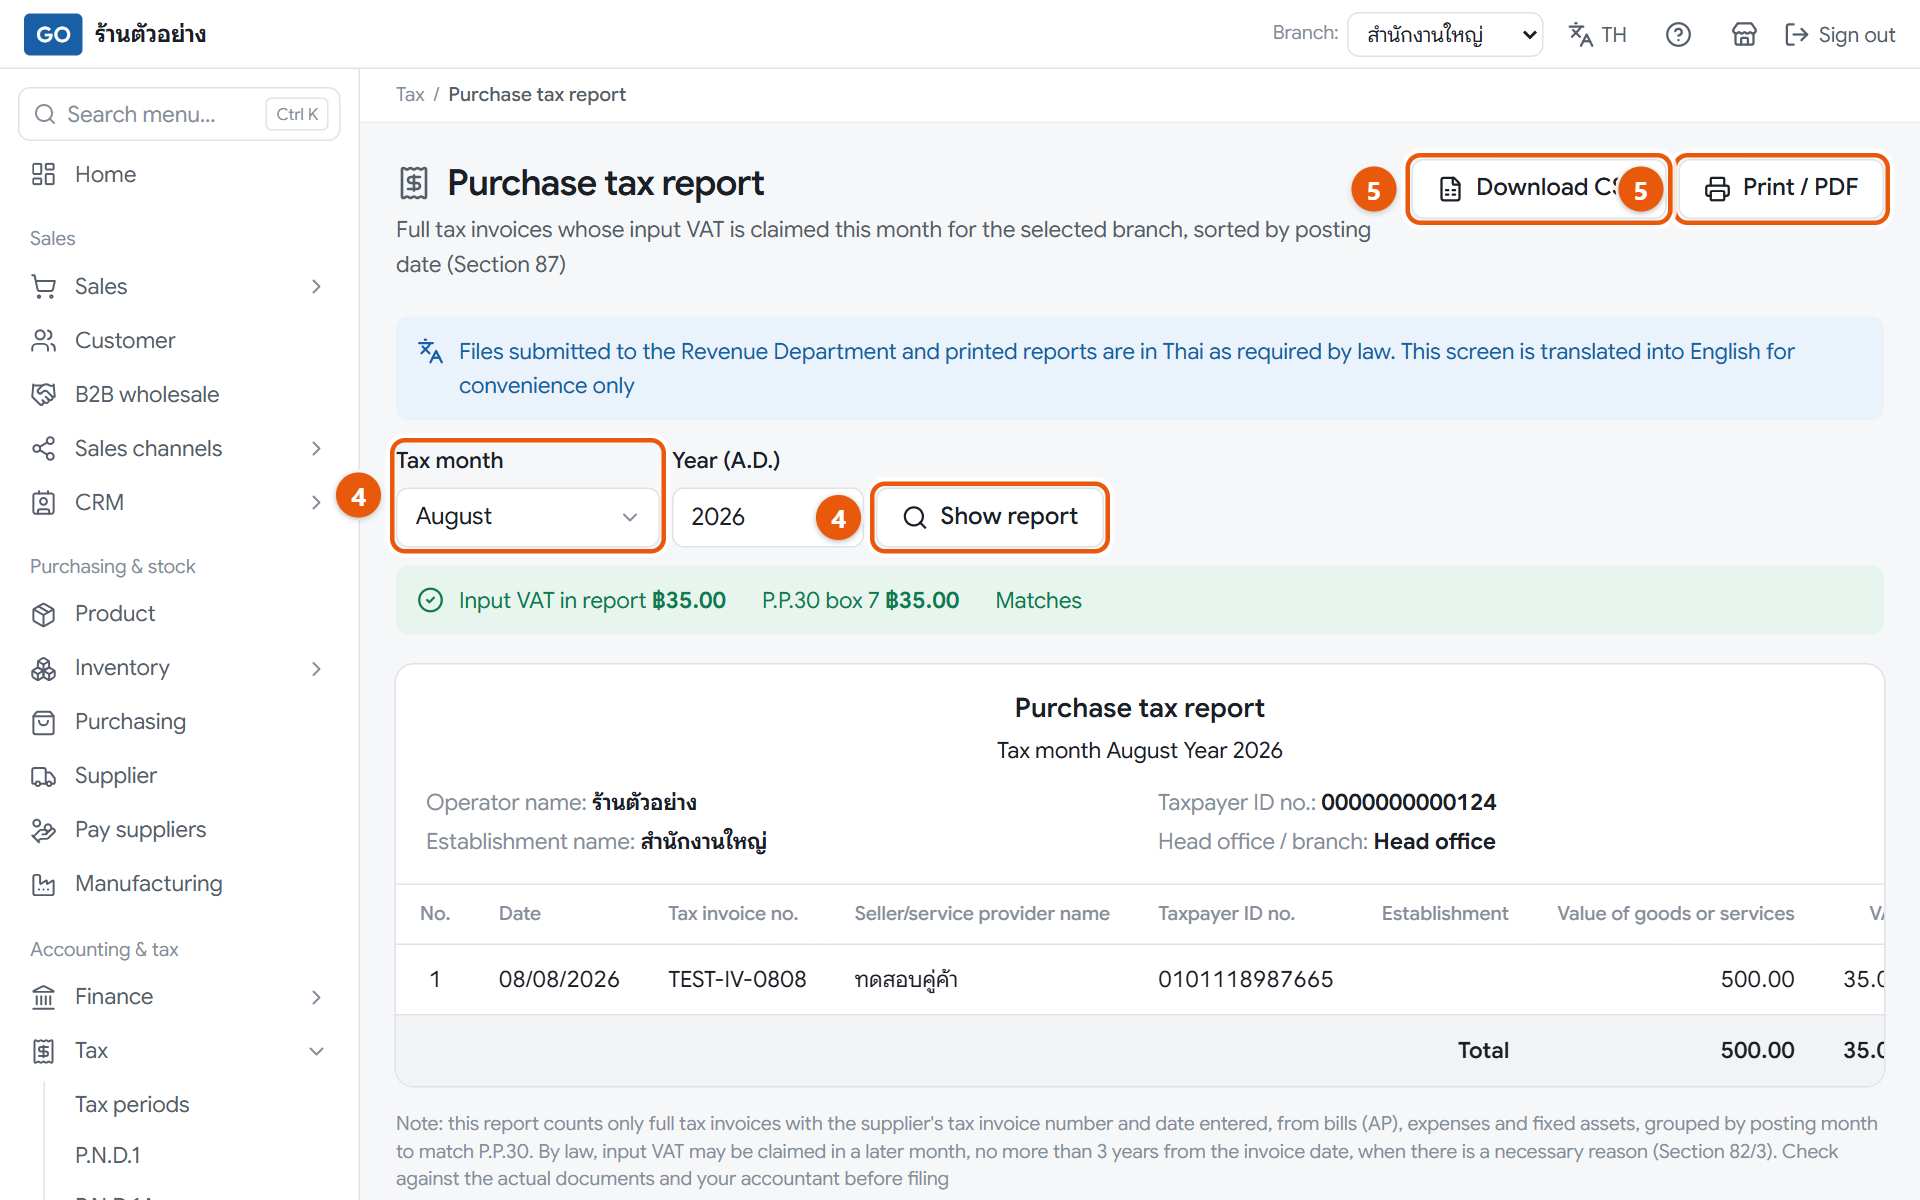
The sales tax report and its comparison with the P.P.30Last month's purchase tax report
Do this
1Set Branch: to a single branch, because these reports are made one branch at a time.
2Open Tax in the menu, press Sales tax report, choose the Tax month, enter the Year (A.D.) and press Show report.
3Look at the comparison box at the top. If it says Matches, you are fine. If not, scroll down to Why it does not match P.P.30 and fix the document it points to.
4Open Purchase tax report and do the same, then look at the table of items that have VAT but cannot be claimed this month.
5Press Print / PDF or Download CSV to keep a copy or send it to your accountant.
When it worked: Both reports say Matches against the P.P.30, or you know exactly which documents make them differ.
If you get stuck
A purchase bill with a tax invoice doesn't show in the purchase tax report
Usually the supplier's tax invoice number and date haven't been entered. Open Pay suppliers, open that bill, press Enter tax invoice, fill it in from the real invoice, then press Show report again.
I haven't received the supplier's tax invoice yet. How long can I wait?
Input VAT can be claimed in a later month, but no later than six months from the month after the month the tax invoice was issued. See the time left in Input VAT awaiting tax invoices on the Tax periods page, and ask your accountant if unsure.
My shop isn't VAT-registered. Do I need these?
No. Shops that aren't VAT-registered can skip steps 30, 31 and 34. If you're not sure whether you should register, ask your accountant.
31
Prepare your P.P.30 VAT return
The P.P.30 is the monthly VAT return. The program fills in all 12 boxes and makes the file for you, but you or your accountant must file and pay yourselves on the Revenue Department system.
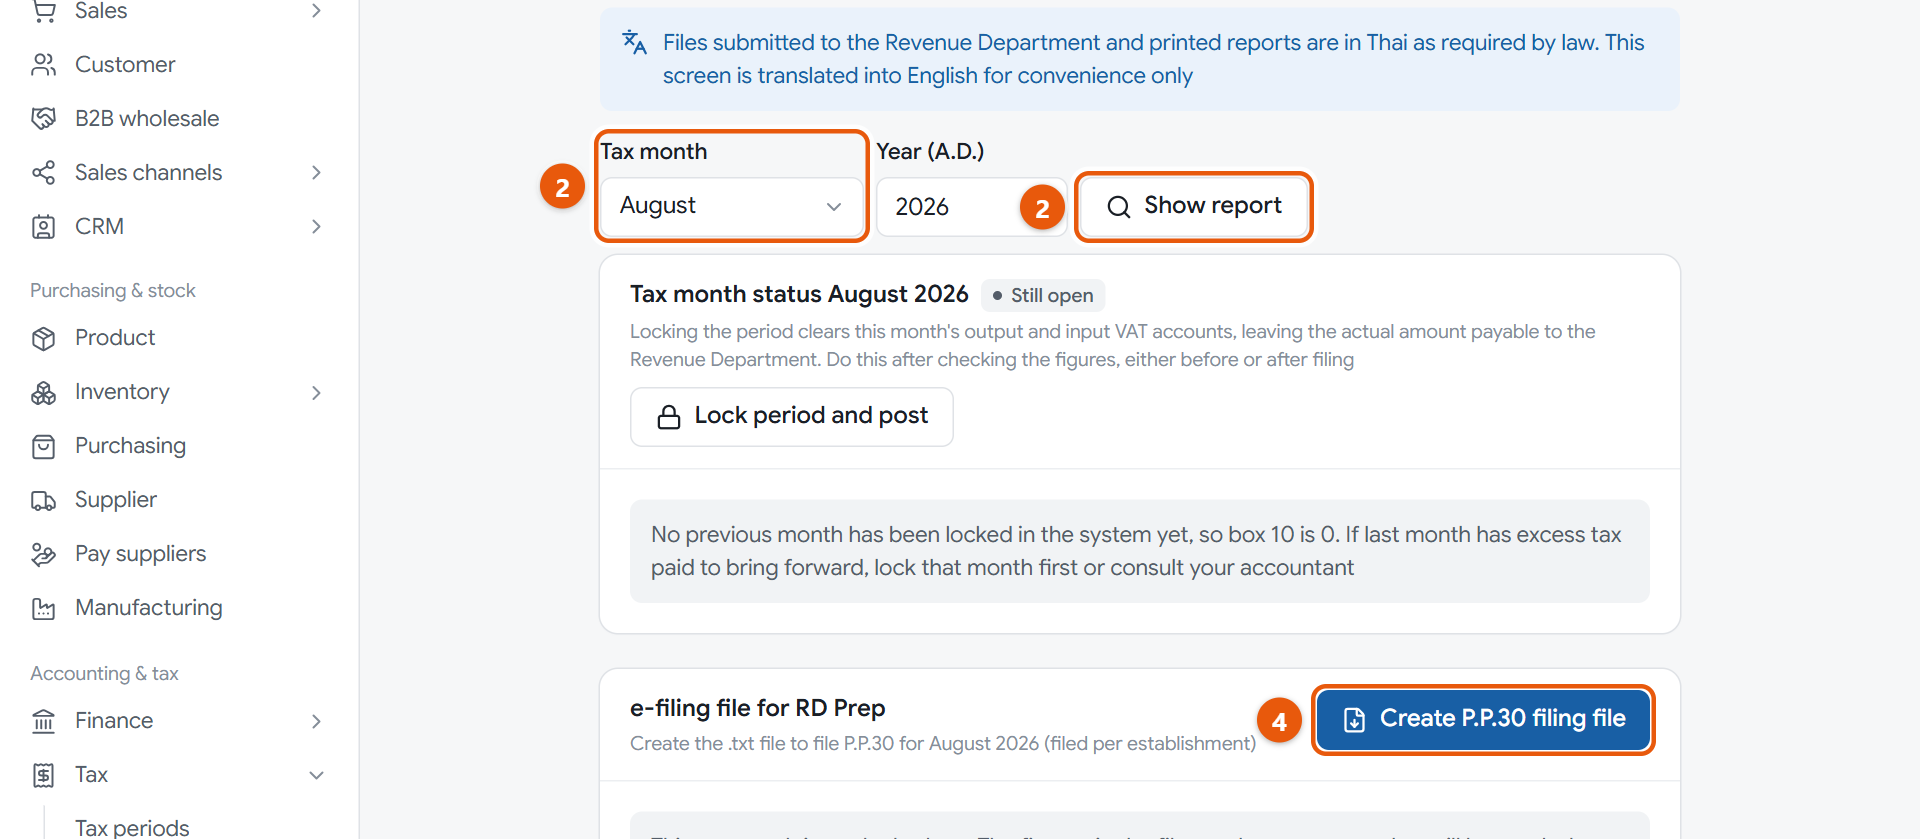
Last month's P.P.30 form and the filing file box
Do this
1Set Branch: to a single branch, because the P.P.30 is filed separately for each branch.
2Open Tax in the menu, press P.P.30, choose the Tax month, enter the Year (A.D.) and press Show report.
3Check that box 5 (output VAT) and box 7 (input VAT) match the reports from step 30, then see at the bottom of the form whether tax is payable or overpaid.
4In e-filing file for RD Prep, press Create P.P.30 filing file, then press Download.
5Load the file into the Revenue Department's RD Prep program, then file and pay on the Revenue Department system within the Revenue Department's deadline.
When it worked: You have a file whose name starts with PP30_, and a P.P.30 form you can keep with Print / PDF.
If you get stuck
The create file button can't be pressed
Either Branch: is still set to All branches or you haven't pressed Show report. Choose one branch and show the report first.
Last month was overpaid, but box 10 is 0
Box 10 only carries forward from a previous month that has been closed. Close last month first, as in step 34.
When is the filing deadline?
The program doesn't show filing deadlines. File within the Revenue Department's deadline, and ask your accountant if unsure.
32
Prepare your P.N.D.1 payroll tax return
Tax withheld from staff pay must be sent in every month. The program makes the attachment and file from approved pay runs; you or your accountant file and pay it to the Revenue Department yourselves.
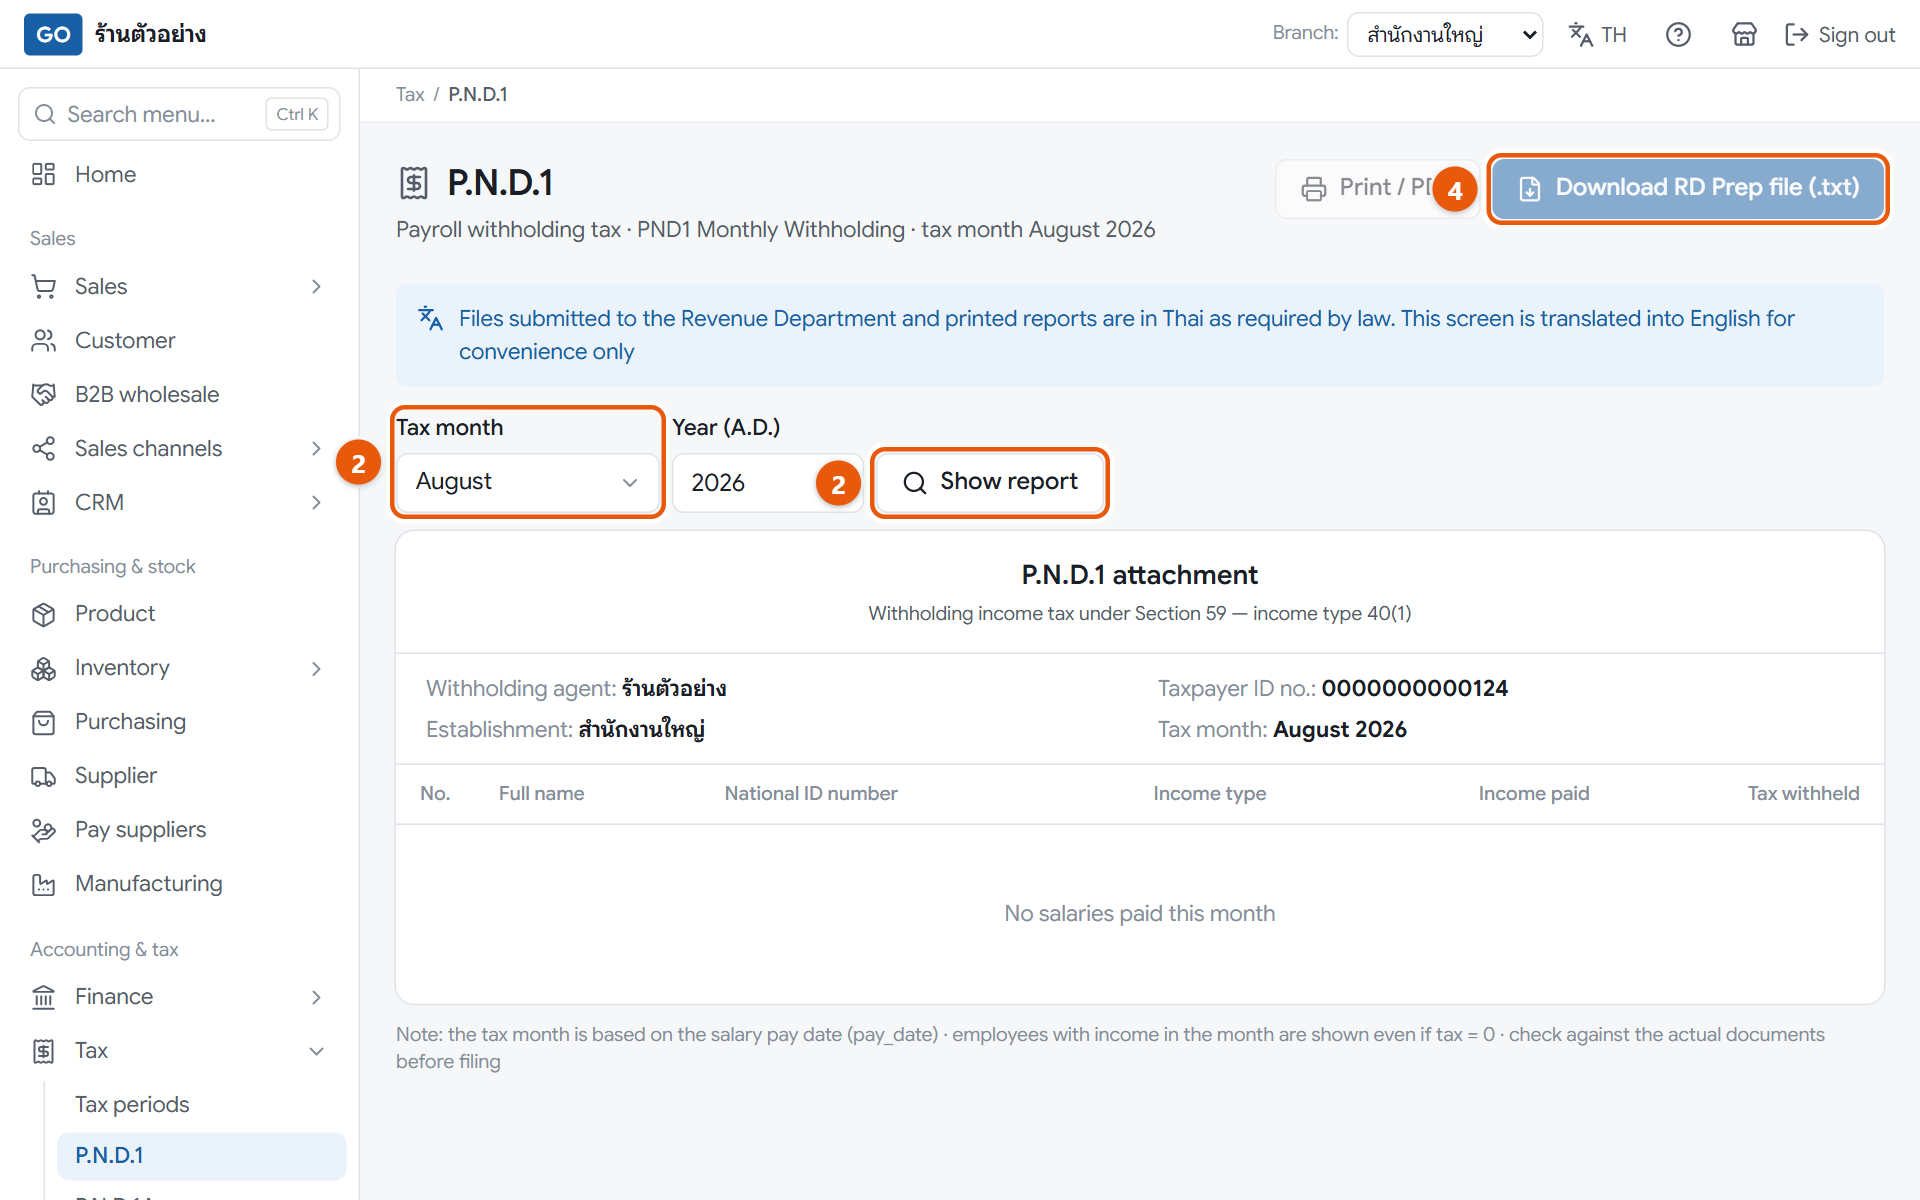
The P.N.D.1 page with the month's employee attachment
Do this
1Check that the month's pay run shows Approved (step 29). Draft pay runs aren't counted.
2Open Tax in the menu, press P.N.D.1, choose the Tax month, enter the Year (A.D.) and press Show report. The tax month follows the pay date.
3If there is a red or yellow warning at the top, fix what it says first, then check the Total withholding tax to remit.
4Press Download RD Prep file (.txt). The file name starts with PND1_.
5Load the file into RD Prep, then file and pay the tax on the Revenue Department system within the Revenue Department's deadline.
When it worked: You have a P.N.D.1 attachment listing everyone paid that month, plus the RD Prep file.
If you get stuck
The download button can't be pressed, or it says employee data is incomplete
Someone is missing a 13-digit national ID or a title. Go to Employee, fix that person's National ID number and Title, then come back and download again.
It says no salaries were paid this month
The pay run isn't approved yet, or its pay date is in another month. Try the month of that pay run's pay date.
A red bar says the tax doesn't match the accounts
The accounts may have been edited by hand. You can still download the file, but have your accountant check the journal before filing.
33
Prepare your P.N.D.3 and P.N.D.53 returns
When you withhold tax as you pay for services or rent, your shop must send that tax in for the payee: P.N.D.3 for individuals, P.N.D.53 for companies.
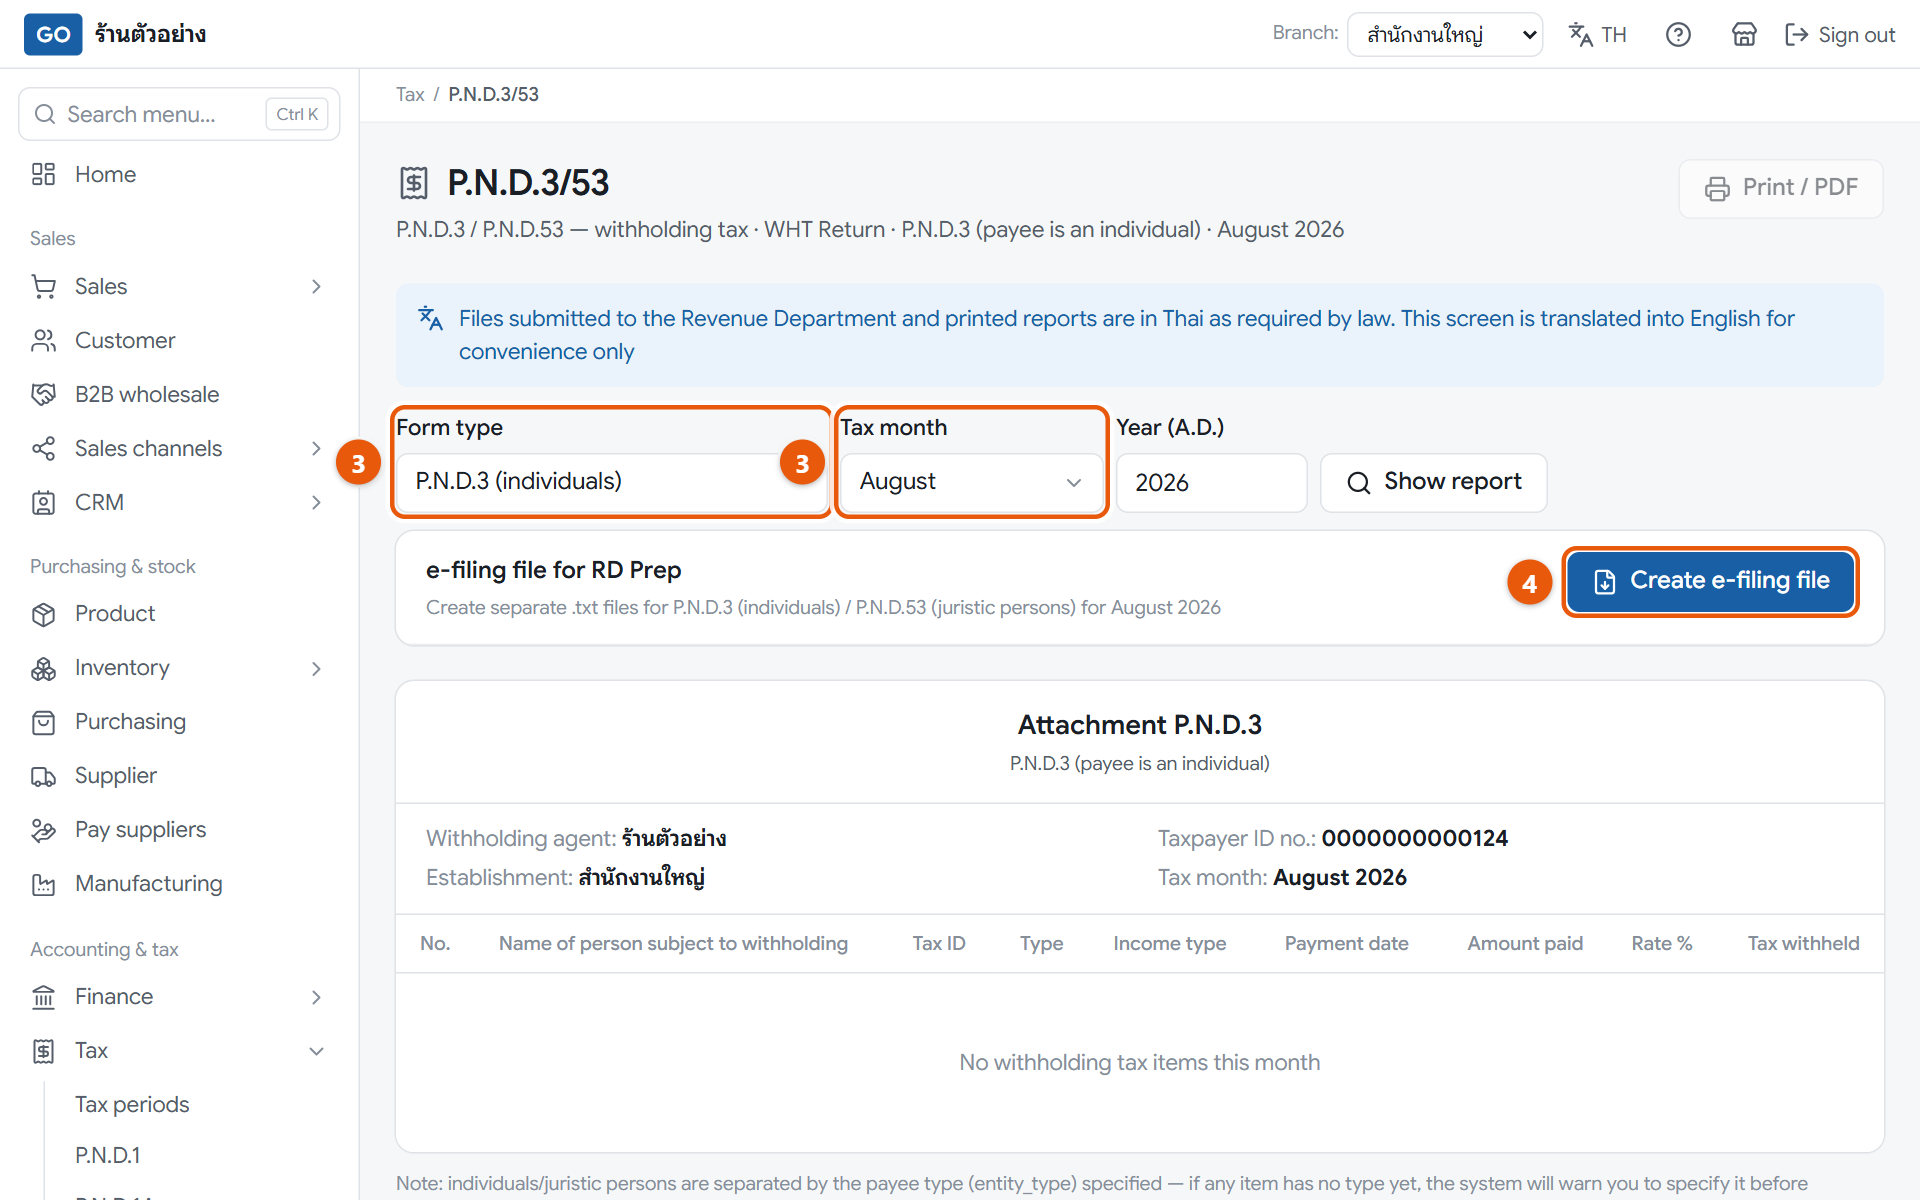
The P.N.D.3/53 page and the filing file box
Do this
1When paying, open Pay suppliers, open the bill, press WHT settings and choose the income type for each line.
2Press Record payment, fill in how and when you paid, then press Save + issue 50 Tawi and print the certificate for the payee.
3At month end, set Branch: to one branch, open Tax, press P.N.D.3/53, choose the Form type and Tax month, then press Show report.
4Press Create e-filing file. The program makes both forms at once; press Download for each form that has items.
5Load the files into RD Prep, then file and pay on the Revenue Department system within the Revenue Department's deadline.
When it worked: You have files starting with PND3_ or PND53_, and attachments that match the 50 Tawi certificates issued that month.
If you get stuck
It says some items don't have a payee type yet
Open Supplier, open that supplier, set Taxpayer type to Individual or Juristic person, then press Show report again.
I don't see the WHT settings button on the bill
The bill is already fully paid, or your role can't edit bills. Ask the owner or accountant to do it.
What percentage should I withhold?
The program uses the rate of the income type you choose, but doesn't check it against the law. Have your accountant confirm the rate for each kind of payment.
34
Close the tax period
Closing a period locks that month so nobody can post back into it, keeping the program in line with what you filed, and it books the tax you owe.
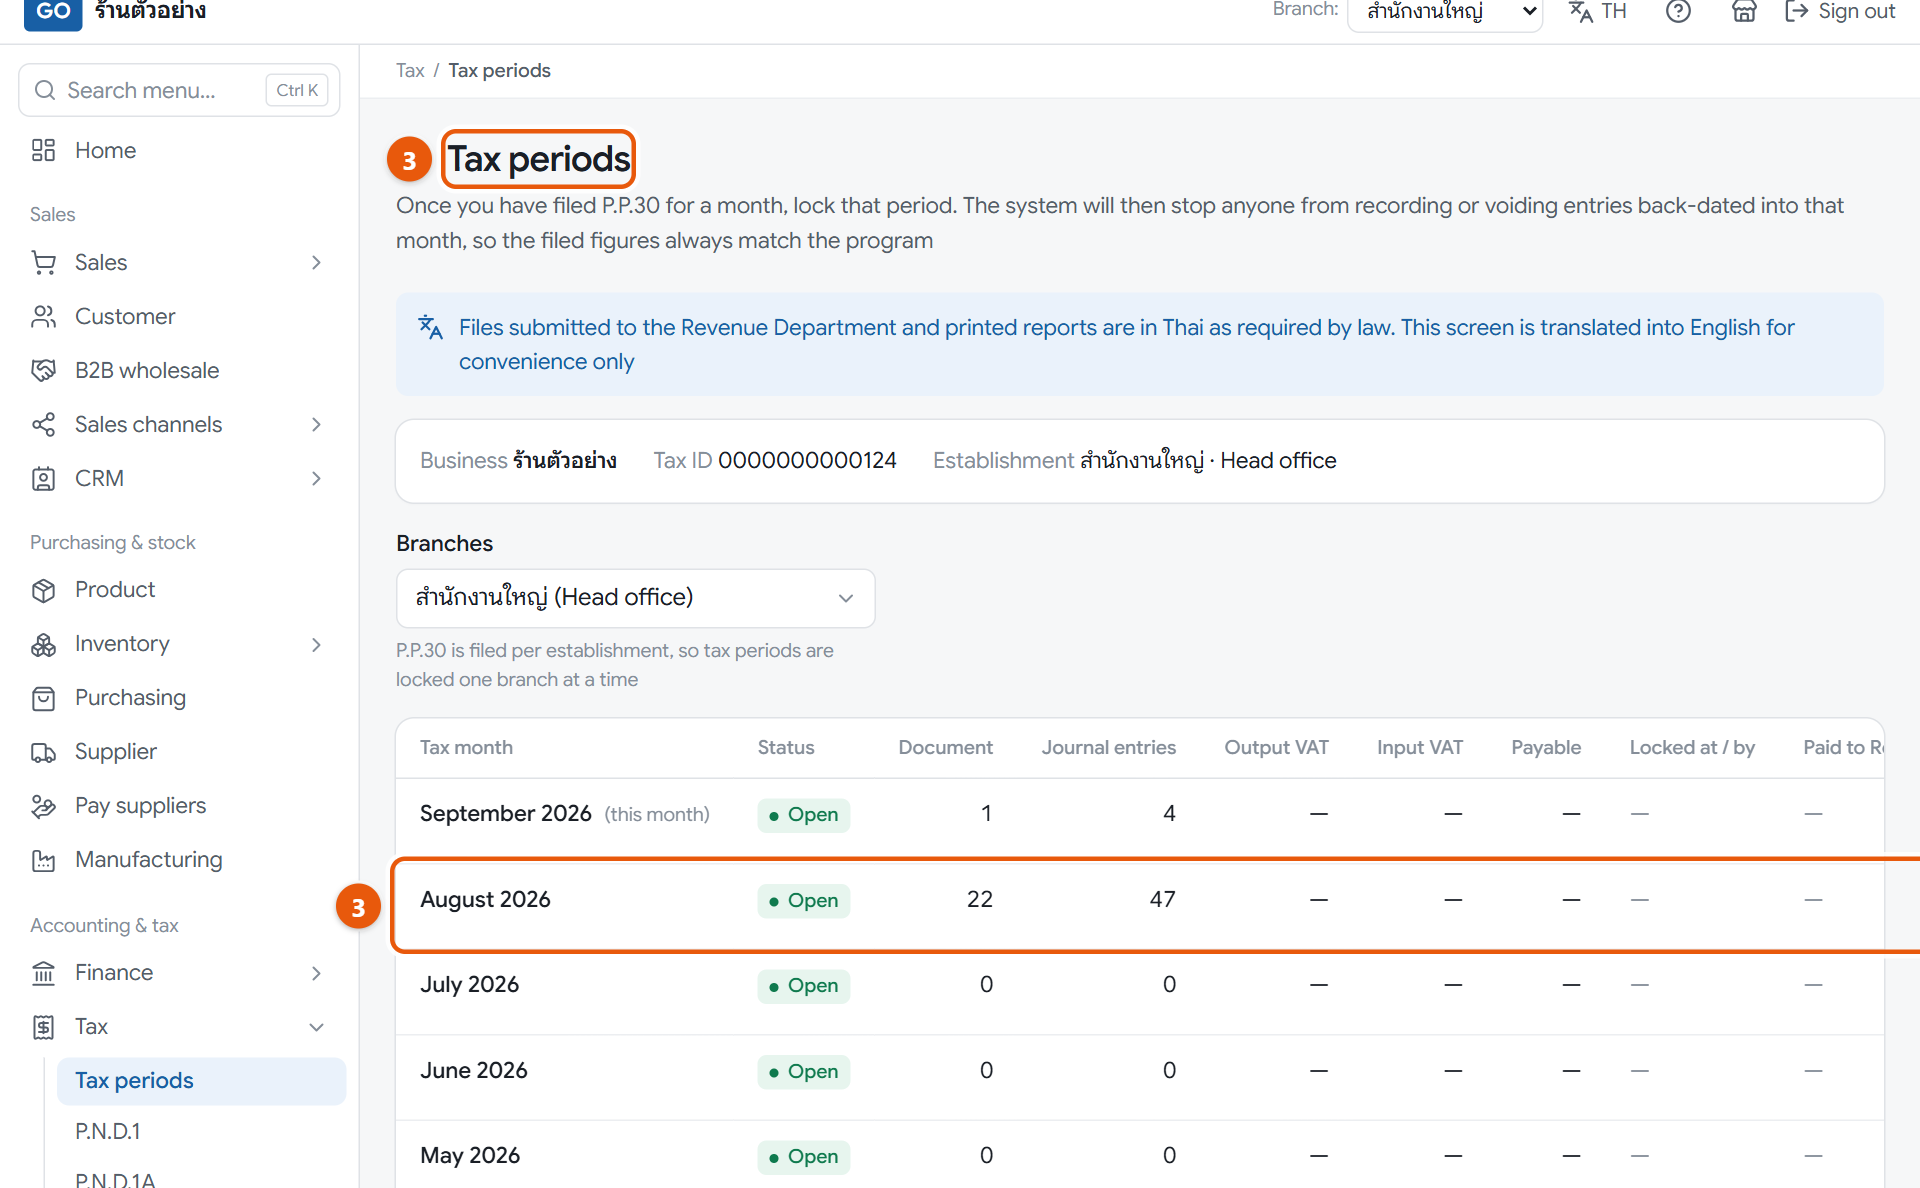
The tax periods page. Each row is one month, and the record payment button appears on months that were closed and postedThe panel of input VAT still awaiting tax invoices, at the bottom of the tax periods page
Do this
1Once the figures are right and you've filed, open the P.P.30 page for that month and press Show report.
2In Tax month status, press Lock period and post, read the amounts in the window, then press Lock period and post again.
3After paying the Revenue Department, open Tax, press Tax periods, then press Record payment on that month's row.
4Enter the payment date from the receipt, choose the account you paid from, then press Record payment.
5Scroll down to Input VAT awaiting tax invoices. Yellow rows are close to the six-month limit and red rows have passed it, so chase those suppliers for their invoices.
When it worked: That month's row shows Closed, and after you record the payment it shows Paid with the payment date.
If you get stuck
I found a wrong document after closing
Issue a credit or debit note dated in the current month instead. If you haven't actually filed yet, you can press Undo period lock on the P.P.30 page and fix it.
The lock and post button can't be pressed
Read the line under the button. Usually the month hasn't ended yet, or an earlier month is still open; close them from oldest to newest.
There's no record payment button
That month was closed with Lock period on the tax periods page, which only locks without posting. Go to the P.P.30 page for that month and press Lock period and post.
35
See whether you made a profit and have enough cash
The program posts the accounts every time you sell, buy or pay, so you can see your profit and cash straight away without waiting for your accountant.
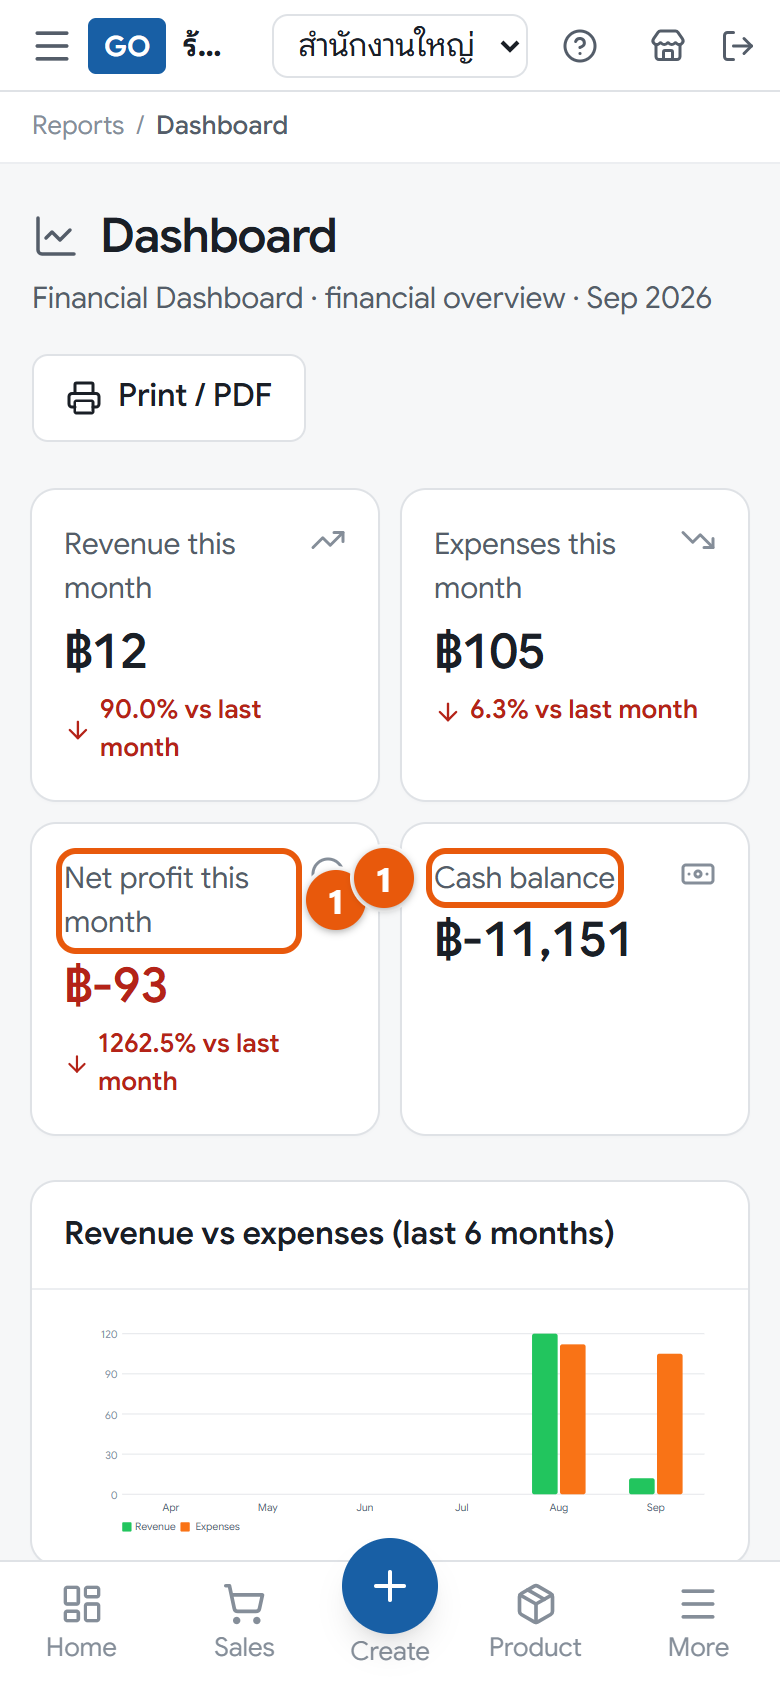
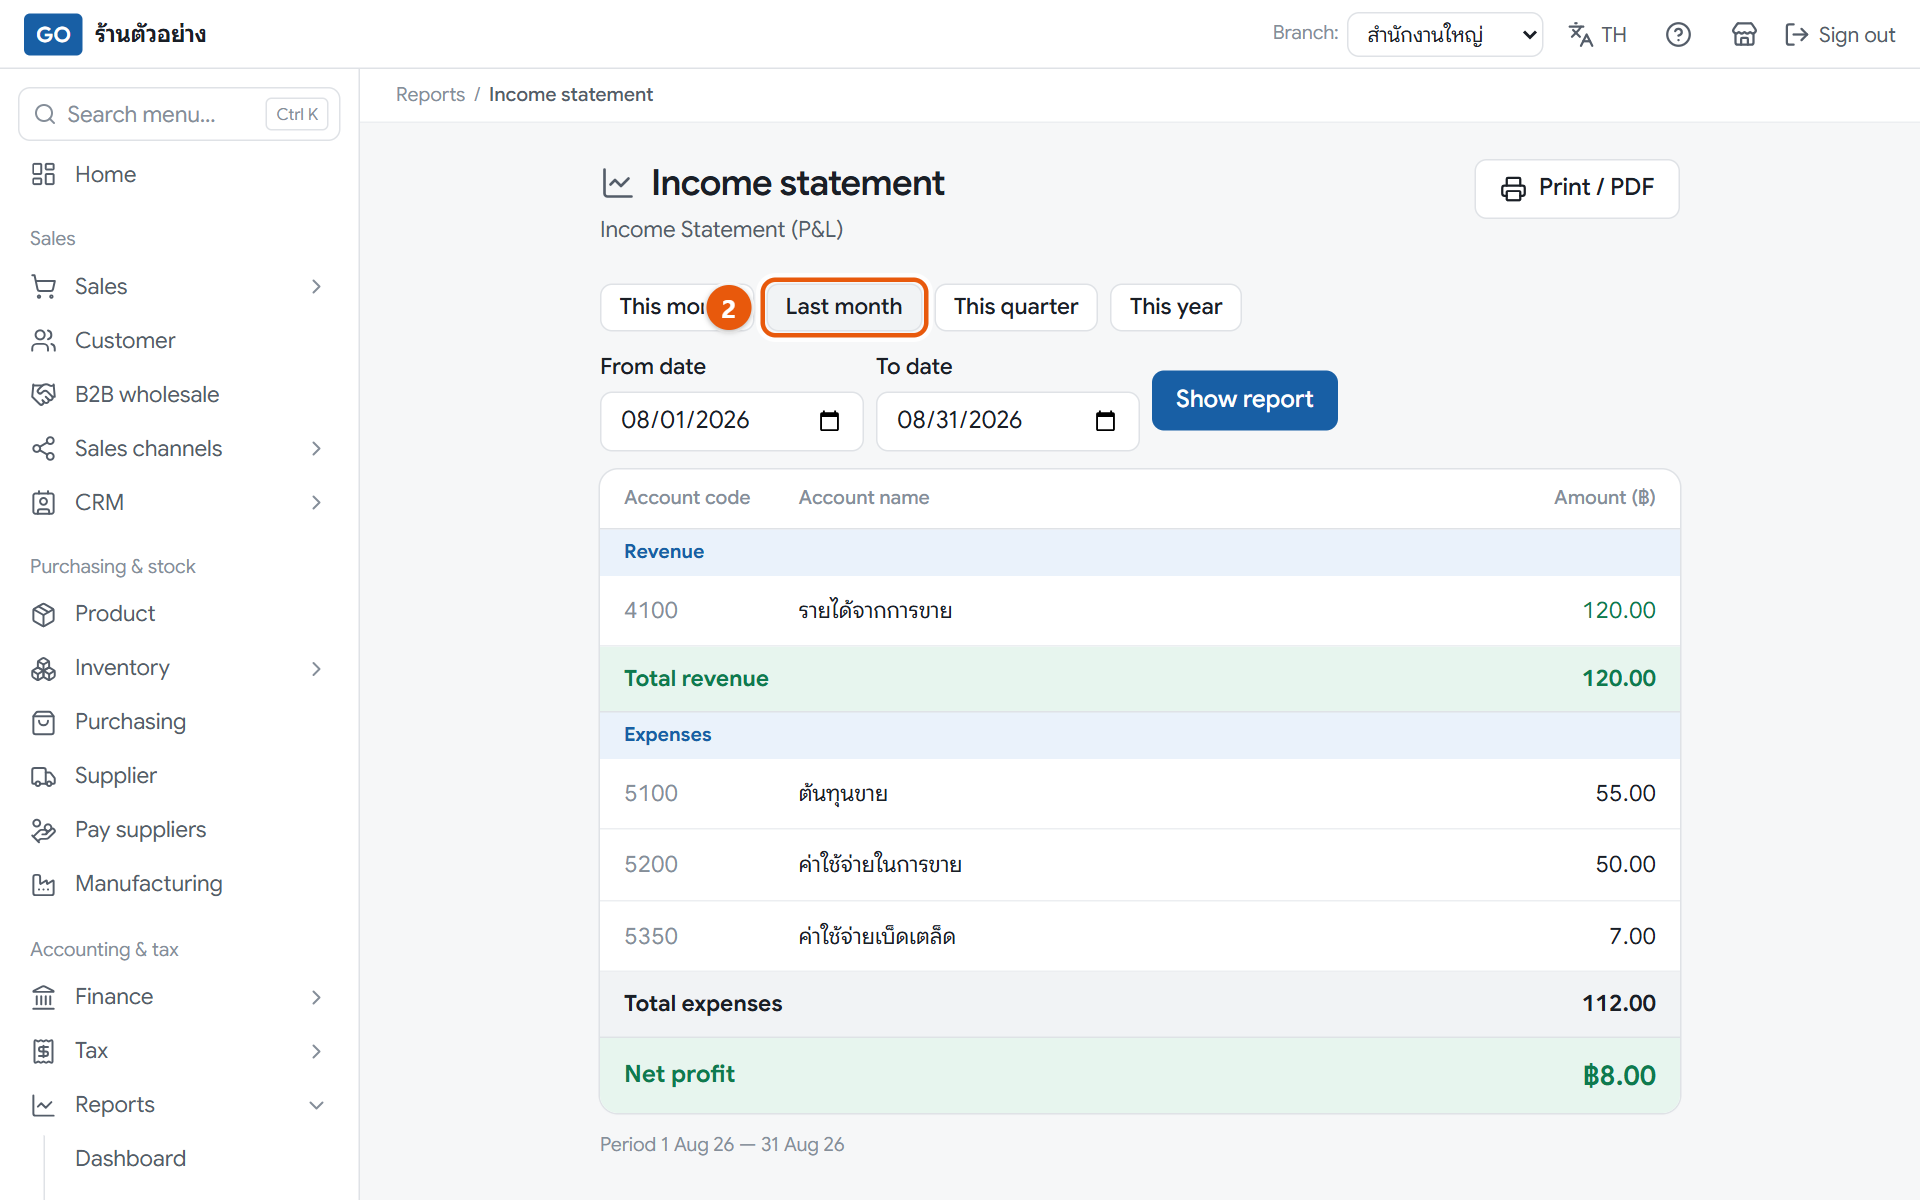
The finance dashboard with this month's profit and cashLast month's income statement
Do this
1Open Reports in the menu, press Dashboard, and look at Net profit this month and Cash balance plus the six-month charts.
2Open Income statement and press Last month. The bottom line in green is Net profit; in red it is Net loss.
3Open Balance sheet, set As of to the last day of the month, press Show report, and see what you own and owe.
4Open Cash flow statement, press This year, then press Show report to see where cash came from and went.
When it worked: You know last month's profit or loss, and the balance sheet says Balanced.
If you get stuck
I made a profit but cash didn't go up
Look at operating activities in the cash flow statement. If customer debts or stock went up, less cash comes in than the profit. Ask your accountant if it is still unclear.
The cash flow statement shows a difference that is not 0
Usually an account in the chart of accounts doesn't have a cash flow category yet. Ask your accountant to check the Chart of accounts page.
I pressed a date range on the cash flow statement and nothing changed
On this page the range buttons only fill in the dates. You always need to press Show report afterwards.
36
Send your numbers to your accountant
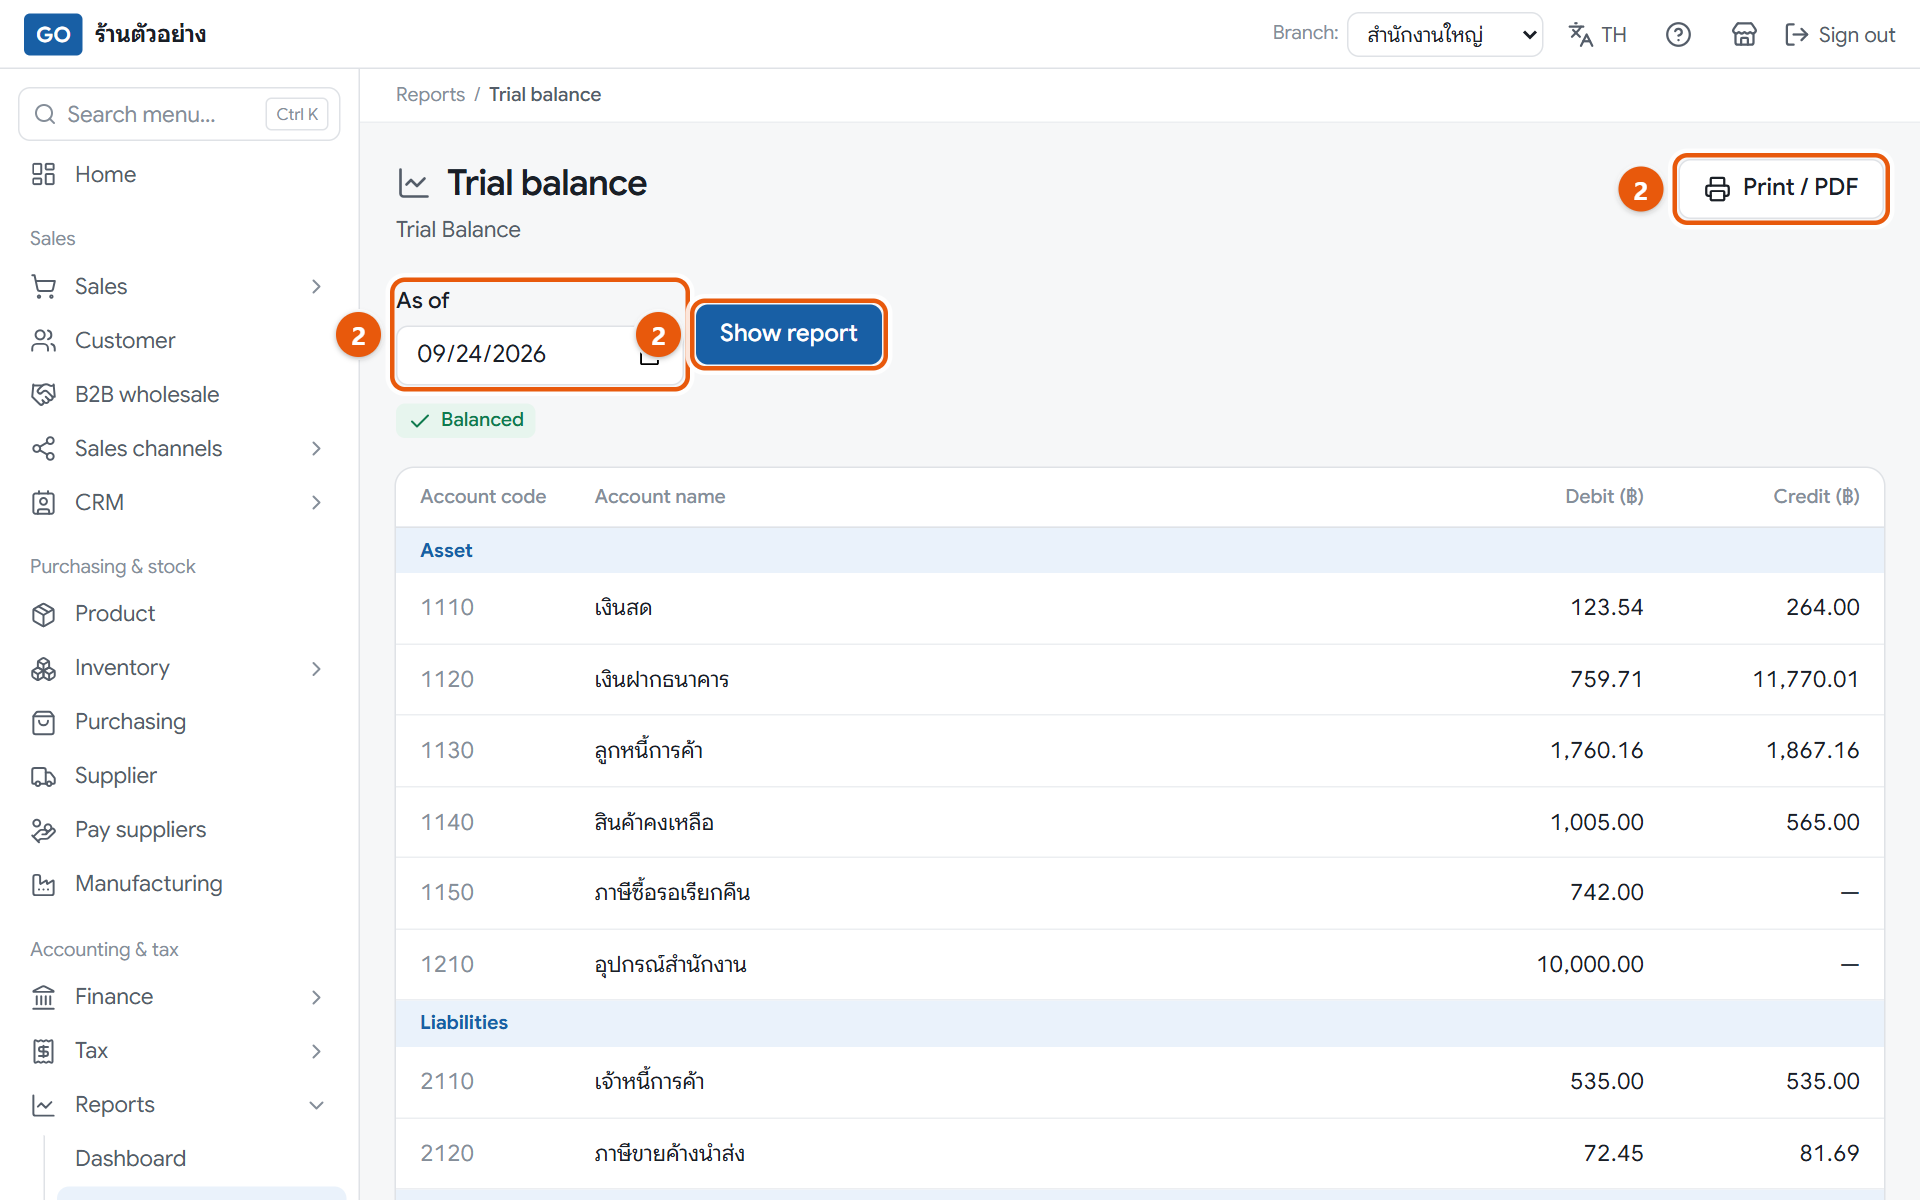
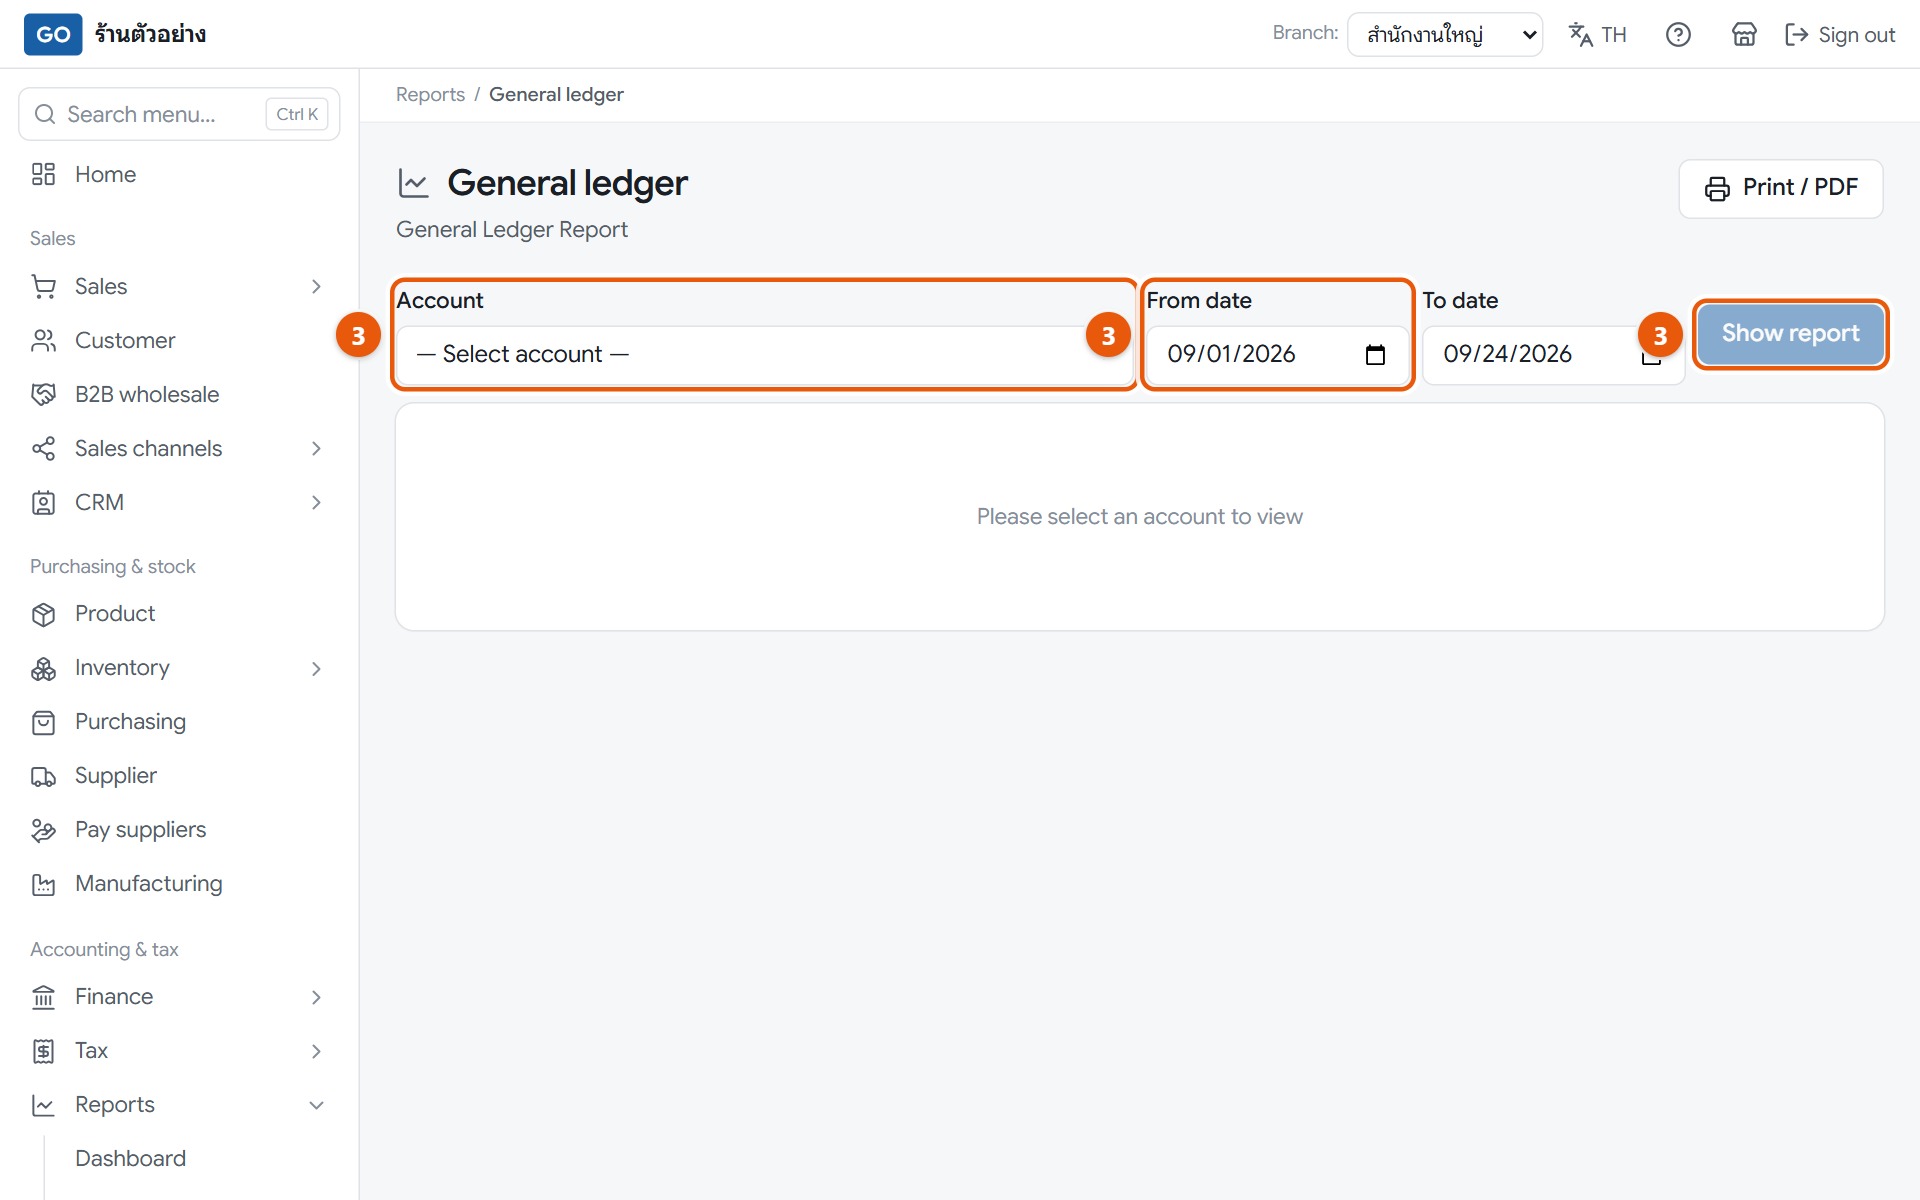
Your accountant needs the trial balance, general ledger and journal to check your books before filing tax and closing the accounts. The easiest way is to give them their own login.
The trial balance at month endThe general ledger, showing one account at a time
Do this
1Invite your accountant under System settings > Users & roles and give them the Accountant role (as in step 12).
2Or send files: open Reports, press Trial balance, set As of to the month end, press Show report, then press Print / PDF and save as PDF.
3If your accountant asks about one account, open General ledger, choose the Account, set From date and To date, press Show report, then press Print / PDF.
4Each journal entry is under Finance > Journal entries. That page has no print button, so your accountant should look at it with their own login.
5Attach the tax reports and files from steps 30 to 33 as well.
When it worked: Your accountant can see the numbers themselves, or has a trial balance PDF marked Balanced.
If you get stuck
The trial balance says it is out of balance
An entry was not posted on both sides. Look through each account on the General ledger page and ask your accountant to check.
Can I export to Excel?
The trial balance and general ledger only have Print / PDF for now. The sales and purchase tax reports have Download CSV, which opens in Excel.
My accountant works for several shops. Can they use the same email?
One email can belong to only one business, so ask your accountant to use a separate email for your shop.
Year end
Once a year
37
Prepare your P.N.D.1A annual payroll tax summary
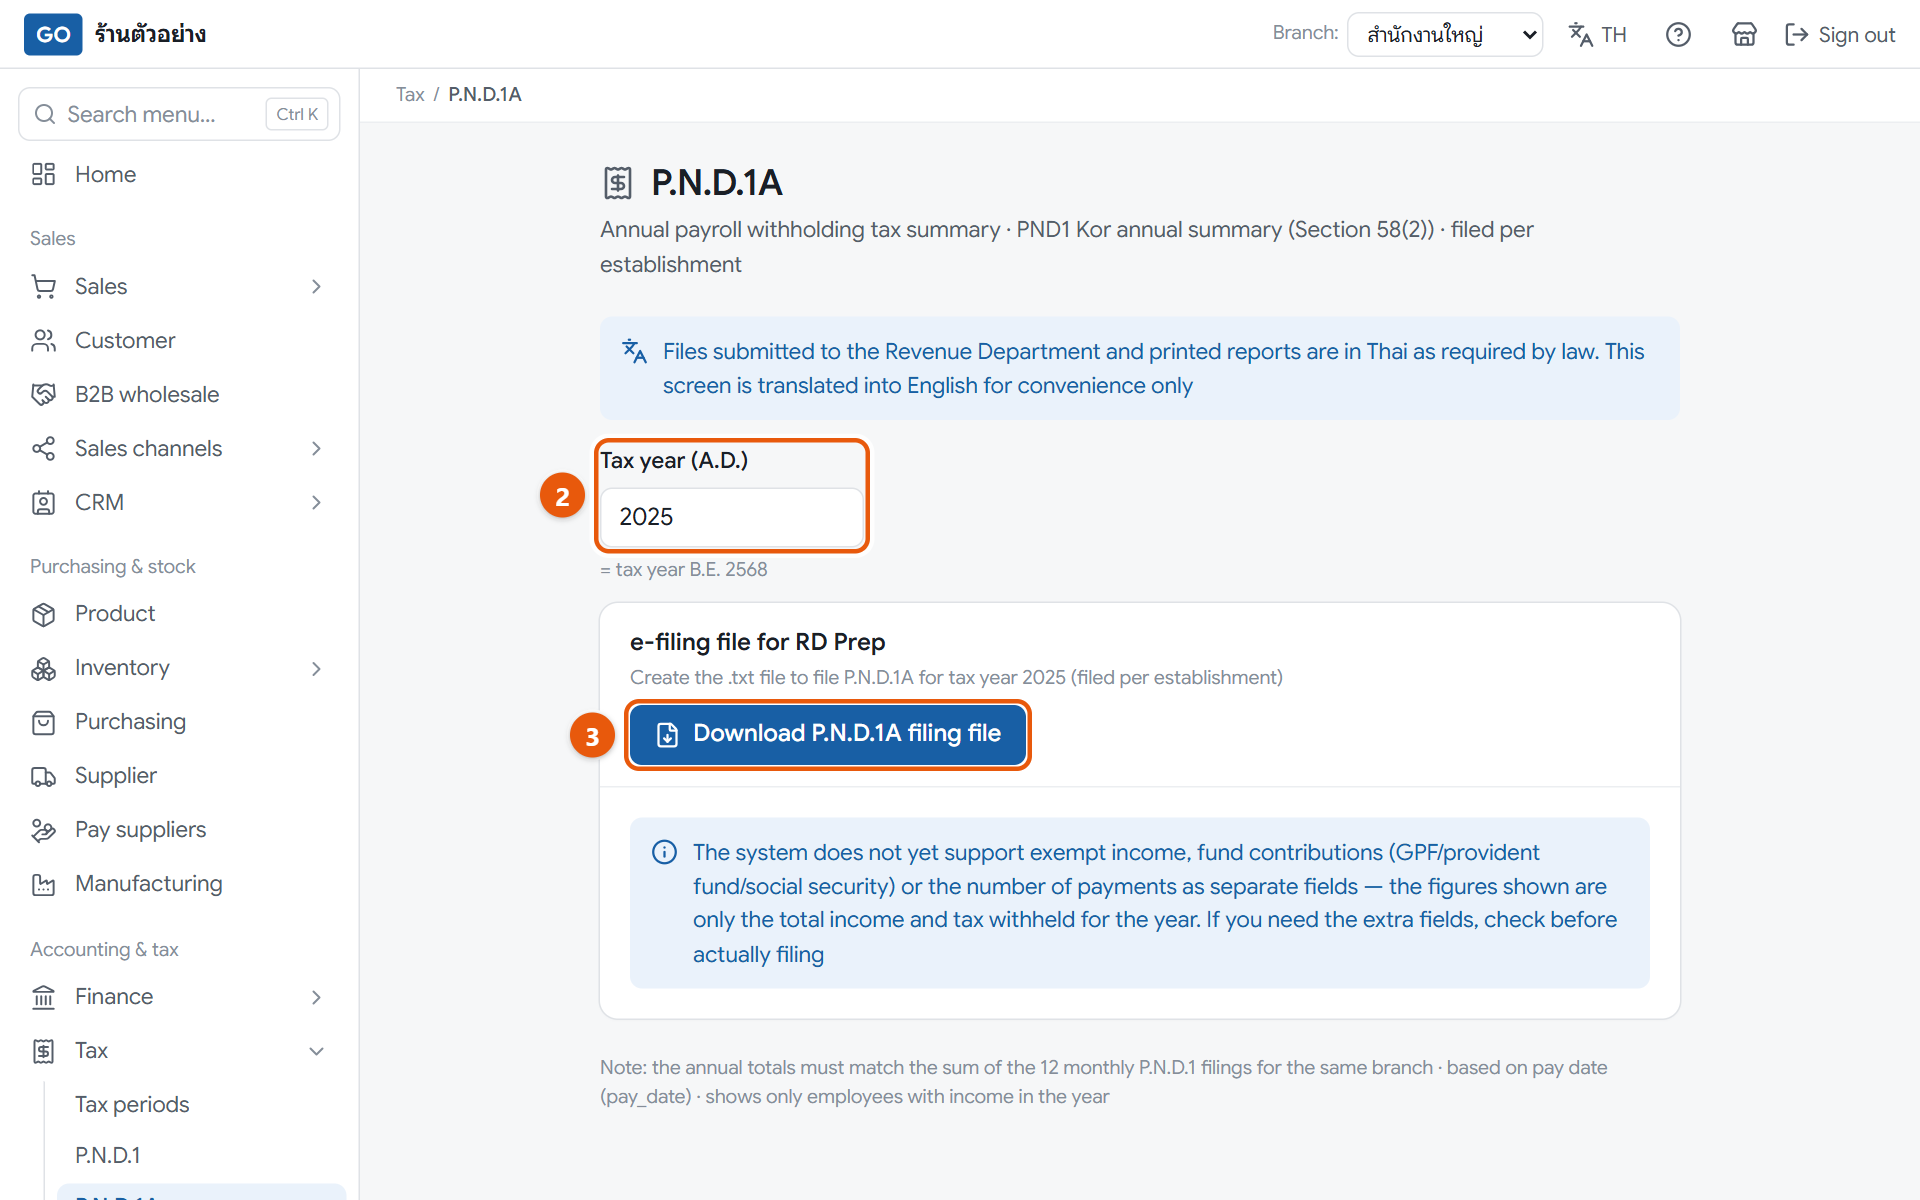
The P.N.D.1A sums up each employee's pay and withheld tax for the whole year. The program totals your approved pay runs and makes the file; you or your accountant file it with the Revenue Department yourselves.
The P.N.D.1A page before creating the file
Do this
1Set Branch: to a single branch, because this form is filed separately for each branch.
2Open Tax in the menu, press P.N.D.1A, and enter the Tax year (A.D.), for example 2026.
3Press Download P.N.D.1A filing file, check the number of people, total income and total tax for the year, then press Download.
4This page has no list of names, so compare the totals with the P.N.D.1 page for all 12 months in the same branch.
5Load the file into RD Prep and file it on the Revenue Department system within the Revenue Department's deadline.
When it worked: You have a file whose name starts with PND1A_, and the yearly totals match the sum of all 12 monthly P.N.D.1 returns.
If you get stuck
It says there are no salary payments for this tax year
The year box only takes the A.D. year. Enter 2026 rather than 2569, and check that the pay runs for that year are approved.
It says the file can't be made because employee data is incomplete
Go to Employee, fill in the 13-digit National ID number and the Title for the people listed, then download again.
Do I need to show social security or provident fund amounts separately?
The program has no fields for these yet; the file only has total income and tax for the year. Have your accountant check what the form needs before filing.
38
Record fixed assets and depreciation
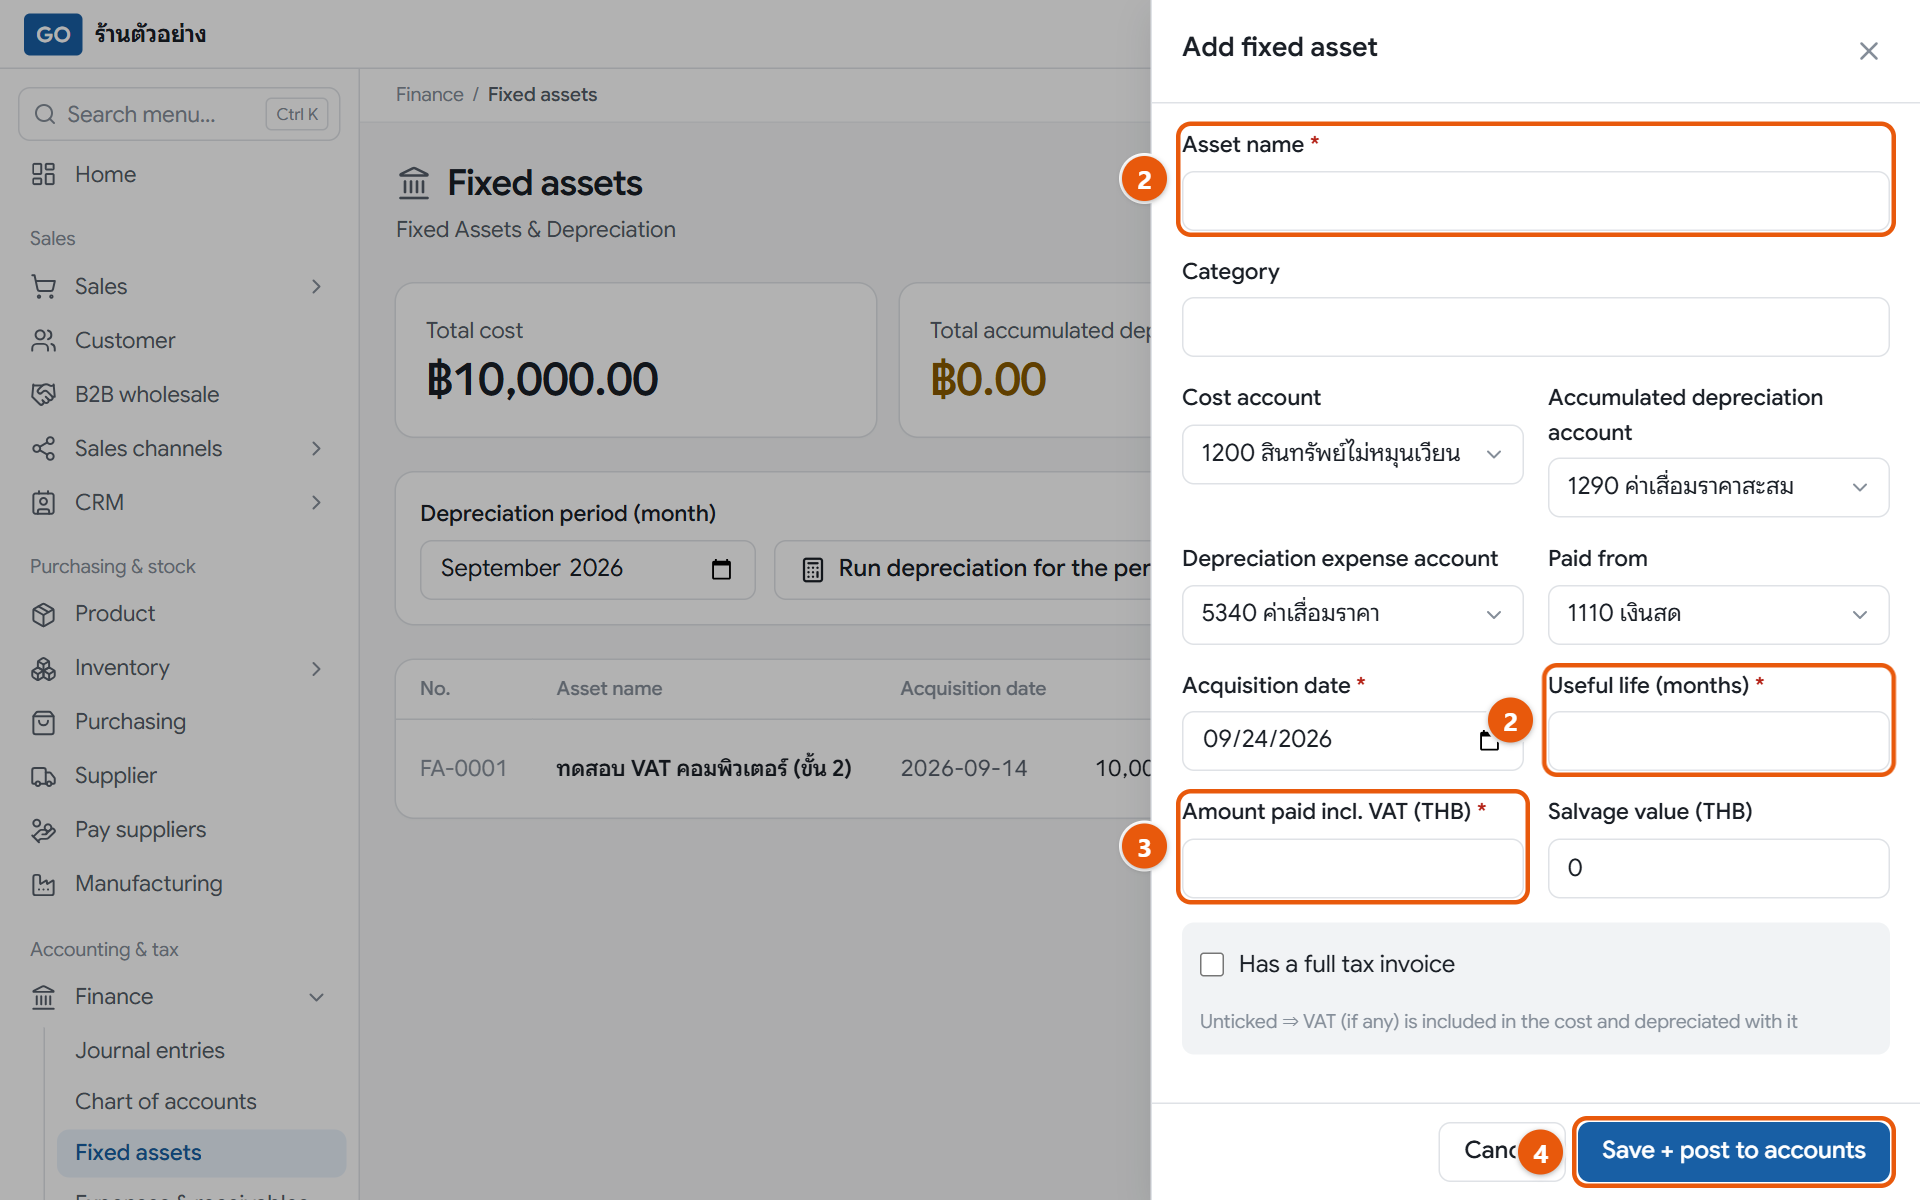
Things you buy to use for years, like machines, fridges or vehicles, are expensed a little each month. If you don't record them, your profit for the year will be wrong.
The fixed assets page with the add asset panel
Do this
1Set Branch: to the branch that owns the item, then open Finance in the menu and press Fixed assets.
2Press Add asset and fill in Asset name, Acquisition date and Useful life (months).
3Enter the price in Cost (THB). For VAT-registered shops this box is called Amount paid incl. VAT (THB); if you have a tax invoice, tick Has a full tax invoice and fill in its details.
4Press Save + post to accounts. The program posts the purchase for you straight away.
5Run depreciation every month: pick the month in the depreciation bar and press Run depreciation for the period. At year end, check it has been run through December.
When it worked: The asset appears in the table with an FA number and its accumulated depreciation grows each month. Items fully written off show Fully depreciated.
If you get stuck
I entered it wrongly. Can I edit or delete it?
This page has no edit or delete button yet, so check carefully before saving. If you already saved a mistake, ask your accountant.
It says there are no assets to depreciate this period
That month was already done, or a later month was run first. To catch up, start from the oldest month and go one month at a time.
How many months of useful life should I set?
It depends on the kind of item and the tax rules, so ask your accountant before saving.
39
Inventory and raw materials report
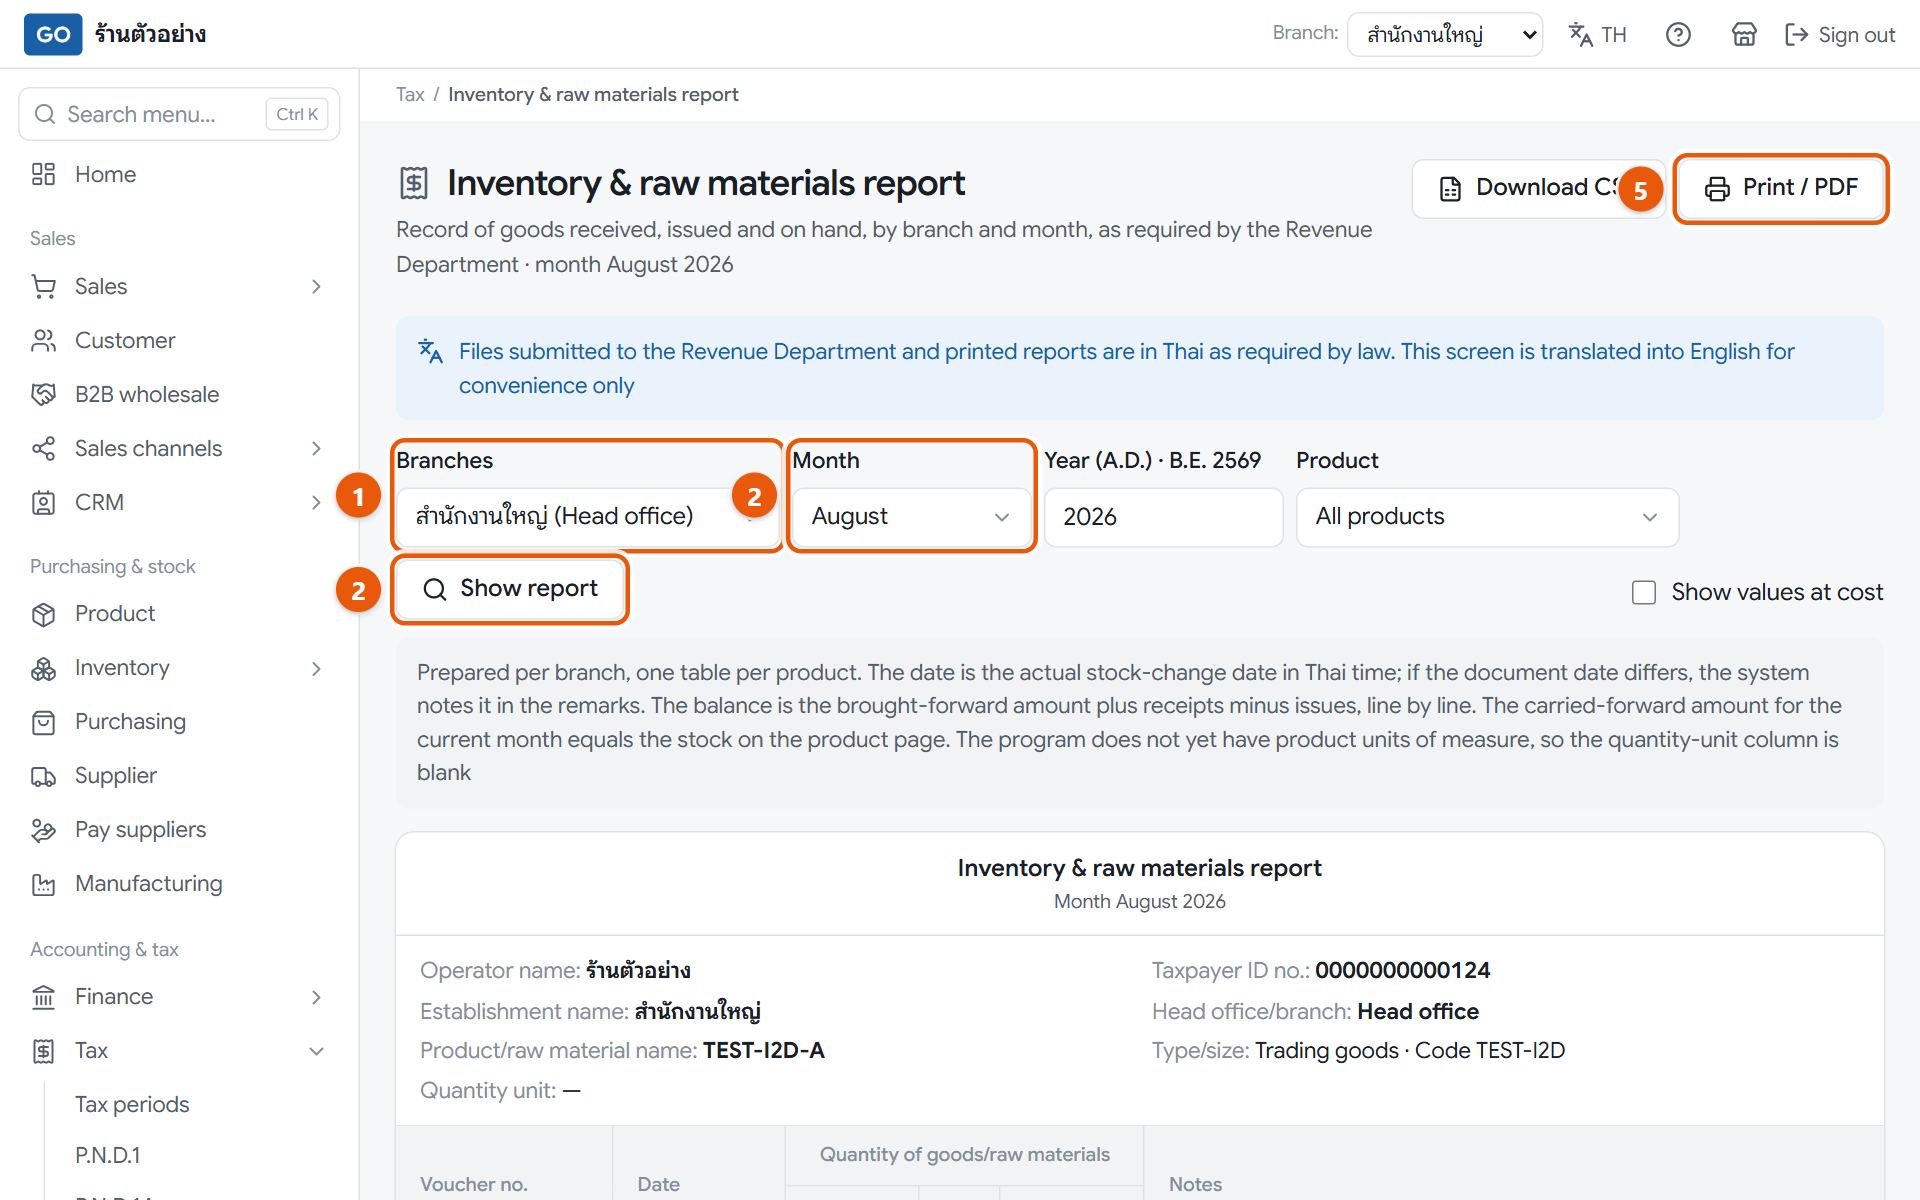
VAT-registered shops that sell goods must keep a monthly record of stock received, issued and remaining for each branch. The program builds it from your stock movements, and year end is a good time to count the real stock and compare.
The inventory and raw materials report, one table per product
Do this
1Open Tax in the menu, press Inventory & raw materials report, and choose the branch in Branch.
2Set Month to December, enter the year in A.D., leave Product on All products and press Show report.
3Count the real stock on the shelves and compare it with the carried-forward row at the end of each product table.
4If they don't match, make a count sheet under Stock count. The adjustments then show in the report with their document numbers.
5Press Print / PDF or Download CSV for each month to keep a copy, and ask your accountant how long you must keep them.
When it worked: Each product has a table for the month, starting with Balance brought forward and ending with a carried-forward balance that matches your count.
If you get stuck
It says the month or year is invalid
The year box only takes the A.D. year, such as 2026. Entering a Thai Buddhist year shows this message.
Can I see all branches in one report?
No. This report has to be made one branch at a time, so pick each branch and press Show report.
I want to see money values too
Tick Show values at cost to add unit cost and value columns. Items with no recorded cost, such as stock adjustments, show a dash.
40
Set next year's budget
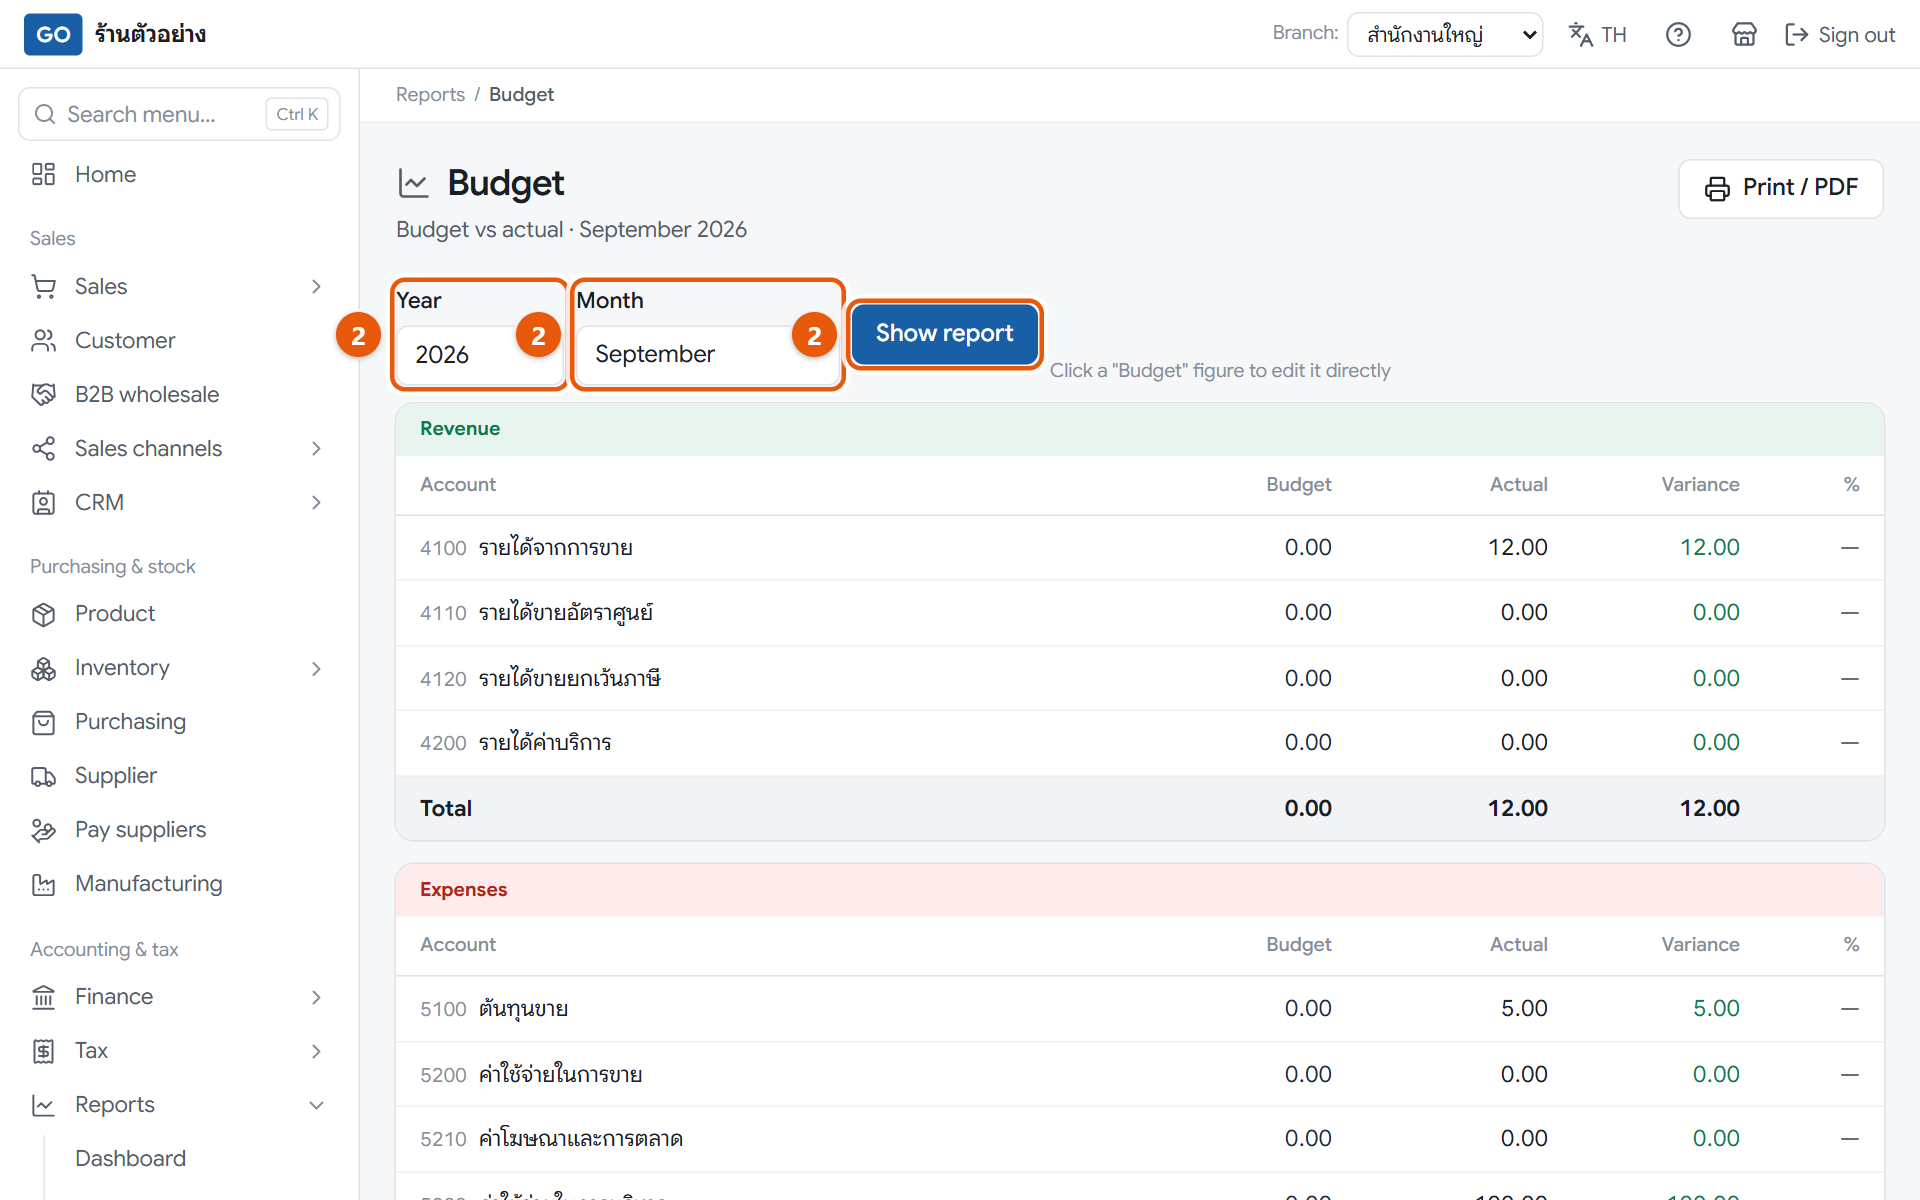
Set income targets and spending limits in advance, and every month the program compares them with the actual figures, so you quickly see where you overspent.
The budget page comparing budget and actual by account
Do this
1Set Branch: to a single branch, because budgets can't be edited in all-branches mode.
2Open Reports in the menu, press Budget, choose the Year and Month, then press Show report.
3Click the figure in the Budget column for the account you want, type the amount and press Save.
4Repeat for the other accounts, one month at a time until all 12 months are done.
5During the year, open this page every month. Yellow rows are accounts that are more than 10 percent off budget.
When it worked: The income and expense tables have budget figures, and the summary compares Net profit (budget) with Net profit (actual).
If you get stuck
I click a budget figure but no box opens
Either Branch: is still on All branches, or your role can only view. The owner and accountant can edit budgets.